Looking for a guide for a different GoPro? Check out all of my complete guides here:
Updated May 18, 2020
So you got a new GoPro HERO3 Black Edition! Luckily for you, GoPro has added about 137 different filming options so you’ll never really be sure if you’re using the right mode for the activity/film job. Hopefully I can break it down a bit and unshroud the mysteries of the modes. Keep in mind this is written for the slightly technologically inclined. This specific guide was written for the HERO3 line of cameras, but many of the principles and ideas transfer up to the later models of HERO3+ and HERO4. To learn about both of those cameras see my additional guides – HERO3+, HERO4, HERO4 Session
A few things need to be explained when talking about the technical aspects of video resolutions, framerates, and video quality. In digital video there are a lot of different variables that go into what makes up the overall IQ (image quality). 1080P on a GoPro is FAR different than 1080P on an Alexa – and it’s not just the image sensor that makes it different. Processors in cameras are a huge determinant to how video gets from the sensor to the SD card. There are tricks and shortcuts that can be made to ensure the camera pumps out all the different modes we want in the end.
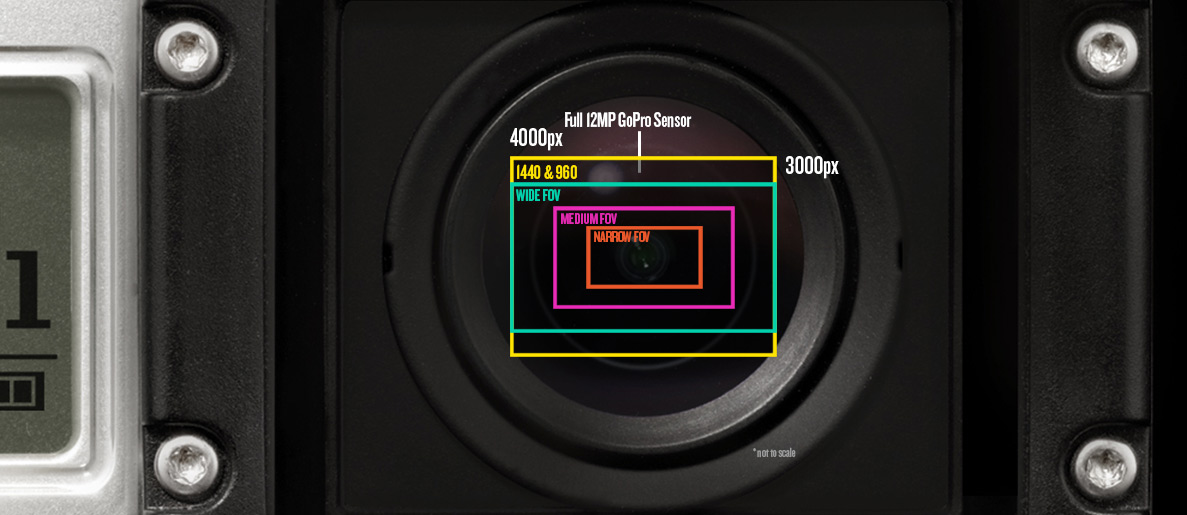
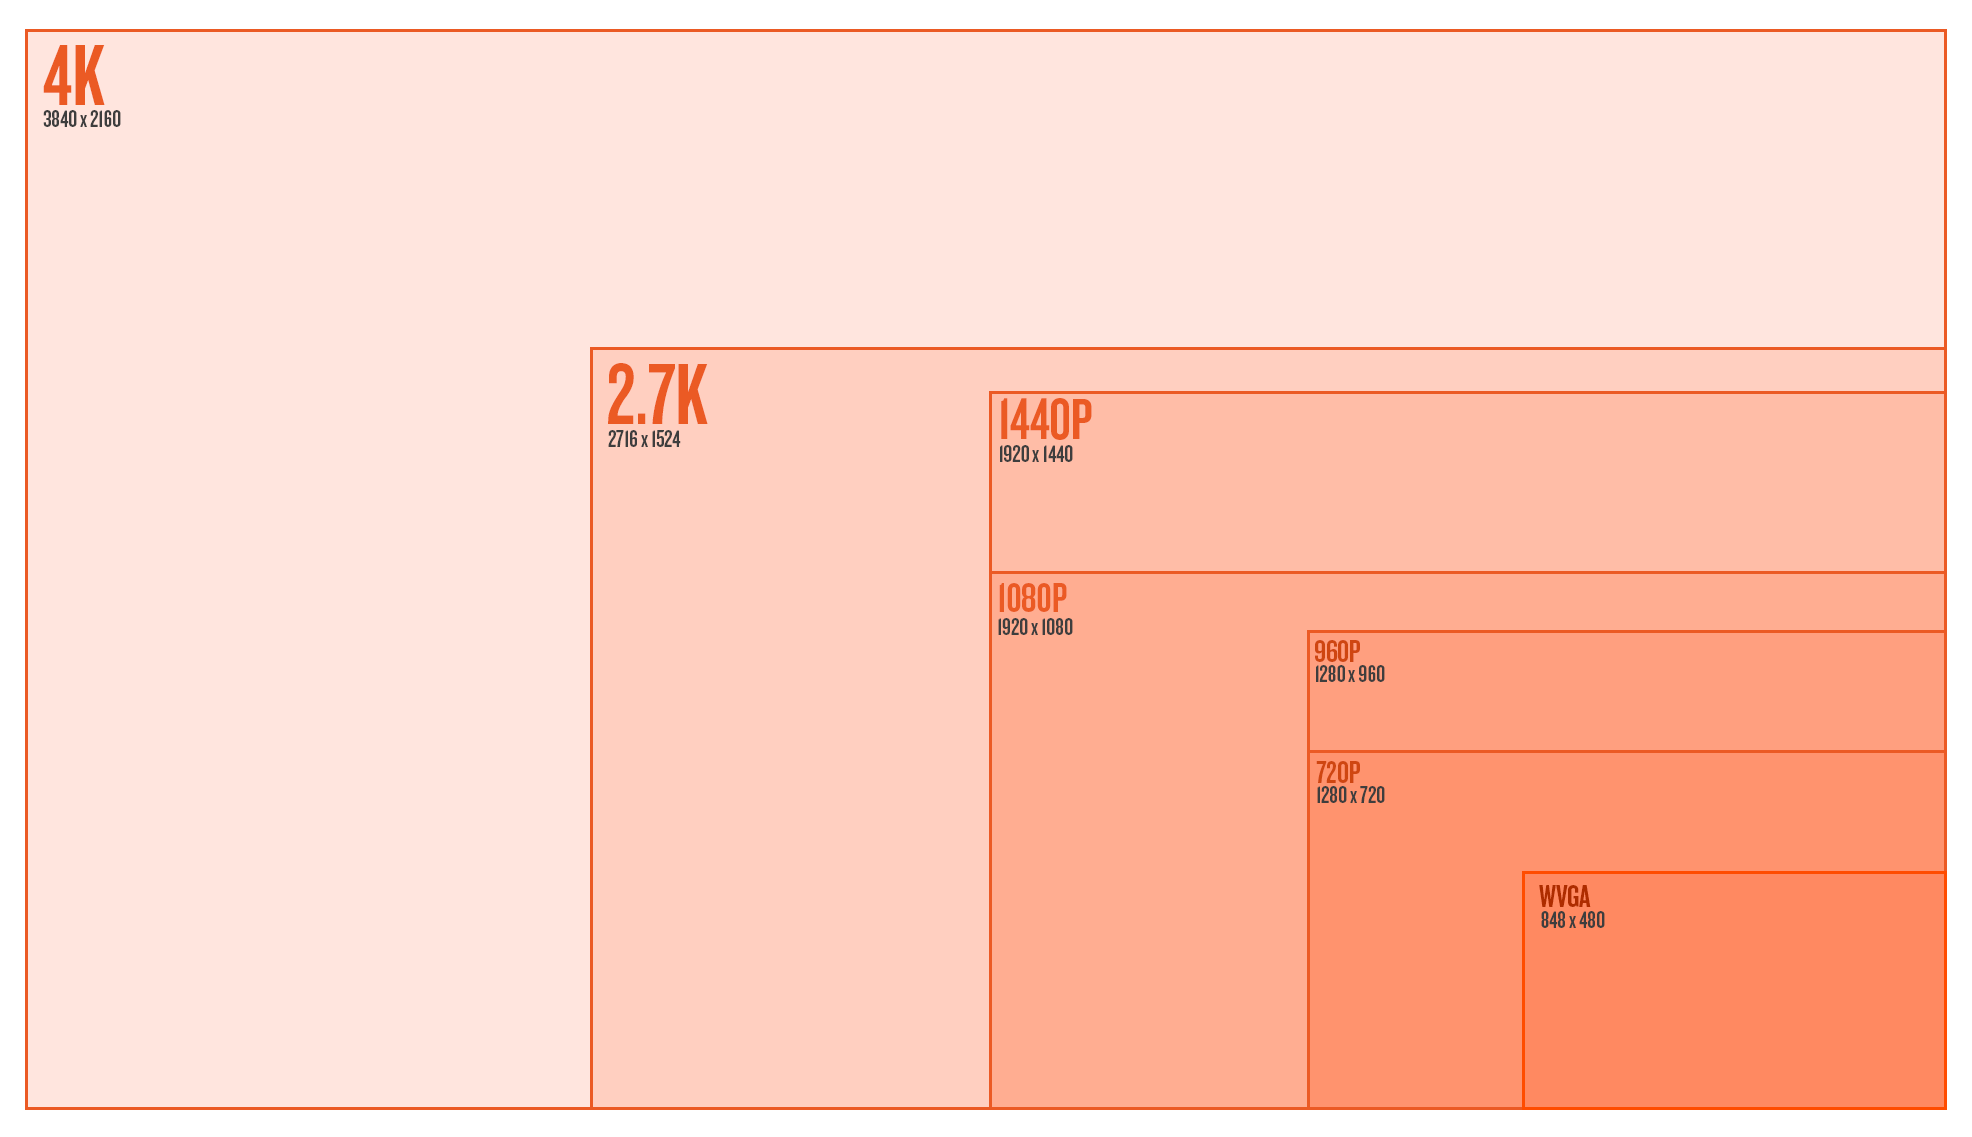
Starting with the sensor, the camera is told to read a certain window of the overall sensor – the bigger the window, the more taxing it is on the processor. Reading the full sensor means you’re getting the full view coming from the wide angle lens of the GoPro. The sensor in the HERO3 Black edition is 12MP with a 4:3 aspect ratio. For 4K in the GoPro it’s reading the full width of the sensor, but not the full height – it’s capturing a 16:9 portion of the middle of the 4:3 full sensor. Since the final delivery is 4K, it doesn’t have to scale that initial capture at all. This capture window is identical for, say, 1080P Wide; however, it scales it down to 1080P for the final output. The final output size also has a say in processor taxation – we can get 4K at only 15FPS, while we can do that same capture window but scaled to 1080P at 60FPS.
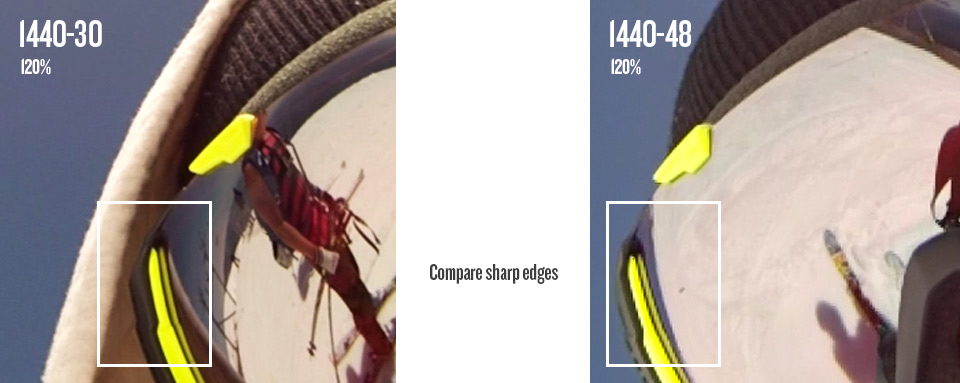
When we talk about digital video sometimes we use the term native to the camera or not. In the HERO3 Black the camera can capture that full wide 16:9 window, scale it to 1080P and do that natively 60 times a second. 1080-60 and 2.7K are just about the most optimal modes in the camera that really show the true power of the sensor and processor combo. There are some modes in the camera that are read off of the sensor slightly differently which will end up showing some aliasing (jagged edges). Take 1440 for example – look at 1440-30 at full resolution and compare it against 48. The way 48 is read and processed is slightly different than 30FPS to get that large of a resolution combined with a high frame rate. You’ll see the same type of thing in a Canon 7D when looking at 1080P at full resolution compared against 720-60 at full resolution. Canon’s 720P will have jagged edges because of the way they process the image to get a high frame rate from such a large sensor (high pixel count).
Let’s talk about sensor window captures and fields of view (FOV). This is where the Medium & Narrow FOVs come from. 1080P Medium only captures a window in the very middle of the sensor, meaning we don’t see the full wide angle of the camera lens – only that middle slightly distorted part. The raw capture is still larger than 1080P, so it still scales down after the capture. 1080P Narrow is an even smaller capture window at the very very middle of the sensor so the distortion is even less. By this time, the capture size is nearly equivalent to the pixel size where we are reading nearly 1920 pixels by 1080 pixels (remember the full sensor is 4000 pixels wide by 3000 pixels tall). In this narrow mode it’ll appear fuzzier since the pixels are very small on the sensor and are accompanied by a decent amount of noise. When we are reading more pixels there are image processes that are done to clean up this noise – and scaling helps a lot. With no scaling, the narrow mode is extremely zoomed in from the original (imagine grabbing the middle 30% of a gopro photo – that’s what your full 1080P video will be). This is very different from digital zoom because the final readout is still native, we’re not digitally increasing the video capture size at all.
Now that a few of these details have been explained very briefly, let’s take a look at all the modes below:
Abe’s Personal Reviews of the Modes
- WVGA 240 Wide
Well, it’s WVGA – If you look closely at the image it’s not very clean – aliasing is present. The novelty of 240 FPS is pretty cool if you don’t care about image quality when stacked up against some of the other modes. It can look decent by itself when posted on YouTube. - 720 60 Wide
Looks great, but why don’t you try using 1080 60 Wide instead - 720 120 Wide
This mode is tough for me to like. You’ll notice jagged edges in this mode when looking at full resolution so it won’t even compare to 1080-60 wide – the way it was scaled and read off the sensor gives some aliasing. It looks great on the web on YouTube – if that’s your final output, go slowmo crazy. - 720 120 Narrow
Bingo. 120 FPS? Check. No lens distortion? Check. Clean image without aliasing? Check! If there’s any mode in the camera that screams “I’m not a GoPro!” it’s this one. It looks like a 50mm lens and is a clean image. Slow mo is rad. This mode is great for web as well. Blown up next to 1080 or 2.7K, you’ll notice the softness that comes from the Narrow FOV. - 960 48 Wide
I’ve never even tried this mode. I bet it looks good. - 960 100 Wide
I feel similarly about this mode as I do 720-120 Wide. With this mode there is the opportunity to gain a bit of resolution by stretching 960 to fit to 1080 and dynamically stretching it. Either way, this mode will have slight jagged edges when looking at full resolution. - 1080 30 Wide
I did a test where I filmed the same scene at 1080-30 and 2.7K 30. When 2.7K 30 was scaled down to 1080, the details and sharpness were just about identical to 1080-30. So this one gets my full approval; however, you have to ask yourself, why not film this at 2.7K 30 and have the extra resolution if you need it? Either way, 1080 30 Wide is one of the cleanest modes in the camera. Also regarding low-light, this mode will look much sharper at dusk or at night vs 60 FPS. - 1080 60 Wide
Comparing 1080 30 & 1080 60, you’ll see 60FPS is ever so slightly softer than 30. It’s not something you’d ever notice even scaling the image to 720P or viewing on YouTube, but there’s a slight difference in the way it’s processed. At the end of the day, 1080-60 W is my go-to mode for 90% of filming action sports. With 60FPS you’ve got reduced rolling shutter as well due to reduced exposure time. Switch it to a lower frame rate at night to get a sharper image. - 1080 60 Medium
This mode rocks. It’s very clean, doesn’t look super GoPro-ie, and is in slow mo. Consider this mode for sweet slider dolly shots, glidecam, or cranes. Try it for car mounted shots. Careful with the POV with Medium or Narrow as you’ll get shakier and more disorienting. Again, switch to a lower frame rate (30 or 24) for night or dusk. - 1080 60 Narrow
This mode is very cool. Still a very clean image; however, at this level you’re going to see more of the pixel noise & artifacting. You’re close to pixel levels without scaling so sensor noise could be an issue at lower light levels. Also details will be softer overall. The narrow FOV looks like DSLR video, very unique to GoPro. Fun fact – we actually pulled out a few 1080-60 Narrow shots from the HERO3 reel because your average joe may see it and assume the video wasn’t fully shot on GoPro. - 1440 30 Wide
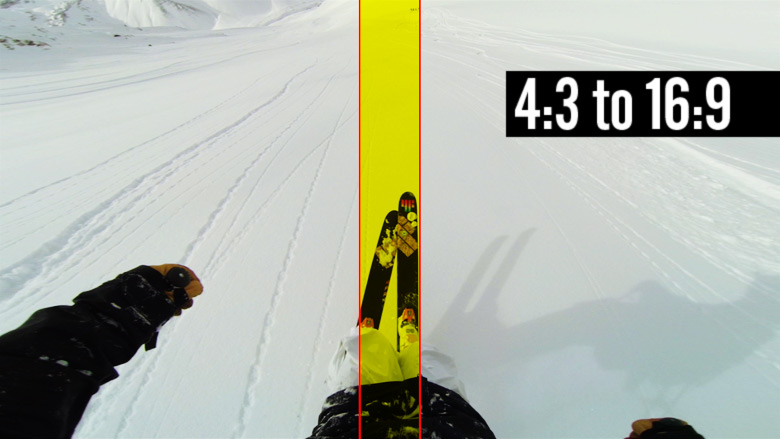
I love this mode! First off, it’s VERY sharp and very clean. It really gives you a sense of real POV when you wear the camera on your head, chest, or bite it in your mouth. It can be a pain to deal with, as the aspect ratio is 4:3, but if you know the anamorphic 16:9 dynamic stretch tricks, it can be wonderful. If you’re filming POV to just keep to re-live life later, this is a rad mode to use. - 1440 48 Wide
The high framerate is great, but when looked at full resolution, you’ll see some aliasing. The way the image was processed to get high framerate produces some jagged edges. Thankfully, hardly anyone watches this at full resolution so jagged edges are harder to pickup. This mode still looks great online and scaled down. - 2.7K 30 Wide
This mode is insane. Here’s what I like about it – sharp as a knife, full sensor wide, full 30 fps, native to the camera. The one downside is rolling shutter since it is a 30FPS mode. If you can get it mounted to something steady, at high speeds or low light you’ll notice really nice motion blur with this mode. The high resolution makes this ideal for cropping and re-framing, or stabilizing in post. I find this mode has great low-light as well. - 2.7K 24 CIN
This mode is interesting – it’s 2.7K width but shorter to give it a 17:9 aspect ratio, so it’s got a bit less resolution than the basic 2.7K. I’ve requested 2.7K Wide in 24 FPS as well so 2.7K CIN isn’t the only option. We’ll see, but not sure how that missed the initial spec sheet. - 4K 15 Wide
This is great for timelapse, conform to 30FPS later. Don’t make a video at 15 FPS unless you’re highly stylizing it and know what you’re doing. Great for setting in ProTune and locking to a specific color temp for timelapses that might otherwise cause color shifts in the photos (sunset/sunrise). - 4K 12 CIN
This is 4K but wider, so there’s slightly more resolution (17:9 with the height of 4K’s height). This is also a great mode to do video for timelapse.
Protune
This is one of the great mysteries to the general public, but amazing for film professionals. Most noticeably is its flat color profile. It’s got special curves in the color matrix to pick up shadows more and not blow out highlights. It also produces very muted colors that can later be color corrected to better match video from other cameras. Next on the list is the lack of sharpness. You might look at the video footage and think it looks much softer than standard video or that something must be wrong with the lens. The sharpness you see in the standard modes is actually all digitally added. For film professionals, the less digitally added stuff in-camera, the better. It can always be added later and edited to match the sharpness of footage coming from other cameras. Next is the high bit-rate. It films up to 45mbit. Bit-rate levels essentially tell the camera how much data it’s allowed to pass on from the sensor to the SD card – higher bit-rate equals larger video files but is much more high quality. Low bit-rate will use compression techniques to lower file size by grouping large blocks of colors. Last on the list of ProTune is the ability to choose color temperatures.
- Auto
This is my go-to when using ProTune. The camera does a great job of reading color and light and correcting for that. This will give your footage a consistent look and color across the board for seamless footage, especially in snow. I can provide some insight about what the other color temperatures do but I really haven’t used them much at all. - 3000K
This should be used for very warm light such as early morning sunrises or sunsets. In a neutral environment (white room indoors) the footage will look pretty blue to offset the warm tones. - 5500K
This should be used for average daylight around noon when it’s harsher and a little cooler light. In a neutral environment it will look slightly warm. - 6500K
This should be used for colder overcast skies, it’s even warmer in a neutral environment. - Cam Raw
This won’t add any color balancing correction and just spit out what the camera sees in any given condition. Truly this will give you the most freedom for correction for later, but it could be quite cumbersome as it will always spit out a slightly different hue depending on light and what it sees.
Some important downsides – Protune will NOT look better at night. Right now the camera has quite a bit of digital gain when it’s dark (think auto ISO pumping) so you see more detail than you’ll normally see with a camera of this size. This comes at a price, obviously, which is noise in the dark. This auto gain coupled with the boosted shadows will really look like a lot of noise in pure dark. You’re better off switching out of ProTune as soon as dusk rolls around. Also the noise reduction in Protune is lowered almost entirely so you you’ll get more detail in the visuals at the cost of noise. All this said, this sensor performs extremely well at low-lights for its size. Eventually GoPro could add a gain control button which would lower all the added auto-noise at low levels. This would make the camera look crisp and perfect at lower light at the sacrifice of seeing more of the visuals in the dark.
In summary, for me – ProTune + AutoWB + 1080-60, 2.7K, 1440-30 & 1440 48 is my jam. Experiment with 720-120 Narrow, 1080-60 Medium & Narrow as well, they are super cool.
Update: Here’s a handy chart Lewis Walsh created summarizing my review of the modes, thanks Lewis! http://lewiswalsh.com/gopromodes.pdf
Update #2: Here’s a handy printable cheat sheet summarizing this whole post by Balcones on Reddit! http://imgur.com/a/CjmC5
