If you’ve found yourself with a new GoPro but have no idea how to start using it, you’ve come to the right place! I’m here to explain the basics of getting started with your GoPro, from what it’s capable of, to what settings are best for your situations. This specific guide is made for the HERO3+ line of cameras; however, the ideas in here transfer across many of the different models of GoPro!
Table of Contents:
Buttons Explained
Modes & Settings
Basic Filming Recommendations
Basic Photo Recommendations
Creating Time Lapses
Basic Video Editing
Before we Dive in – Software Update
Before we jump into the camera features, it’s always a good idea to make sure your camera is updated with the latest firmware (techie name for software).
Firmware Update – GoPro.com/Support
Follow the steps on the GoPro support page to download and install the latest version of software. If you have an iPhone or Android device and know how to connect to the WiFi on your camera, that will also allow for updates over the air via camera WiFi (HERO3+ only).
Getting Started – Buttons Explained
The HERO3 line of cameras has 3 buttons – A power button, a shutter button, and a WiFi button.
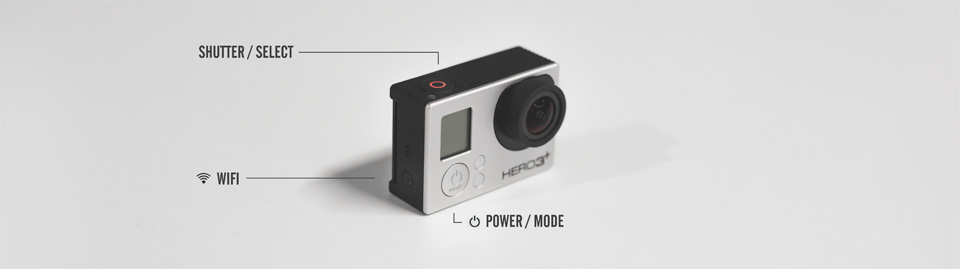
POWER/MODE
The front button is known as the POWER button. We use this to turn the camera on (one short press), and turn the camera off (one long press, until the camera starts to beep 7 times). The HERO3+ has a slightly longer startup time so don’t be alarmed if the camera takes a few seconds to turn on after you press the front button once.
SHUTTER/SELECT
The top button is known as the SHUTTER button. Think of this as a classic shutter button on a camera. Once the camera is on press this button once to start recording and once again to stop the recording. It acts as a shutter button for the photo modes as well – more on that below.
WIFI
The side button is the WIFI button. When the camera is off, one single button press will initiate WiFi in the camera. The blue light will turn solid for a few seconds while WiFi boots up, after that it will begin flashing to indicate that it’s active. If you hold the button down for 3-5 seconds the WiFi will turn off and the blue light will flash 7 times indicating that it’s turning off. When the camera is on the button functions act the same; however, once WiFi is active one short press of the WiFi button will jump the camera into the WiFi specific settings menu. Here you can choose whether you want the WiFi to be setup for mobile devices or for the remote.
Navigating Menus
When the camera is powered on, the Power button and the Shutter button have two specific navigational functions for cycling through modes and changing settings. The front POWER button is used to cycle through camera modes.
The top Shutter button is used to enter/accept settings changes.
Once you land on the settings page (picture of the wrench), press the Shutter button to enter into the settings. You’ll see a page that displays the video settings. You can either cycle to the next settings page by pressing the POWER button, or press the SHUTTER button to enter into that specific setting.In any of the menus you can cycle around (using the front POWER button) to end up on an EXIT menu which will take you back to the previous menu. Once you enter the general settings page (the wrench), you can cycle around 9 times to hit the exit page. There’s a handy shortcut to jump all the way out of any settings menu – Hold down the SHUTTER button for 3-4 seconds and the camera will return to the default state that you started up in.
Getting Started – Modes & Settings
The HERO3 has 4 main film/photo modes and a settings menu – these make up the 5 main screens you see when cycling through the camera. They are Video, Single Photo, Burst Photo, and Timelapse Photo.

As you cycle quickly a general image indicating the mode will appear. If you stay on any of those modes for more than a second, the display will show a more detailed view of that specific setting. Let’s start with Video.
Video Mode
When you turn on the camera, video mode is the first mode you come to. The screen displays the camera in the top left followed by a W-M-N indicating FOV. Below this is the video resolution and frame-rate. The large number shows how many clips are recorded. The bottom small number shows how many hours and minutes the SD card has left, and the far bottom right shows the battery level.
Field of View – W/M/N
The top left of the screen shows the video icon with a W, M, or N next to it. These letters refer to the field of view (FOV) and stand for wide, medium, and narrow.
Video Resolution
Next down is the video resolution followed by the frame rate. A dash separates the two. Video resolution tells you how large (dimension-wise) the video file will be.
Frame Rate
Displayed next to video resolution is the frame rate number. This number tells you how many frames per second (FPS) the camera is capturing.
Clip Numbers & Record Time
The large numbers on the display indicate how many video files are saved on the SD card. This number changes when you switch into photo mode, where it will display number of photos on the card. When you’re in video mode if you press record, this number goes away and a current display of record time is shown. This is pretty straight forward.
SD Card Capacity & Battery
At the very bottom, next to the battery indicator, is the SD card capacity readout. It’s measured in hours and minutes and is dependent on the size of SD card you’ve got in the camera and the video mode you’re in. A larger capacity SD card will obviously show a higher available record time. A 32 GB card should give about an hour of video. If you’re in a high resolution it’ll take up more space than a lower-sized mode.
Video Settings – Diving Deeper
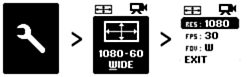 After turning on the camera, cycle around to the settings menu. Press the SHUTTER button to enter. The first screen you come to is the Video Settings Overview page. The overview tells you the frame-size, frame-rate, and field of view (FOV). Enter the video settings by pressing the SHUTTER button on the overview page. The top choice we land on is the video resolution.
RES: Video Resolution – Explained
The GoPro has a lot of settings so this is an important topic to understand. 1080 means the file is 1920 x 1080 pixels – this is the classic widescreen size of your HDTV. If the resolution is 1440 it means it’s the same width as 1080 but taller (1920 x 1440 pixels). It’s a 4:3 aspect like an old non-widescreen TV. It provides more vertical view above and below compared against 1080. The HERO3+ Black edition has a few resolutions above 1080 which will simply provide more detail than 1080 (2.7K and 4K). If you want to go lower, the camera can go down to standard definition as well. Lastly if the resolution has an “S” on the end, it’s in Superview mode. This is explained in more detail below.
FPS: Frame Rate – Explained
Next down the list in options is the video frame rate. Typical video you see online or on TV is 30 FPS. On the GoPro when you see a number higher than 30 it means you can do some level of slow motion. If your frame rate is 60 it means you are shooting twice as fast as normal video so you can slow it down smoothly by half. 120 FPS means you can slow it down to 25% (quarter speed) and still play back at 30 FPS. By default all of the modes will play back real-time, you’ll need to adjust the speed when editing to see the slow motion.
FOV: Field of View – Explained
Next is the option of Field of View. Think of this setting as levels of zoom. Wide is the most wide angle and gives the classic fisheye look. Medium is slightly zoomed in and shows less view. Narrow is the most zoomed in and is hardly wide angle at all. Narrow looks like a classic video camera lens with the least distortion. It’s not a digital zoom like an iPhone so you don’t lose quality when zooming in, but it’s also not an optical zoom from the lens. It’s actually a technique called sensor cropping. Read more about that in Understanding Your New GoPro. These options are only available in certain modes. 1080-60 has all 3 – Wide, Medium, and Narrow.
LOWLIGHT: Auto Lowlight – Explained
Last on the list is an auto lowlight option (for HERO3+ users only). If you are filming in slow-motion modes (60 FPS, 120 FPS, etc), the camera will automatically reduce the frame rate in the middle of a video when it’s dark out. Naturally if you’re filming at 30 FPS (30 frames in one second) you’ll have more light being let into the camera than if you’re filming at 60 FPS (60 frames in one second). If this setting is set to ON, it will switch your video from 60 FPS down to 30 automatically. I personally always keep this off because if I want to film in slow motion, I’ll choose 60 FPS, and if I want to get better lowlight, I’ll choose 30 FPS. This lets you set one mode and forget about it, if you want. It’s only available on frame rates 48 or higher.
S: Superview – Explained
Superview automatically captures the visual information from one of the tall modes (1440 or 960) and dynamically stretches it to fit a 16:9 aspect ratio (1080 or 720). It doesn’t just stretch it down, everything would look fat, but pinches the center so anything in the center of the frame looks good, while it stretches out the outsides. I explain this and how to do it manually in great detail in this post. Superview has the potential for great results as well as some pretty funky looking video. Basically anything POV without a ton of important visual items in the edges of the frame will look good – examples are motocross from the head, downhill mountain biking from the head or chest, skiing on the head or chest, surfing from the nose of the board, etc. Anything where you start interacting with people or holding it in your hand will end up with some stretchy looking figures. Bottom line for this mode is the more view you have in any of your sports the more immersive and smooth your video will be – try it out and see how you like it.
Single/Continuous Photo Mode
Single/Continuous Photo Mode is the 2nd mode in the list and is indicated by an icon of a classic camera. It’s made to make the GoPro act like a normal camera – you press the shutter button and it will take a photo. If continuous photo is enabled then you’ll be able to hold down the shutter button and take photos continuously (for up to 30 photos at a time). The screen displays the camera in the top left followed by a W or M indicating FOV. Below this is the photo resolution followed by continuous photo rate (if you have that option enabled). The large number shows how many photos have been recorded. The bottom small number shows how many photos can fit on the remaining space of the SD card, and the far bottom right shows the battery level.
Field of View – W/M/N
The top left of the screen shows the video icon with a W or M next to it. These letters refer to the field of view (FOV) and stand for wide and medium.
Photo Resolution
Next down is the photo resolution which tells you how many megapixels the photo is.
Continuous Photo Rate
To the right of photo resolution is blank by default; however, if you have continuous photo enabled it’ll show you how many shots per second it’s taking as you hold down the shutter button. The default is 1 but you can set the camera to take up to 10 photos per second while you hold down the shutter button. It’s indicated by a number followed by SPS indicating “# shots per second”.
Burst Photo Mode
Burst Photo Mode is the 3rd mode in the list and is indicated by an icon of a stack of 3 photos. It’s made so you can take a whole lot of photos in a short amount of time. It’s particularly handy with the remote or mobile device to trigger the right time. One thing to note is once you hit the burst it will take up to 10 seconds to save all of the files after it has captured them. You won’t be able to do another new burst until all the previous photos have saved. The screen displays the stack in the top left followed by a W or M indicating FOV. Below this is the photo resolution followed by burst photo rate. The large number shows how many photos have been recorded. The bottom small number shows how many photos can fit on the remaining space of the SD card, and the far bottom right shows the battery level.
Field of View – W/M/N
The top left of the screen shows the video icon with a W or M next to it. These letters refer to the field of view (FOV) and stand for wide and medium.
Photo Resolution
Next down is the photo resolution, which tells you how many megapixels the photo is.
Burst Photo Rate
To the right of photo resolution shows something like 30/1s. This tells you how many photos will be taken in what amount of time. The default is 30 photos in 1 second (30/1s).
Time lapse Photo Mode
Time lapse Photo Mode is the 4th mode in the list and is indicated by an icon of a clock with a camera. This mode is made to take a photo at specific intervals of time (every second, every 5 seconds, etc) until either the battery runs out, the card is full, or you stop the recording. You start it like a normal video recording by pressing the shutter button once, and stop by pressing the shutter button again. Keep in mind you’ll still end up with photos in the end, not video. The photos can be combined to make a time lapse in GoPro Studio. The screen displays the clock+camera in the top left followed by a W or M indicating FOV. Below this is the photo resolution followed by the interval. The large number shows how many photos have been recorded. The bottom small number shows how many photos can fit on the remaining space of the SD card, and the far bottom right shows the battery level.
Field of View – W/M/N
The top left of the screen shows the video icon with a W or M next to it. These letters refer to the field of view (FOV) and stand for wide and medium.
Photo Resolution
Next down is the photo resolution, which tells you how many megapixels the photo is.
Photo Interval
To the right of photo resolution shows something like 0.5sec. This tells you how much time goes by before it will automatically take another photo. In the instance of 0.5sec it means it will take a photo every half second (2 per second).
Photo Settings – Diving Deeper
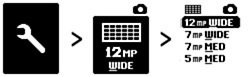 After turning on the camera, cycle around to the settings menu. Press the SHUTTER button to enter, then press the MODE button to access photo settings. The first screen is megapixel & FOV settings for all photo modes. The next screen is how many shots per second will fire when in single photo mode. After that is the settings for number of photos taken in a designated duration during a burst. The last screen is to set the photo time-lapse interval duration.
Photo Settings: Megapixels & FOV – Explained
When you enter into the photo settings in the menu there’s a choice of 12MP Wide, 7 MP Wide, 7 MP Med, and 5 MP Med. These settings will affect all photo modes in the camera – single photo, burst, and time-lapse.
Currently when you’re in 12 MP Wide you’re taking the largest and widest photo the camera can take. A 7 MP Wide photo is simply the 12MP Wide photo but scaled down by about 40%. You can get the same results if you shoot a 12MP Wide shot and scale it on your computer. Similarly, a 7 MP Med photo means you’ll have a smaller photo that shows less view than a 12 MP Wide. In this instance you can take a 12MP Wide photo and crop the edges off and you’ll end up with the same photo as a 7MP Med. Lastly a 5MP Med photo is the same as a 7MP Med photo but scaled down. Still you can get this by taking a 12MP photo, cropping it, then scaling it down.
The gist – always shoot in 12MP Wide. The one instance where you may think about changing the resolution is if you’re concerned with SD card capacity. A smaller photo will take up less space on the SD card.
Capture Settings – UpD, Spot Meter, Photo+Video, Loop Video, ProTune
In the settings menu past all of the video and photo settings is a sub-menu called capture settings. If you enter this menu you’ll have the option of changing more settings under the hood which will affect how your video & photo looks. The menu items are UpDown, Spot Meter, Photo in Video, Loop Video, and ProTune.
UpDown
UpDown is pretty straightforward – if on, it will flip your recorded videos and photos upside-down. This is particularly handy if you’ve mounted your camera upside-down and you’d like all of your photos and videos right side up!
Spot Meter
Spot meter changes the way the camera auto exposes for light in a scene. If active, rather than look at a scene as a whole, the camera will look to the center of the frame to adjust for light. This is handy when you’re mounting the camera in a car looking forward and you’d like to see the road, not inside the car. Normally the camera will adjust for the darkness of the car and the road will be pretty bright. With spot meter on it will make the inside of the car dark and adjust the light for the road more properly.
Photo + Video
This mode will capture photos at set durations while your video is recording. The modes in which this can be enabled are limited to lower resolution and lower frame-rates. When a photo is captured it’s not exactly the same as a photo from any of the photo modes. It will look more like a high resolution frame-grab from video. If you’re filming in a 16×9 mode (widescreen) the photo will also be widescreen. If you’re filming in one of the 4×3 modes (taller) the photo will look closer to a normal photo from the camera.
Loop Video
Loop video means the video will film a set duration and then re-write the previous file. This is particularly handy if you can plug your camera in and use it as a car dash-cam, or a security camera. If something happens you can stop the recording and you’ll a set duration of video saved to the card.
ProTune
ProTune is the last setting in capture settings and it’s a whole set of video adjustments you can enable. By default ProTune is off. If you turn it on (in the HERO3+) it will basically just turn up the quality of your footage. It does this by making the file sizes larger (we say increases the bit-rate). Once ProTune is on it also turns on a few settings that you can adjust – White Balance, Color Tuning, ISO Limit, Sharpening, and Exposure Bias. Something to note is ProTune will only affect video, not photos.
White Balance
White balance basically determines the color temperature of your footage (cool to warm). By default this is set to Auto. If you switch it to the different Kelvin values, your footage will vary from pretty blue (3000K) to pretty yellow (6500K). Lastly is a setting called Cam-Raw which turns off the camera’s compensation of color.
Color Tuning
Color tuning is the overall color, contrast, and saturation settings of your video. There are two options – GoPro Color, and Flat. GoPro color is the standard color tuning that you’ll get out of the box – higher saturation, contrast, and accurate colors. Previous versions of GoPro ProTune defaulted to Flat which is a more neutral color profile. Flat should only be used if you’re an experienced color corrector or are trying to match GoPro footage to other video sources in post.
ISO Limit
ISO Limit tells the camera how bright it should get in darker scenes. By default it’s set to 6400. This means in a dark room it will use digital light gain to make it brighter and compensate for the darkness. The brightness comes at a price, which is noisy footage (grain, spots, etc). As you set the ISO limit lower, the footage will appear darker, but also cleaner with less noise. ISO limit won’t ever affect video footage during daylight or in bright situations because the camera won’t need to use the extra ISO boost. 400 is the darkest/cleanest looking footage, while 6400 is the brightest and noisiest footage.
Sharpness
The Sharpness setting affects just that – the digital sharpness in the video. A GoPro lens is only sharp to a certain point. After that digital sharpness is added to make the footage appear sharper. By default it’s set to high, which will make your footage pop and appear sharp. This setting allows you to lower the digital sharpness if you like a smoother looking video, or plan to add sharpness in post.
Exposure Bias
The last setting in ProTune is Exposure Bias which lets you tell the camera whether to always be slightly lighter or darker than normal. By default it’s set to 0. If you set it to +2.0, the footage will appear to be 2 “stops” lighter in all situations. In photography if you go up by 1 “stop” you’re doubling the amount of light that gets let into the camera. If you set the exposure bias to +2.0 the footage will be 4 times brighter than normal. Similarly if you set it to -2.0 it will be 4 times darker than normal.
Set Up – Default Startup Mode, 1 Button Mode, NTSC/PAL, On Screen Display, LED, Beeps, Auto Power Off, Date/Time
After capture settings is a camera Set Up menu. These are more for the basic setup of your GoPro and will rarely be used. Inside of this you’ll have access to the default startup mode, 1 button mode, NTSC/Pal, On Screen Display, LED control, Beep control, Auto Power Off, and Date/Time.
Default Startup
When you first turn on your GoPro it will always go straight to video mode. If you’d like it to start up in photo, time-lapse, or burst, you can change this here.
1 Button Mode
With 1 button mode active, when you turn on the camera it will turn on and automatically start recording. To stop the recording you have to hold down the power button and it will stop the recording and turn off the camera. This saves on battery but also limits you to whatever your default startup mode is. To exit out of 1-Button mode hold down the SHUTTER button for 3 seconds while you’re recording. It’ll stop the recording and bring you to the settings menu to turn it off.
NTSC/PAL
This is used to set the correct frame-rates for broadcast in the Americas or overseas. When in PAL all 30 FPS video frame rates will turn to 25 FPS, while 60 FPS settings will turn to 50 FPS. This is only necessary when using your footage for broadcast or for TV. I recommend leaving it in NTSC for anyone doing video for computers or the web.
On Screen Display, LED, Beeps, Auto Power Off, Date/Time
The rest of the settings are pretty self explanatory. On Screen Display, if active, shows video settings over the video if you’re plugged into a TV via HDMI. LED lets you set whether the red lights flash during recording and how many. Beeps lets you turn down or turn off the beeping noise of the camera. Auto Power Off lets you set how long the camera will stand idle before turning off, and Date/Time is to have the proper date and time stamp for your video clips. *Tip – use the app to automatically set the date and time quickly and easily.
Wireless Controls – App, WiFi RC
To turn on WiFi press the side WiFi button once – it’ll turn blue while it initializes, then start flashing when it’s ready. To access the settings, press the side WiFi button again once the wireless lights are flashing. Once WiFi is active, you can either set the GoPro to be used with a smart phone or tablet, or with the GoPro Wireless Remote. To turn off the WiFi, hold down the WiFi button on the side until the blue light flashes 7 times consecutively and quickly.
GoPro APP
To connect to the GoPro App with a smart phone or tablet, navigate to the GOPRO APP setting in the WiFi menu. It will create a WiFi hotspot that you’ll have to connect to in your smart phone or tablet’s wireless settings (outside of the GoPro app). By default, the camera’s wireless network is called GOPRO-BP-….. The default password is “goprohero”. Once you connect and open the GoPro app, it will ask you to change the network name and password right away. After you’ve connected to the app, you can access a live preview of your GoPro, access all of the settings in the camera, and even/download the content you’ve already shot. If you turn off your GoPro, WiFi will stay on. You can still access the GoPro from your smartphone/tablet; however you won’t be able to access the files on the GoPro unless the camera is on. You can turn it on wirelessly from your device.
Wi-Fi RC
The Black Edition comes with a wireless remote called the Wi-Fi RC. It mirrors the screen of the GoPro and has both POWER/MODE and SHUTTER buttons. To sync your Wi-Fi RC go into the wireless menu and enable the Wi-Fi RC setting. If it’s the first time you’re connecting, select the NEW setting. It will look for your Wi-Fi RC. At this time power on your Wi-Fi RC and hold the SHUTTER button of the Wi-Fi RC. It will look for the camera until it makes a pair. If you ever forget the order of operations, instructions are printed on the back of the Wi-Fi RC. Once synced, you can remotely change settings, record, or power off your GoPro up to around 100 yards distance from the camera. One other thing you can do is sync up multiple GoPros to one remote. With this you’re able to wirelessly start and stop multiple cameras at one time.
Deleting Files
The last setting to be discussed is the trash at the end of the settings menu. If you select this you can either delete the last file you recorded or format the entire card.
Getting Started – Basic Filming Recommendations
Go-To Mode: 1080-60 W
1080-60 Wide is the best combination of high resolution, wide angle, and high frame-rate allowing for slow motion in post. If you’d like to go beyond the basics of filming with a GoPro, it’s best to think about two things: type of mount and end goal of the video.
Type of Mount
At GoPro we usually separate filming type into two main buckets: POV (Point of View) & Other. POV refers to anything mounted to your body, equipment, etc. Other refers to things like handheld, tripods, pole cams, etc. If you’re filming POV you usually want to have the most immersive view possible – the modes that cater to this are anything with the WIDE field of view and going even further – anything that has more of a vertical view. Modes like 960, 1440 or the Superview modes all show the most immersive wide & tall view possible. Getting away from POV, if you’re filming with other film tools you may not need the most amount of vertical view. Most of the time a more traditional mode will work great such as 1080, 720, or even the higher resolutions like 2.7K. Also if you need to zoom in slightly try utilizing the Medium or Narrow fields of view.
End Goal of the Video
You may want to use different modes if you’re creating a video to store on your archives and re-live later, compared to filming specifically to make a YouTube video. Something to think about is do you need slow motion, higher resolution, or a mixture of both? The way the technology works is there’s typically a trade-off between quality and slow motion. The highest resolutions can’t film in high frame-rates and the highest frame-rates may not look as good as the high resolution modes. Also if you’re shooting at night, indoors, or in any other dark areas – lower frame rates will have much better image quality. This is due to allowing the most amount of time for the camera to expose to the scene (taking 30 frames in one second is much more light than 120 frames in one second).
When I know I don’t need slow motion, 1440-30 (POV) and 2.7K-30 W (non-POV) are my favorites because they are the highest quality modes in terms of clarity of the image. These are great modes for capturing a real-life feel. When I’m shooting for an action packed YouTube video I like to keep it in 1440-48 for POV and 1080-60 for anything else. This allows me to have a good mixture of high resolution plus the ability to slow it down smoothly in the edit.
If you’re just getting started with video editing I recommend utilizing Superview (1080-S or 720-S) wherever I’ve mentioned 1440 or 960. The Superview modes are more friendly in the edit process because they’re already at a 16:9 aspect ratio like most other content sources vs being in a 4:3 aspect ratio like 1440 and 960.
ProTune
I personally keep ProTune activated at all times to achieve the highest quality video. As far as the custom settings in the HERO3+, I set the following:
White Balance: Auto
Color Profile: GoPro Color
ISO Limit: 400
Sharpening: Low
EV Compensation: 0
These settings provide me with vibrant, high quality footage at all times. Limiting the ISO to 400 means it will have cleaner night-time footage at the expense of seeing more. It won’t affect the video at all during the day. I keep sharpening at low because I add it back while editing. If you don’t want to do any editing of the video footage on the computer, try bumping the sharpness up to Medium or High.
Getting Started – Basic Photo Recommendations
Go-To Mode: Time-Lapse 0.5 Sec, 12MP W
If you’re trying to get great photos, this is the mode that will get you the best results. Rather than utilizing single shot mode when you want to take a photo, switch it into time-lapse mode and start the shutter when you want to take a photo. You’ll obviously be getting more than a single photo but it just increases your chance of getting great photos. Also if your camera is handheld, you’re more likely to get less blurry shots by starting the shutter and getting your hand still for a few photos. Keep in mind the GoPro photo mode excels with a lot of light. If you’re indoors or in dark areas I recommend putting the camera on something static or a very steady hand to get high quality photos without blur.
To see what the GoPro Time-Lapse Photo mode is capable of, check out my GoPro Photo Stream!
Getting Started – Creating Time Lapses
Creating real & amazing time-lapses couldn’t be easier with a GoPro. Set the GoPro to time-lapse mode, set it down somewhere and start it with the shutter button. Once you have a set of photos, you’ll need GoPro’s free editing software: GoPro Studio. You simply drag one of the photos from your card into the import window in GoPro studio and it will automatically recognize that it was part of a timelapse. It will build the lapse into video. From there you can either convert the entire thing or enter into the advanced settings to change a few parameters such as frame size, frame-rate, speed, etc. You can also utilize this tool to create time-lapses from videos. Often times if I want to do a shorter duration time-lapse (such as 10-30 minutes), I’ll actually shoot high resolution video and speed it up in GoPro Studio.
Below is a good reference to use when deciding what photo duration to use when doing a time-lapse.
5-30 Min Lapse: Video Mode – 2.7K-30 W or 4K-15 W (speed up in GoPro Studio)
30 Min – 1 Hr Lapse: Time Lapse Mode – 0.5 or 1 Sec, 12MP W
1 Hr – 2 Hr Lapse: Time Lapse Mode – 2 Sec, 12 MP W
2 Hr – 4 Hr Lapse: Time Lapse Mode – 5 Sec, 12 MP W
> 4 Hr Lapse: Time Lapse Mode – 10 Sec, 12 MP W
Getting Started – Basic Video Editing
It’s really simple to create a basic edit with GoPro’s free editing software: GoPro Studio. Once you’ve got it installed and open, drag any of the clips you’d like to use over to the Import panel on the left side of the program. When you’ve got all of your clips in the left panel, click on them individually to bring them up in the main video window in the center. It will bring up the whole clip, giving you the ability to watch it back and scrub through. Here you have the chance to convert the whole clip over to the editing side of things or just take a small chunk. I like to grab little bits to make it easier when I’m editing. If I’ve got a 10 minute clip of skiing from my head-cam I might select a couple different sections from one single clip. I do this by selecting an “In” and “Out” point (i and o for shortcuts). You then have the opportunity to name the clip at the bottom (handy for later). Select a location for your clips with the “Save To:” setting. I recommend utilizing an external drive for these converted clips since they could take up a fair amount of hard-drive space. Click “Add Clip to Conversion List” when you’ve got a named and selected In and Out point. All of these ‘selects,’ as we call them, will be little pieces you will use in your edit.
Once all of these clips convert, click on the STEP 2 > EDIT tab at the top of the program. All of your named/converted clips appear in the left panel. It may ask you to create a template. If you’d like to create your own video from scratch, click ‘Blank Template’, otherwise experiment with the GoPro original templates. You then can drag the whole clips you converted into the timeline or even select smaller portions of the converted clips utilizing the same In & Out selection technique. You can import music, create titles, and do transitions. Lastly on the right side are color correction tools, color presets, speed controls, and more. Experiment! You’ll have an awesome edit in no time.
When you’re ready to export click the ‘Export’ button at the top. There’s a few presets that will make it easy to get the right setting for what you need.
Exporting for Instagram Video
If you want to export a video for Instagram, select the ‘Custom’ option from the Preset Menu after hitting ‘Export’. Make the image size 1280 x 720, the Frame-Rate 29.97, and encode it as H.264. Next go back up to the quality slider and slide it to the left and right until the file size estimate says just under 10MB. Remember to make your Instagram video only 15 seconds in your edit, otherwise the size estimate will be off! Once you have an export under 10MB you can easily email this to yourself to get it onto your phone!

Helpful Resources
GoPro Studio Software
GoPro Product Manuals
GoPro Product Updates (Firmware Updates)
GoPro Video Tutorial Page
GoPro Reddit
As always, feel free to shoot any questions below!