In this breakdown, I’ll give you the inside scoop on how to get the best quality out of your new GoPro. As one of GoPro’s long-time Creative Directors, I’ve been developing and using HERO12 Black for the past few months. If you’re looking for more information about the new features and details about the HERO12, head over to my article Things you Should Know About HERO12.
The way I approach video settings is aiming to get the right amount of view, stabilization, and most detail for any given scenario. These days, with quality being so high and sharing on social media being the main platform of distribution, the proper lens setting or view of my activity is usually the biggest thing to think about and try to nail. Beyond that, it’s dialing little things here and there that can ensure I’m getting the most detail and quality out of my GoPro.
Most of the questions I see about settings are things like “What should I use for skiing?” or “What should I use for diving?”. In my opinion, these aren’t the correct questions to be asking. I’ve distilled my settings down into more of an intention of the specific shot, rather than the specific activity. Rather than saying “what should I use for skiing?”, ask yourself what kind of shot you’re trying to get while skiing – is it POV? is it a follow-cam? is it a vlog style? The camera is so good these days that we can leave it in mostly the same under-the-hood settings across the board, and only really play with resolution, frame-rate, and digital lens.
Next, just to caveat, I personally like to do some adjustments in post, so below I suggest shooting with low sharpness. If you don’t want to do any post-processing, leaving sharpness on Medium is fine; however, the HERO12 will produce the cleanest image if sharpness is on ‘low’. OK, onto the settings!
HERO12 Video Settings & Protune Setup
Bit Rate & Bit Depth First!
HERO12 has moved the bit rate and bit depth out of the Protune settings and into the general camera settings under “Video Settings.”
Video Settings
Bit Rate: High
Bit Depth: 10-Bit
Protune Settings
Next, regardless of resolution, this is generally what I choose for all of my Protune settings when starting:
- Shutter: Auto
- EV Comp: -0.5
- White Balance: Auto (or Specific Temp based on Scene)
- ISO Min: 100
- ISO Max: 1600
- Sharpness: Low
- Color: Natural
HERO12 Settings Guide
If you want to capture the best quality with your GoPro, it’s important to adjust the settings based on your specific needs. Consider what you want to achieve: Do you need slow motion? Do you want a wider view? Do you require the best stabilization? All of these factors influence how you approach filming.
The Difference in Digital Lenses
One of the most important aspects to understand is the difference between the digital lenses, so I’m going to run through each one before we dive into the settings guide.
Digital Lenses in HERO12
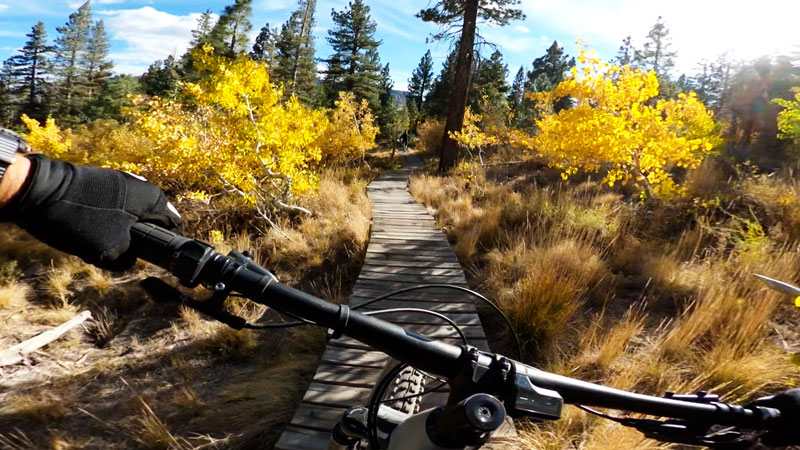
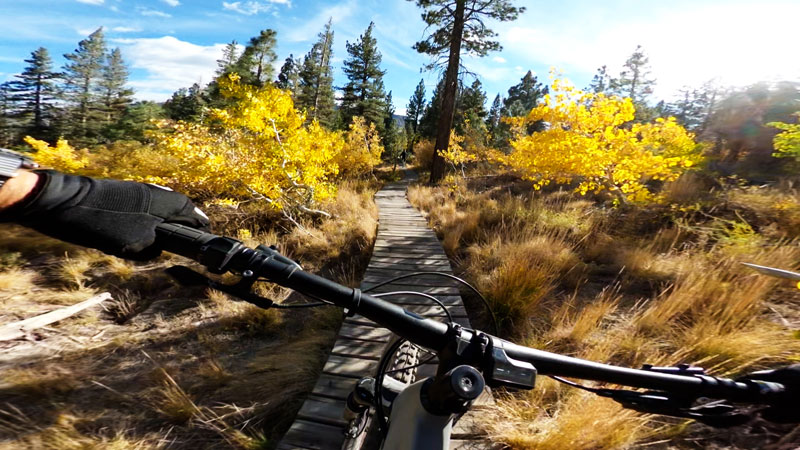
- Wide – This is the standard fisheye distortion of the GoPro lens
- SuperView – This is only found in 16:9 modes and is created by taking the Wide Lens view on a 4:3 frame and squishing it down to fit inside a 16:9 frame. So Superview isn’t any wider than wide, but it does have 33% more view vertically, above and below the standard wide 16:9 frame. Because the frame is squished vertically, you’d think everything would look shorter and fatter. There’s some distortion happening so the middle is pinched together to give everything near the center the correct aspect and look, and then gets stretched out as you go left and right towards the edges of the frame. SuperView is great for POV sports where things down the center will look good.
- HyperView – Found only in 16:9, and similar in form and function as SuperView, HyperView takes the full wide 8:7 frame and squishes it down to fit in a 16:9 frame. Again, for this reason HyperView does not have any additional view left and right from a standard wide 16:9 frame; but it does have 55% more vertical view than wide 16:9, or 17% more vertical view than SuperView. Because of the extreme stretching, HyperView has even more distortion on the edges compared to SuperView. As mentioned above, If you’re not happy with the distortion levels in HyperView, you can use the Quik App or FX Reframe in Premiere to reverse the distortion of HyperView and bring your clip back to 8:7 wide.
- Linear – An undistorted, non fish-eye view with straight lines. Linear will appear quite a bit more narrow than the wide lens, where wide has a 30% wider view than Linear. Because linear is more narrow, it provides more room on the sensor for stabilization, making Linear lens have extremely good stabilization. If you want a linear lens but don’t want to sacrifice view, you can shoot in wide and change to Linear in post using the GoPro Quik App or FX Reframe in Premiere.
Digital Lenses in HERO12 + Max Lens Mod 2.0
- Wide – This matches the lens curve of the HERO12 without Max Lens Mod. The FOV is about 10% wider than Wide in HERO12, due to HERO12 having to lose about 10% for stabilization. If you turn off HyperSmooth on the HERO12, the Wide lens will match FOV quite closely to Max Lens Mod 2.0 Wide.
- Max SuperView – Unlike SuperView in the HERO12 without Max Lens Mod, this mode is actually just a wider, fisheye view – this means it’s also available in all aspect ratios (16:9, 9:16 and 4:3). The naming is really confusing in my opinion, it should really be called “Ultra Wide”. Max SuperView is great because it’s 36% wider than Wide, but still doesn’t have any of the HyperView sort of distortion on top of it.
- Max HyperView – Only found in 16:9, this mode does have the same sort of HyperView distortion on it, where it’s pulling an 8×7 frame from Max SuperView (the undistorted ultra-wide view) and squishing it down into a 16:9 frame. Coupled with the extremely wide lens of Max Lens Mod 2.0, you get some pretty extreme distortion in this mode. It really shines in POV scenarios of MTB, ski, surf, moto, etc. Again, if you’re not happy with the amount of distortion, you can use the Quik App or FX Reframe to reverse the distortion. One very nuanced detail about Max HyperView is that it’s pulling from a tall 8:7 view; but if you compare against Max SuperView in 4:3, it’s not as wide left and right; however it does have significantly more view vertically.
- Max Linear – Introduced in a December 2023 release, this just brings the same Linear distortion and zoom level as without Max Lens Mod.

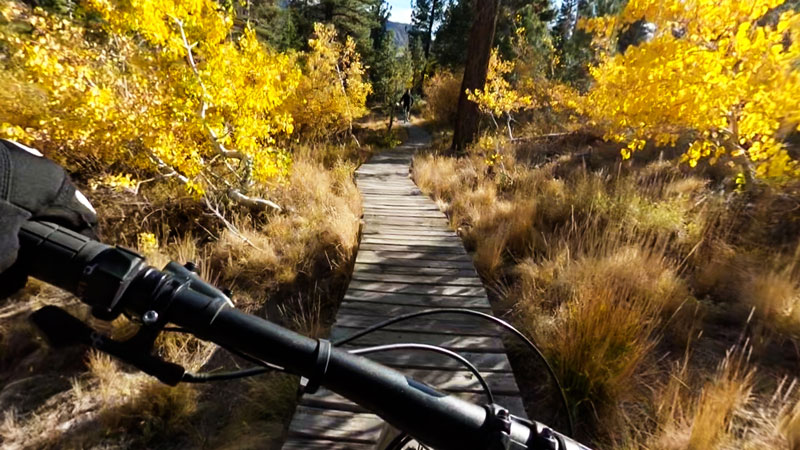
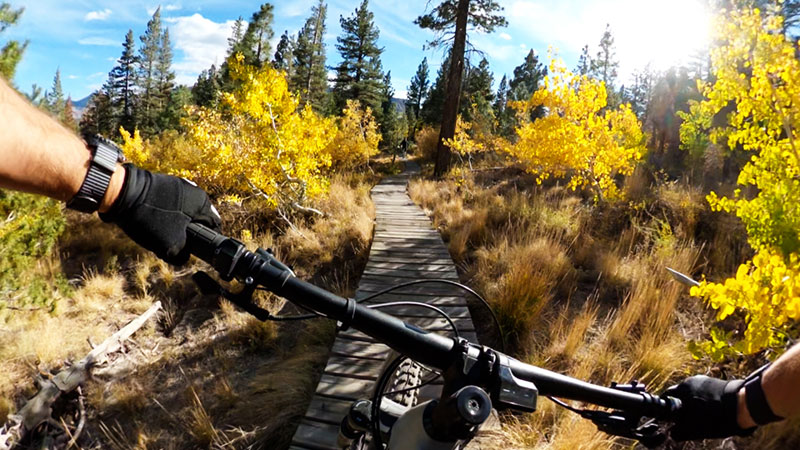
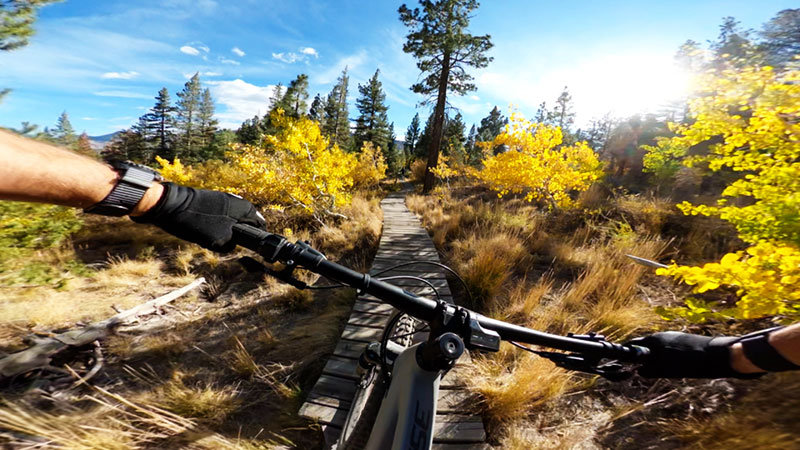
OK, onto the settings guide !
In the HERO12, you can create presets for each of these scenarios or simply follow these tips and modify your settings accordingly every time you go out. Fun fact, you can now rename all your presets using the Quik App!
Where I suggest 30FPS, you can extend that to 24FPS or 25FPS!
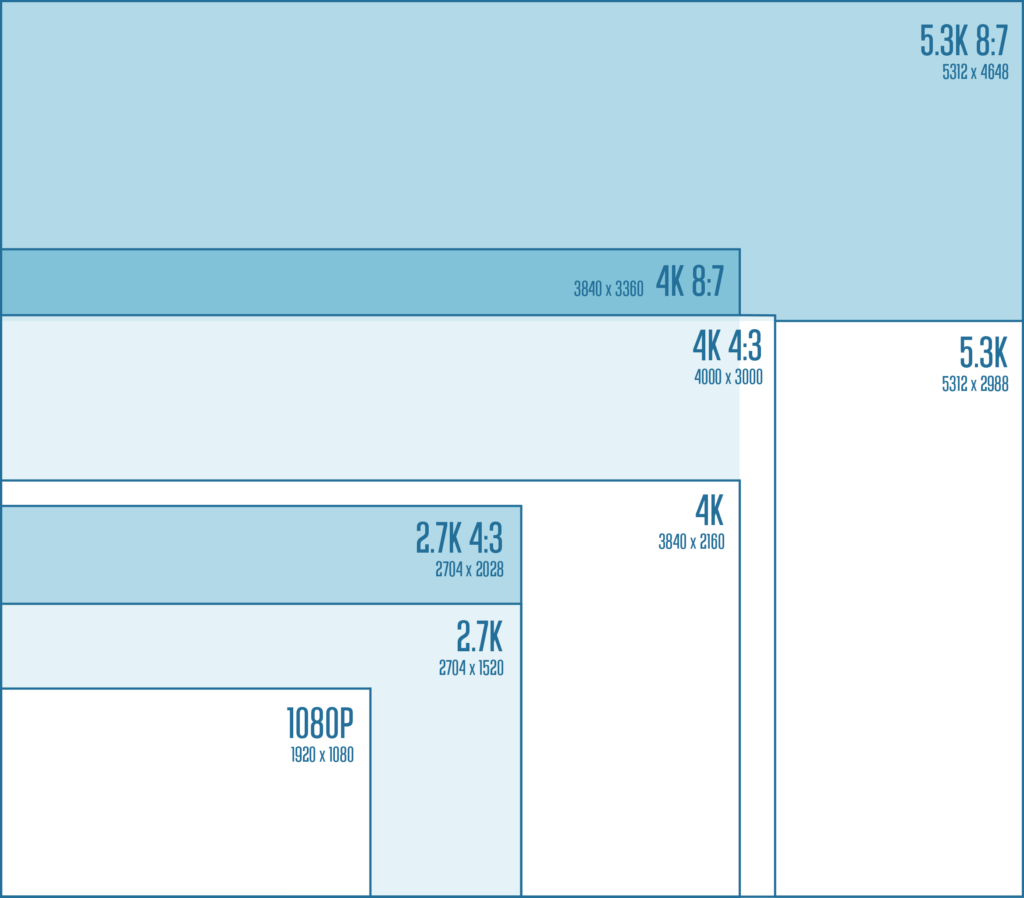
Flexibility in Post
For the modes with the most flexibility in post and the widest field of view use the following. Adjust depending on slow-motion need.
Aspect Ratio: 8:7
Resolution: 5.3K 8:7-30 | 4K 8:7-60
Lens: WIDE
HyperSmooth: On
Shooting in 8:7 offers the most “raw” video in the GoPro – it utilizes the native lens and full sensor, so you can adjust to your preferences in post with post lens correction, cropping, etc. These are my go-to settings for capturing most things POV as well as B-Roll. If you need slow motion but don’t need the widest or tallest field of view, there are other modes below that will have slightly higher quality over 4K 8:7-60. There are also modes that will offer better stabilization, as 8:7 has less room for stabilizing overall.
Travel / VLOG / Documentary
If you don’t need slow motion, this is the best for detail, stabilization, and lens compatibility.
Aspect Ratio: 16:9
Resolution: 5.3K-30
Lens: WIDE, LINEAR, LINEAR + Horizon Lock
HyperSmooth: On
By shooting in 16:9, you take advantage of significantly better stabilization over 8:7. 5.3K 16:9 offers the full suite of Wide, Linear, and Linear + Horizon Lock available. Auto Boost shouldn’t be necessary with the increased stabilization. You will see a significant jump in detail and quality by shooting in 5.3K 16:9 over 4K 16:9 – for this reason I highly suggest shooting in 5.3K even if 4K is your final output. Scaling 5.3K to 4K in post will retain those details.
POV without Max Lens Mod 2.0
For the widest field of view, use these modes. Adjust depending on your need for slow-motion. Separately, for the very best POV experience, see section about Max Lens Mod 2.0 below.
Aspect Ratio: 8:7 or 4:3 or 16:9
Resolution: 5.3K 8:7-30 | 4K 8:7-60 | 5.3K-30 HyperView | 4K-60 HyperView | 5.3K-60 SuperView | 4K-120 SuperView | 2.7K 4:3-120 |
Lens: HYPERVIEW or SUPERVIEW or WIDE
HyperSmooth: On or Auto Boost
If you’re shooting POV footage, or video that’s mounted where you want more view, shooting in 8:7 modes offer the most amount of view vertically. If your final output is 16:9, the HyperView lens takes the same amount of field-of-view you get in 8:7 and distorts it to fit the 16:9 frame. So in essence, any 8:7 mode can be swapped for a 16:9 HyperView mode, as they have the same FOV. One watch-out when shooting in HyperView is the distortion at the left and right edges of the frame. HyperView looks best when shooting traditional POV content – biking, skiing, surfing, driving – where objects and things that are important are mostly in the center and you’re traveling forwards.
When looking at slow-motion options for POV, 4K 8:7-60 is generally my initial go-to (or the equivalent 4K-60 HyperView). If I need either higher quality or better slow-motion (but slightly less vertical view) HERO12 has two great options in 16:9 SuperView: 5.3K-60 SuperView and 4K-120 SuperView. SuperView is created by taking a 4:3 view on the sensor (so taller than 16:9 but shorter than 8:7) and dynamically squishing it down to fit the 16:9 frame. I prefer shooting 4K-120 SuperView rather than 2.7K 4:3-120, as they both provide the same view, but in different formats. We can use the Quik App or FX Reframe within Premiere to reverse SuperView to 4:3.
POV – Max Lens Mod 2.0
Use Max Lens Mod 2.0 for the best POV experience due to widest field-of-view, and balance of resolution and frame-rate. Word to the wise – make sure you set your camera to Max Lens Mod 2.0 mode before shooting with MLM. If you see a black circle around your video, you haven’t enabled it yet.
Aspect Ratio: 16:9 or 4:3 or 9:16
Resolution: 4K 4:3-60 | 4K 16:9-60 | 4K 9:16-60
Lens: MAX SUPERVIEW or MAX HYPERVIEW
HyperSmooth: On
If you shoot in 16:9, 4:3 or 9:16, make sure you’re in the Max SuperView lens for the widest and most undistorted look. Without Max Lens Mod, SuperView by definition is taking a 4:3 frame and dynamically squishing it into a 16:9 frame. With Max Lens Mod 2.0, it’s confusingly named Max SuperView, when in reality it doesn’t follow the same distortion rules – it is actually more like an “ultra-wide” – aka – it’s similar to the native lens distortion curve in the GoPro, but much wider than “wide”.
There’s no 8:7 mode with Max Lens Mod; however, there is a mode called Max HyperView in 16:9, which takes an 8:7 ultra-wide view and squishes it down to a 16:9 frame with some dynamic distortion. It definitely takes some getting used-to, because the FOV is absolutely massive, and comes with quite a bit of distortion. If you shoot in 16:9 Max HyperView, you can use FX Reframe or the Quik App to “un-squish” into an 8:7 frame. I find this to be the most versatile resolution/lens combo that works for both horizontal YouTube content + vertical content for social media. If I know I’m only going to be shooting for 9:16 content on social, the choice is easy, with the dedicated 9:16 aspect ratio.
Vertical 9:16 with Max Lens Mod 2.0 is a non-compromising vertical FOV, meaning you get the same view vertically in 9:16 mode, while the camera is horizontal, compared to physically mounting the camera vertically.
Lastly, better stabilization overall and full 360 degree horizon lock is available in all lenses and resolutions with Max Lens Mod 2.0.
Cinematic
For the highest quality with 2x slow-motion use these modes; specifically for a 16:9 timeline.
Aspect Ratio: 16:9
Resolution: 5.3K-60 | 5.3K-60 SuperView
Lens: SUPERVIEW or WIDE or LINEAR
HyperSmooth: On or Auto Boost
These modes will give the best detail and quality at 2x slow-motion. If you want better stabilization, you can shoot in Linear; however L+HL will crop in more on this mode, so I recommend staying at Wide or Linear. If you’re looking for highest quality POV content with slow-motion, utilize 5.3K-60 SuperView.
Slow Motion
For 4X slow-motion and above use these modes.
Aspect Ratio: 16:9 or 4:3
Resolution: 4K-120 | 4K-120 SuperView | 2.7K-240 | 2.7K 4:3-120
Lens: SUPERVIEW or WIDE or LINEAR
HyperSmooth: On
Prioritize using 4K-120 or 4K-120 SuperView over the other two options, as both 2.7K-240 and 2.7K 4:3-120 will see a drop in quality in comparison. 4K-120 SuperView is a great option if you’re looking for more vertical view in your slow-motion shots. You can reverse the distortion effects of SuperView and convert 4K-120 SuperView to 4K 4:3 in post using the Quik App or FX Reframe within Premiere. If you want better stabilization, you can shoot in Linear; however L+HL will crop in on these modes, so I recommend staying at Wide or Linear. Something to note is that battery 4K-120 and 2.7K-240 require quite a bit of battery power, so you’ll see some drop in record time.
Best Stabilization
For the best stabilization with the widest view, use these modes. Linear & Linear + HL will have best stabilization overall, but wide in these modes is still very good and almost Boost level.
Aspect Ratio: 16:9
Resolution: 5.3K-30 | 4K-60 | 2.7K-120
Lens: SUPERVIEW or WIDE or LINEAR or LINEAR + HL
HyperSmooth: On or Auto Boost
If you’re after the best possible stabilization while keeping the widest field-of-view, these options will be your best bet. I will utilize these options if I know stabilization is my #1 priority, even if I’m shooting POV. Chest-mounted mountain biking is a good example where 5.3K 16:9 SuperView at 30fps has better stabilization than 5.3K 8:7-30 due to having more room to move around on the taller sensor.
Lowlight
If you’re looking to film indoors or at night, these modes will offer the best noise reduction and detail.
Aspect Ratio: 16:9
Resolution: 4K-30 | 1080-60
Lens: WIDE
HyperSmooth: On
These are the modes in the HERO12 that utilize a process of 3DNR noise reduction algorithms. You’ll see better detail and noise-handling in 4K-30 over using another similar mode such as 5.3K-30. If you need slow-motion, 1080-60 is the only mode that currently supports this 3DNR. Additional related mode that supports 3DNR is 4K-30 Superview.
FPV Drone (with Reelsteady GO)
For the best quality with FPV drone, use these modes in conjunction Reelsteady within GoPro Player.
Aspect Ratio: 8:7
Resolution: 5.3K 8:7-30 | 4K 8:7-60
Lens: WIDE
HyperSmooth: OFF
ISO Max: 100
I prefer to shoot FPV content with 8:7 for the best flexibility in post. Note that you can choose your output aspect ratio in Reelsteady. I like to change my Max ISO to 100 for drone-use to force motion blur. Also if you intend to use ND filters, make sure you keep your max ISO at 100, otherwise you’re introducing unnecessary noise into your image. Lastly, I prefer to shoot with HyperSmooth OFF and add my stabilization using Reelsteady; however, you can shoot with it on and still layer Reelsteady on top.
TimeWarp
For the best stabilization use higher speeds & Linear or Linear + HL
Resolution: 5.3K 8:7
Lens: WIDE or LINEAR
Speed: 30x for 10min+, 15x for 5-10min durations, 5x or 10x for 1-5min durations OR AUTO.
ISO Max: 100
I keep ISO Max at 100 to have decent motion blur on my TimeWarps. I like to shoot with Wide if I know I’m going to stabilize further with Reelsteady, otherwise shooting in Linear will provide better stabilization while capturing.
Star Trails
Resolution: 5.3K 8:7
Lens: Wide
Trail Length: Long
Shutter: 30s
ISO Min/Max: 800
These settings should get you a pretty great star trails video lapse!
Vehicle Light Trails
Resolution: 5.3K 8:7
Lens: Wide
Trail Length: Long or Short
Shutter: 0.5s or 1s
ISO Min/Max: 100 (or set for the scene)
This mode requires a little bit of playing around to get the trail length correct. Make sure the camera is static.
Light Painting
Resolution: 5.3K 8:7
Lens: Wide
Trail Length: Long or Max
Shutter: 0.5s
ISO Min/Max: 400 (or set for the scene)
This mode is fun to try at a late sunset to get a little bit of surrounding scene in your light painting. Make sure the camera is static.
Night Lapse (Stars & Milky Way)
For the darkest skies, use the following settings.
Mode: Night Lapse Video
Resolution: 5.3K 8:7
Lens: Wide
Shutter: 30s
Interval: AUTO
ISO Max: 800
For full moon or cityscapes lower ISO to 100, 200, or 400 based on the available light – or utilize AUTO shutter as mentioned below.
Night Lapse (Cityscapes, Traffic, Sunrise & Sunset, Holy Grail)
For a Holy Grail timelapse (Night to Day) or anything brighter than a full starry night sky use the following settings.
Mode: Night Lapse Video
Resolution: 5K 8:7
Lens: Wide
Shutter: AUTO
Interval: 10s or 15s or AUTO
ISO Max: 100
Use ISO 200, 400, or 800 to get more light in the scene. If the exposures are short, use AUTO interval to get photos back-to-back quickly.
HERO12 Settings Table
All of the considerations of modes above can be a little confusing so I’ve put together a table below to consolidate the information.
16:9 Modes
| RESOLUTION | FPS | SuperView | HyperView | 10-Bit | HDR | GP-Log |
| 5.3K 5312 x 2988 | 60 | ✅ | ❌ | ✅ | ❌ | ✅ |
| 5.3K 5312 x 2988 | 30 | 24 | ✅ | ✅ | ✅ | ✅ | ✅ |
| 4K 3840 x 2160 | 120 | ✅ | ❌ | ✅ | ❌ | ✅ |
| 4K 3840 x 2160 | 60 | 30 | 24 | ✅ | ✅ | ✅ | ✅ | ✅ |
| 2.7K 2704 x 1520 | 240 | ❌ | ❌ | ❌ | ❌ | ❌ |
| 2.7K 2704 x 1520 | 120/60 | ❌ | ❌ | ❌ | ❌ | ❌ |
| 1080 1920 x 1080 | 240 | ❌ | ❌ | ❌ | ❌ | ❌ |
| 1080 1920 x 1080 | 120 | 60 | 30 | 24 | ✅ | ❌ | ❌ | ✅ | ❌ |
8:7 Modes
| RESOLUTION | FPS | 10-Bit | HDR | GP-Log |
| 5.3K 8:7 5312 x 4648 | 30 | 24 | ✅ | ❌ | ✅ |
| 4K 8:7 3840 x 3360 | 60 | ✅ | ❌ | ✅ |
| 4K 8:7 3840 x 3360 | 30 | 24 | ✅ | ✅ | ✅ |
4:3 Modes
| RESOLUTION | FPS | 10-Bit | HDR | GP-Log |
| 2.7K 4:3 2704 x 2028 | 120 | 60 | ❌ | ❌ | ❌ |
9:16 Modes
| RESOLUTION | FPS | 10-Bit | HDR | GP-Log |
| 4K 9:16 2160 x 3840 | 30 | 24 | 60 | ❌ | ❌ | ❌ |
| 1080 9:16 1080 x 1920 | 30 | 24 | 60 | ❌ | ❌ | ❌ |
Max Lens Mod 2.0
| RESOLUTION | FPS | Max HyperView | 10-Bit | HDR | GP-Log |
| 4K 16:9 3840 x 2160 | 60 | 30 | 24 | ✅ | ✅ | ❌ | ❌ |
| 4K 4:3 4000 x 3000 | 60 | 30 | 24 | N/A | ✅ | ❌ | ❌ |
| 4K 9:16 2160 x 3840 | 60 | 30 | 24 | N/A | ❌ | ❌ | ❌ |
| 1080 16:9 1920 x 1080 | 120 | 60 | 30 | 24 | ❌ | ❌ | ❌ | ❌ |
| 1080 9:16 1080 x 1920 | 60 | 30 | 24 | N/A | ❌ | ❌ | ❌ |
If you have any questions don’t hesitate to shoot them below! Cheers!

