The GoPro HERO12 is the newest camera from GoPro and packs a number of new and unique features. Combine HERO12 with the new Max Lens Mod 2.0 to create the ultimate POV setup. Beyond that we’ve got HDR, GP-Log, new 9:16 vertical modes, and more. I’ll explain some of the core things to understand about the HERO12 and how they come into play if you’re looking to shoot the best possible video of your adventures.
If you’re up to speed on all things HERO12 and what’s under the hood, head over to my HERO12 Video Settings Guide, which gives you a complete list of all settings for all scenarios!
8×7 Aspect Ratio
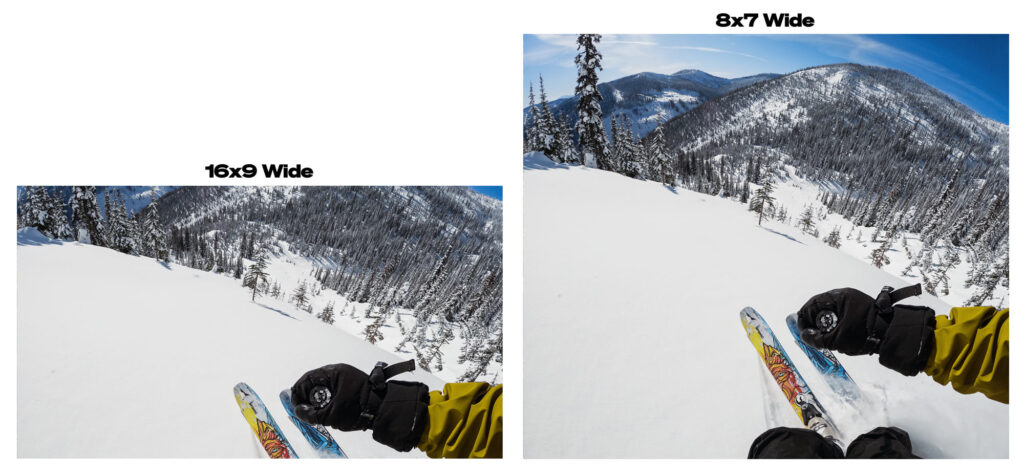
At the core of the HERO12 experience lies a unique 8×7 aspect sensor shape – the same sensor that was introduced with HERO11. This sensor aspect ratio enables GoPro’s 8×7 resolutions and provides more view above and below a normal 16:9 or 4:3 frame. It provides better stabilization for modes that are smaller than 8×7 (because they have more “margin” to work with), and it also provides the view necessary to create GoPro’s unique HyperView Lens.
HyperView
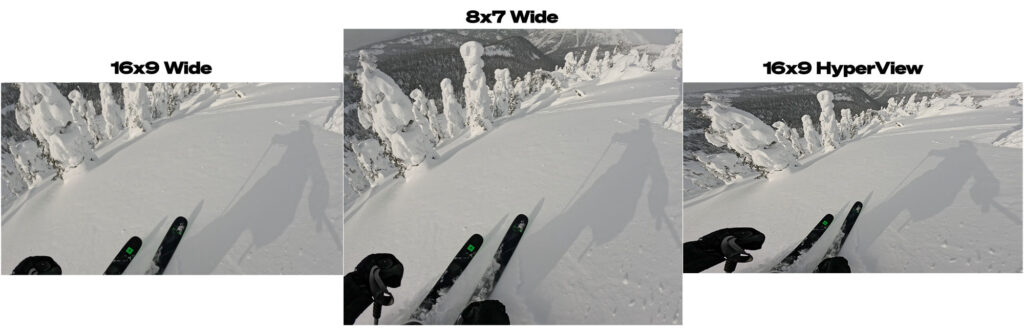
The 8:7 sensor captures more of the scene which is helpful, but if you’re editing in a 16:9 timeline for YouTube, you’d have to crop 8:7 and lose all the view you just captured. This is where HyperView lens comes in handy. HyperView lens takes the full view captured in 8:7 and creatively squishes it into a 16:9 frame. This is very similar to SuperView, which takes a 4:3 view and squishes it down into a 16:9 frame. The top and bottom are scaled to fit the frame, which creates a shorter/fatter distorted image. Next, the center is pinched so that things in the center look normal, and the edges are extra skewed. For this reason I only recommend using HyperView for POV during activities where the view is mostly down the center – MTB, skiing, kayak, etc. The benefits of HyperView are that it gives much more view of the scene top to bottom – which means more visibility of your skis + the horizon at the same time – which is good for POV. It also enhances the sense of speed for POV based activities. The distortion profile makes it so trees seem to whiz by faster, and MTB trails look steeper! Fun fact, I worked with our engineers to define the distortion profile in HyperView, so if you hate it, you can blame me!
Because of the distortion profile, I do not recommend using HyperView while the camera is in the portrait orientation for vertical capture. You won’t be getting any additional view top-to-bottom, only more view left-to-right, which doesn’t do much for vertical content!
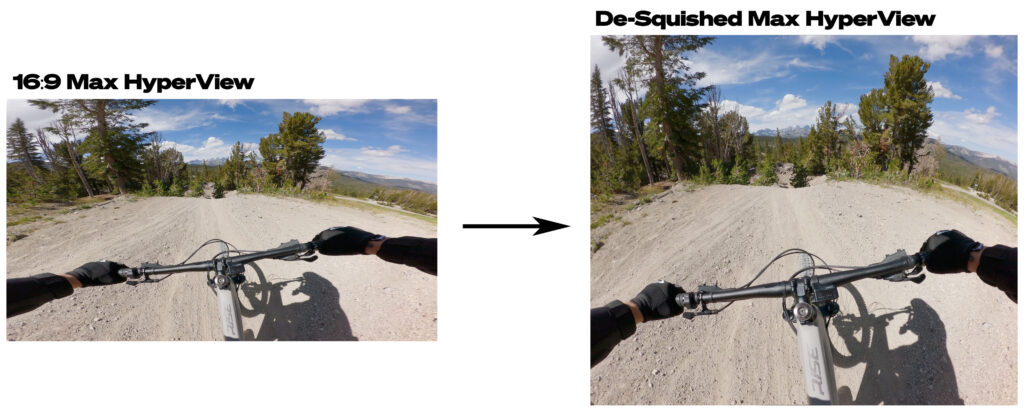
Create SuperView/HyperView in Post from 8:7 OR Reverse HyperView/SuperView in Post
The GoPro Quik App and FX Reframe plugin in Premiere both have lens tools that are able to create SuperView or HyperView from 4:3 and 8:7 sources. It also has a control to “undo” HyperView or SuperView back into an 8:7 or 4:3 if you don’t like the distortion profile.
Some New HERO12 Stuff to Consider
Max Lens Mod 2.0
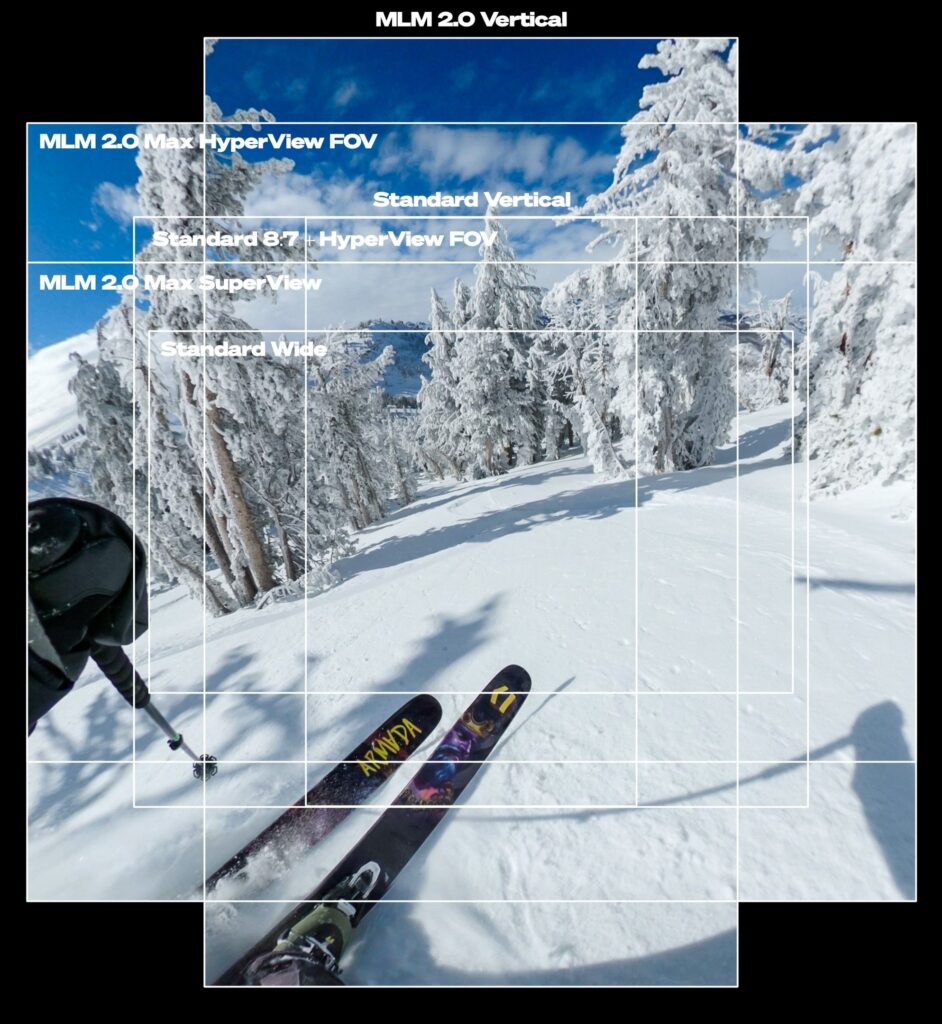
My favorite new aspect of HERO12 is the addition of Max Lens Mod 2.0. Compared against the original Max Lens Mod, the second generation takes advantage of the full 8:7 sensor, with redesigned wider optics (in a slimmer body too!). It has higher resolutions overall compared against the original Max Lens Mod with 4K-60 across all modes. Next, the FOV has been drastically widened within each mode, so the view is truly immersive. It also offers a 4K-60 9:16 mode while the camera is mounted horizontally that gives the best vertical video experience from a resolution and FOV stand-point. It’s equivalent to mounting the camera vertically. Lastly, better stabilization and the availability of full 360 degree horizon lock is present in all lenses and modes with Max Lens Mod 2.0.
There’s also a digital lens worth calling out called Max HyperView available in 4K 16:9. This takes the equivalent of an 8×7 frame with Max Lens Mod and dynamically squishes it down into a 16:9 frame. The resulting view is a super immersive, ultra-wide view. The distortion can be a lot at times, so I recommend using this strictly for POV like skiing, MTB, moto, surfing – anything where the activity is taking place straight down the center of the frame. If you need to “un-squish” the image back to an undistorted 8:7, you can use the lens tool in the GoPro Quik App or FX Reframe in Premiere.
Max Lens Mod 2.0 By the Numbers
- 16:9 Wide vs Max Superview – 123° vs 167° = 36% Wider
- 16:9 MLM 1.0 vs MLM 2.0 – 143° vs 167° = 16.8% Wider
- 16:9 HyperView vs Max HyperView – 141° vs 177° = 26% Wider
- 9:16 Wide vs. Max SuperView Vertical – 113° vs 167° = 48% Wider
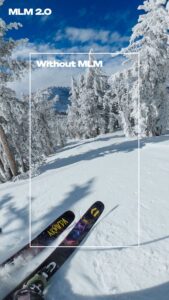
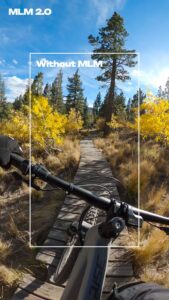
I’ve put together a comparison image to illustrate the differences you can expect to see in view between the standard HERO12 and HERO12 with Max Lens Mod 2.0
HDR and GP-Log
Two new video modes are available in HERO12: HDR and GP-Log. 10-bit must be enabled in the video settings menu before these modes are exposed in the RES/FPS menu. Read below to know when to utilize HDR and GP-Log.
HDR

HDR in the HERO12 at its core is created by capturing two simultaneous frames with two separate exposures at the same time. For this reason, HDR is limited to specific resolutions and frame-rates. HDR essentially requires double the processing; a good rule to know what’s available is as follows: If the camera has 5.3K-60 available, it will have HDR 5.3K-30 available (half the frame-rate). Similarly, with 4K-120 present in the camera, we know that we have 4K-60 HDR available. HDR is not available in HLG/ Rec2100, but it does provide a real benefit in terms of dynamic range, without requiring the need for special processing in post.
When to use HDR
I utilize HDR in specific use-cases where I have a very specific need to expose both highlights and shadows simultaneously. An example may be inside of a car, being able to see outside the windows without blown out highlights. One thing to note is HDR locks you out of the ISO settings because it requires very short shutter speeds to work properly; therefore, do not mix HDR with ND filters – you will introduce unwanted noise/grain. For this reason, I also limit my HDR usage to specific needs, because I like to control my ISO values.
GP-Log
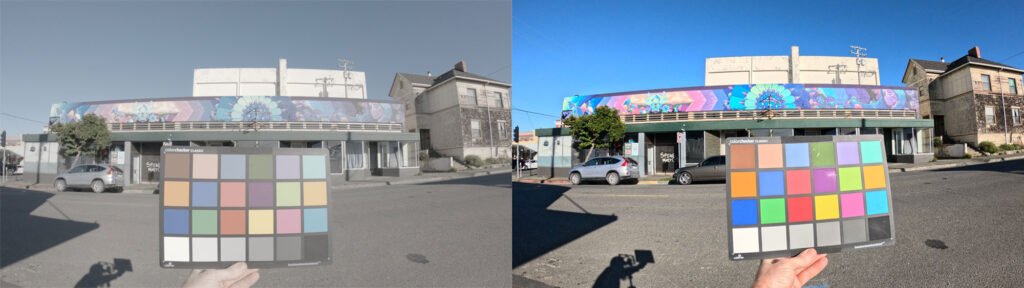
GP-Log is a new color profile that provides a very flat and desaturated image for grading in post. GoPro created GP-Log for those seeking for more control over their final image. As of writing this article (Dec 13), the latest GP-Log iteration due out this week enables a wide color gamut, as well as a flatter overall profile. When GP-Log was launched in September, it was locked to an EV bias of -2 and had a stronger color saturation and gamma curve. We’ve made multiple iterations based on feedback received, and are confident this latest version will be well received. GoPro offers corrective LUTs to bring your GP-Log footage into Rec. 709. These official LUTs should be used when correcting GP-Log. They can be found via link on the root of your SD card once you shoot in GP-Log.
When to Shoot in GP-Log
If you’re a professional colorist, need to match GoPro footage to other sources, or require the most control over your final image GP-Log is the way to go. Shooting in GP-Log will not give you drastically more dynamic range in the image; however, it will provide the ability to have more control over the color, contrast, and overall clarity. If you’re not fully confident in your ability to grade in post, I strongly suggest using Natural color profile, as that looks very good with little to no work in post.
9:16 Vertical
HERO12 now offers a 9:16 vertical mode in the camera to make sharing to social easier without requiring the camera to be mounted vertically. The 9:16 mode is simply a vertical 9:16 crop out of the center of the 8:7 frame. This means you will get the same view if you shoot in 8:7 and crop to 9:16. You will still see a small FOV benefit by turning the camera vertically for the best vertical field-of-view. This is not the case for Max Lens Mod 2.0, which enables a true full-wide FOV experience in 9:16 mode while the camera is mounted horizontal.
Media Mod Audio Improvements
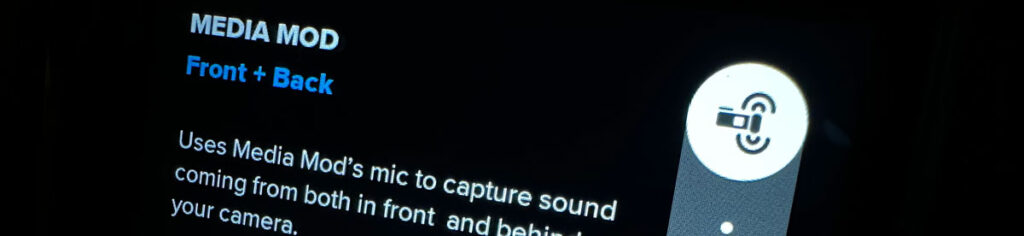
One benefit of HERO12 is a big change to the media mod mic tuning. First off, the overall EQ of the on-board mic has been reworked to sound less “tinny” and more full and bright. It’s actually a decent mic, the tuning was always just a bit off in my opinion. Next, you can now enable both Front + Back microphones simultaneously. This setting can be found in the Protune menu when Media Mod is connected. I personally use the media mod with the foam wind-screen to get the best audio when shooting POV. It is able to cut out all wind-noise and provide crystal clear audio.
5.3K 8:7 for All Lapse Modes
HERO12 offers the ultra-versatile 8:7 aspect ratio in all lapse modes: TimeWarp, Time-Lapse, Night-Lapse, and all Light-Painting modes. The extra resolution and view is always a bonus especially in lapses.
Improved Stabilization with HERO12 in AutoBoost
AutoBoost is a mode in HyperSmooth that dynamically crops into the image based on the level of stabilization needed at any given time. AutoBoost will start out as wide as possible (the same FOV as when AutoBoost is OFF), and only crops in when it needs to. If you know you’re going to want better stabilization, feel free to use AutoBoost, I find it works great.
There are actually pretty massive improvements in stabilization when using AutoBoost in HERO12 over HERO11. It is able to analyze more of the video before applying stabilization, which helps reduce any bumps or kinks in the video.
Custom Naming of Presets
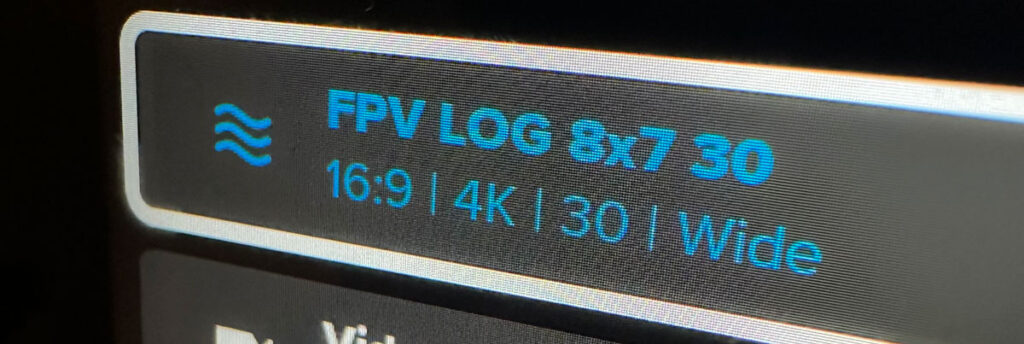
As of Dec 14, 2023, you can now rename the presets on your HERO12 in all modes using the Quik App, or with QR Codes and Labs FW. This is extremely handy and breathes new life into the context and clarity of creating and utilizing presets on your HERO12. Rather than naming things “Air” you could now name something “FPV LOG 8×7 30”.

Between Max Lens Mod 2.0, HDR, GP-Log color profile, Media Mod audio improvements, and more, HERO12 is a powerful POV machine, and creative powerhouse. Now you’re ready to shoot so head over to my HERO12 Video Settings Guide, which gives you a complete list of all settings for all scenarios!