HERO11 Black AND HERO11 Black Mini owners look no further! I’ll dive into how I approach settings on my GoPro to get the best quality for any activity! HERO11 and HERO11 Mini both share the same internals, so video settings and modes are all identical between the two. What I mention below will pertain to both cameras!
First I’ll run through what’s new, and why it’s important for the decision making later-on down in the settings guide!
New Taller Sensor
The biggest additions in HERO11 are due to its new taller sensor. With that comes with a host of new benefits like a new taller aspect ratio for video & photo, more view when recording, and improved stabilization.
8×7 Aspect Ratio

There’s a new aspect ratio for video and photo called 8:7, which is based off of the new taller sensor. I’m very careful to call the sensor taller, as opposed to larger because it’s the same pixel density as previous generations but with more view of the scene being captured above and below what the previous generation sensor was capturing. This new aspect ratio is closer to a square which makes it a perfect and flexible mode for cropping to both 16×9 for YouTube, and 9×16 for Instagram, TikTok, etc. Because of this fact, I almost exclusively film in 8:7 modes which gives me the most flexibility in post. Sometimes it’s hard to wrap your brain around capturing more of the scene and cropping down, but because the new sensor captures more area than before, you’re not losing quality or view by capturing more and cropping down compared with shooting a smaller aspect ratio from previous cameras.
HyperView Lens
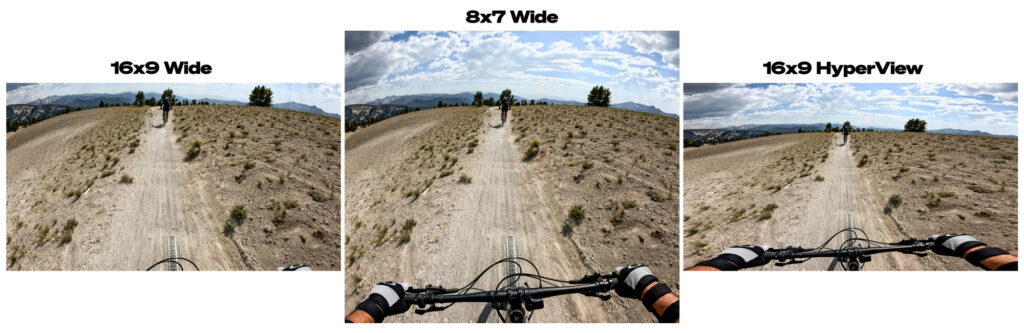
I only recommend HyperView for POV where the view is mostly down the center
I do not recommend HyperView while the camera is in the portrait orientation for vertical capture.
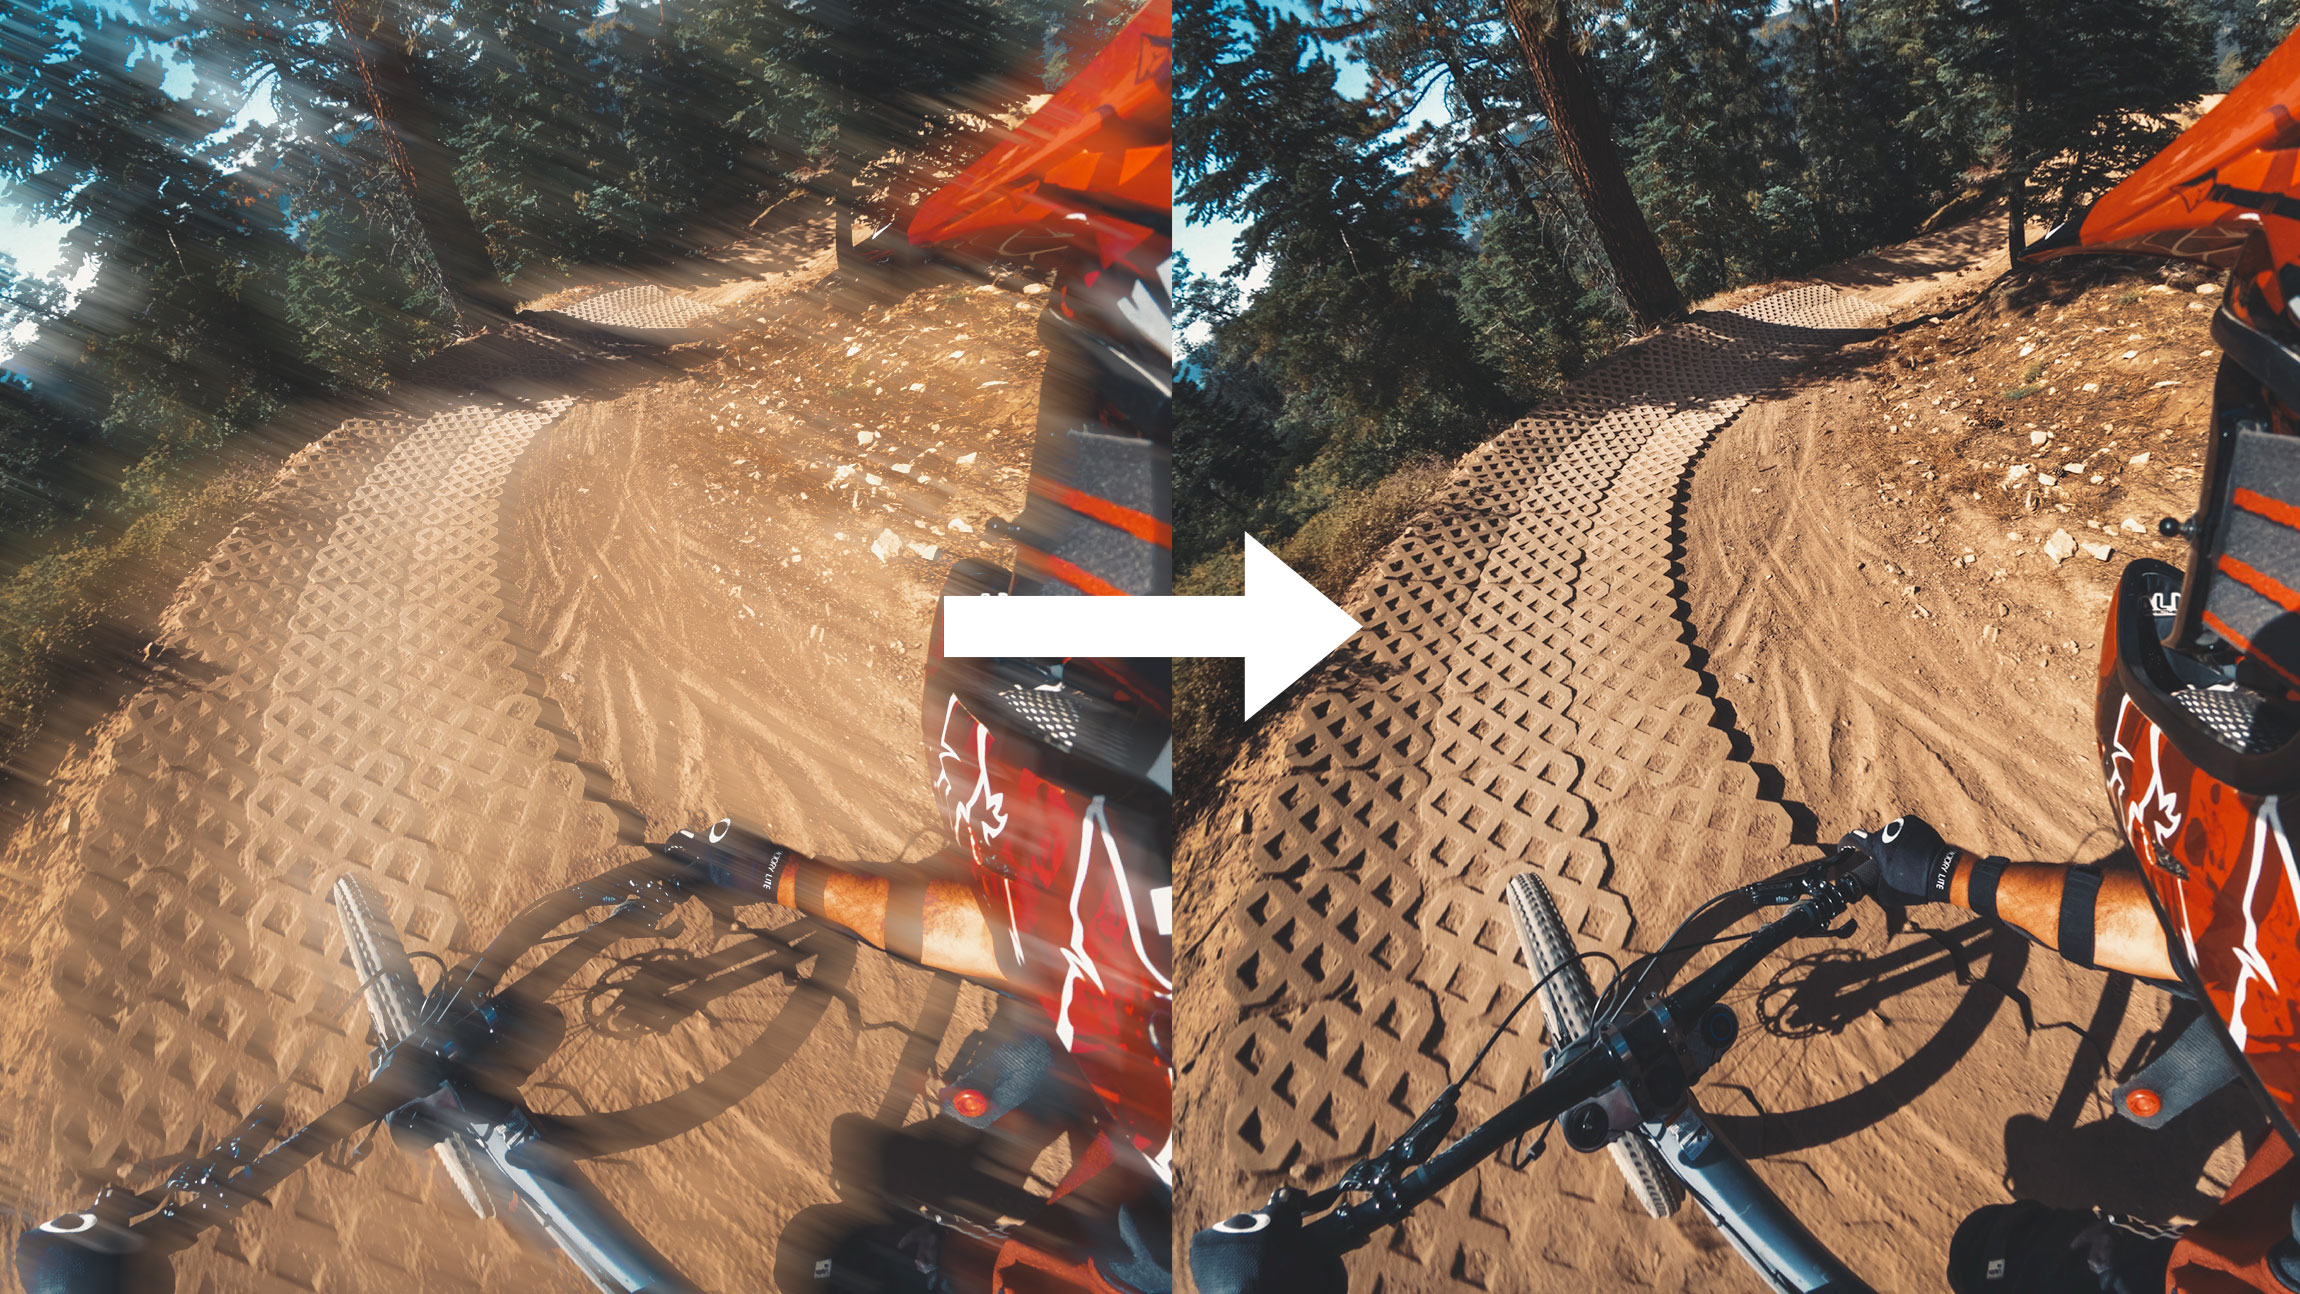
The new taller sensor captures more of the scene which is helpful, but if you’re editing in a 16:9 timeline for YouTube, you’d have to crop 8:7 and lose all the view you just captured. This is where HyperView lens comes in handy. HyperView lens takes the full view captured in 8:7, and creatively squishes it into a 16:9 frame. This is very similar to SuperView, which took the full 4:3 view and squished it down into a 16:9 frame. The top is pulled down and the bottom is pulled up which creates a very distorted image. Next, the center is pinched so that things in the center look normal, and the edges are extra skewed. For this reason I only recommend using HyperView for POV during activities where the view is mostly down the center – MTB, skiing, kayak, etc. The benefits of HyperView are that it gives much more view of the scene top to bottom – which means more visibility of your skis + the horizon at the same time – which is good for POV. It also enhances the sense of speed for POV based activities. The distortion profile makes it so trees seem to whiz by faster, and MTB trails look steeper! Fun fact, I worked with our engineers to define the distortion profile in HyperView, so if you hate it, you can blame me!
Because of the distortion profile, I do not recommend using HyperView while the camera is in the portrait orientation for vertical capture. You won’t be getting any additional view top-to-bottom, only more view left-to-right, which doesn’t do much for vertical content!
Create SuperView/HyperView in Post from 8:7/4:3 OR Reverse HyperView/SuperView in Post
I will go more in depth with this with a tutorial, but FX Reframe plugin has added an incredible new control which makes it possible to create SuperView or HyperView from 4:3 and 8:7 sources. It also has a control to “undo” HyperView or SuperView back into an 8:7 or 4:3 if you don’t like the distortion profile.
Improved Stabilization
The last benefit of the taller sensor is improved stabilization throughout the camera in a few different forms.
Better Stabilization in 4:3 Modes & SuperView
4:3 modes are now able to take advantage of the extra wiggle room in the taller sensor, so you’ll see HyperSmooth “High” level stabilization across the board. The same goes for SuperView modes in 16:9, being that they use the same capture area as 4:3 modes. If you had HERO8 – HERO10 you’ll notice HyperSmooth High is gone. It’s been merged into the base level HyperSmooth for modes where it’s available which is all 16:9 modes 60FPS and under, as well as now all 4:3 modes 60FPS and under (plus 1080-120).
Horizon Lock
Horizon Lock is now available without Max Lens Mod because there’s more room in the full 8:7 sensor to spin 360 degrees within the capture window. This is available in the form of the Linear + Horizon Lock lens. The benefit of Max Lens Mod is that you get full horizon lock in the Max Superview and Wide lenses. Linear + Horizon Lock is cropped in on the view and may not be ideal for POV based shots where wide view is most important. Linear + Horizon Lock will switch to Linear + Horizon Level in modes where the camera can’t handle the full 360 lock. It’s a little tough to decipher where that appears so I’ve listed it in a table below. Also along those lines, there’s a few modes where switching from Linear to Linear + Horizon Level crops in even further on the image, which is also listed in the table below.
AutoBoost
AutoBoost is a new mode in HyperSmooth that dynamically crops into the image based on the level of stabilization needed at any given time. This is closer to how ReelSteady works, and is much better for GoPro style video. If you switch into Boost you are cropping in on the image a significant amount in exchange for better stabilization. AutoBoost will start out as wide as normal HyperSmooth and only crop in when it needs to! If you know you’re going to want better stabilization, feel free to use AutoBoost, I find it works great.
Higher Resolutions
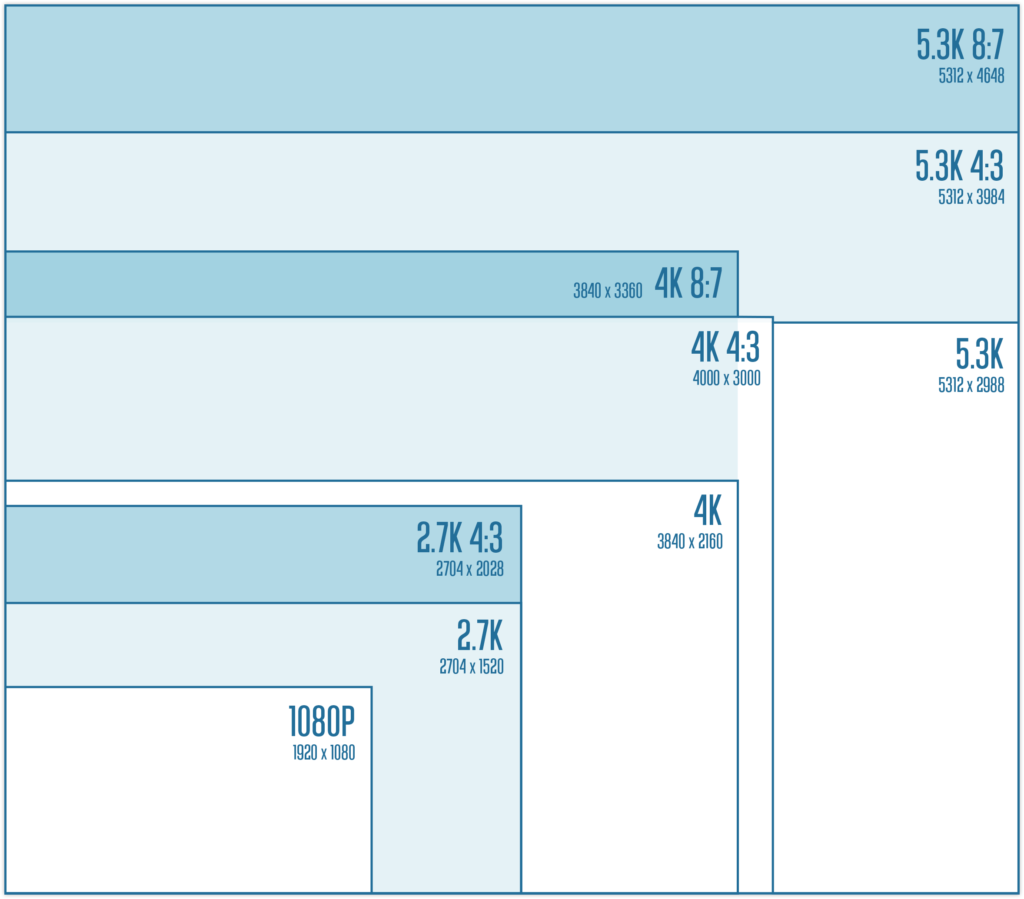
Last but not least in HERO11 are some awesome bumps in resolution on some of my favorite modes. Previously once you moved from 5.3K 16:9 to 5K 4:3, you went down in width. Now all 5K aspect ratios share the same full 5.3K width. All time-lapse, time-warp, and night effects now can go up to 5.3K 4:3, which is a huge leap from 4K 4:3 in HERO10. Last thing to note is 4K 8:7 shares the same 3840px width as 4K, compared to 4K 4:3 having a width of 4000px.

HERO11 Protune Setup
The way I approach settings is generally dialing in the Protune settings first (under the hood stuff) – which typically don’t change a whole lot – and then adjusting resolution, frame-rate, lens, and HyperSmooth on a shot-by-shot basis. Below is what I set all of my cameras at to start.
Bit Rate: High (now at 120MBIT in HERO11)
10-Bit: On
Shutter: Auto
EV Comp: -0.5
White Balance: Auto (or Specific Temp based on Scene)
ISO Min: 100
ISO Max: 1600
Sharpness: Low
Color: Natural
A note about Flat Color vs Natural Color
LTM/GTM not Present in Flat Color
Flat color profile doesn’t have any of GoPro’s LTM or GTM applied. LTM being Local Tone Mapping, which is a process that enhances the contrast between objects across the whole image (think clarity filter in Lightroom). GTM is Global Tone Mapping, which is a means of boosting shadows and bringing down highlights. The picture in Natural Color has been redesigned from the ground up and actually starts with a very underexposed image so that it can do a very good job retaining highlights once GTM is applied under the hood. If you compare Natural against Flat, you likely won’t be able to get the same amount of highlight saving even after rigorous color correction. This brings me to my second note:
Dynamic Range With Flat Color Profile
After extensive testing, I haven’t been able to reproduce quite the same amount of dynamic range when shooting Flat Color as I’m able to get with Natural Color. This is due to the GTM process in the image pipeline that happens under the hood as a sort of faux HDR process. This isn’t to say you can’t shoot in Flat Profile, but a watch-out if you want to get the most range out of the box. It’s also a testament to the advanced algorithms found in HERO11.
Custom Log Curves with Labs
For those interested in digging a little deeper, HERO11 and Mini offer the ability to load custom log curves when shooting Flat Color using GoPro Labs. Flat Color is in-fact a type of log curve, but if you wish to match log curves from other camera sources, you can load those onto the camera. Something to note is that loading a flatter log profile won’t get you more dynamic range out of the camera, it will just change around how the shadows and highlights are displayed. Good news is that 10-Bit color helps quite a bit when shooting in Flat color since the gradations in colors are so similar.
HERO11 Settings Guide
If you’re looking for the best quality from your GoPro, it’s best to change the settings based on what your intended use-case is for the specific shot. Things you should ask yourself: Do I need slow motion? Do I want more view? Do I need the best stabilization? All of these go into how I approach filming where I’m always optimizing the modes and settings. In the HERO11 you can set up a preset for each of the following to make it easy on yourself, or just learn what I chat through here and you can change your settings each time you go out.
Where I suggest 30FPS, you can extend that to 24FPS or 25FPS!

Flexibility in Post
For the modes with the most flexibility in post and the widest field of view use the following. Adjust depending on slow-motion need.
Aspect Ratio: 8:7
Resolution: 5.3K 8:7-30 | 4K 8:7-60
Lens: WIDE
HyperSmooth: On
These are my go-to settings for capturing most things POV as well as B-Roll. If you need slow motion and don’t need the widest or tallest field of view, there are other modes below that will have slightly higher quality over 4K-8:7.
Travel / VLOG / Documentary
If you don’t need slow motion, these are the best for detail, stabilization, and lens compatibility.
Aspect Ratio: 16:9 or 4:3
Resolution: 5.3K 4:3-30 | 5.3K-30
Lens: WIDE, LINEAR, LINEAR + Horizon Lock
HyperSmooth: On
Both of these aspect ratios take advantage of better stabilization over 8:7. Also either of these modes will have the full suite of Wide, Linear, and Linear + Horizon Lock available. Note that 10-bit color is not available in 4:3. Auto Boost shouldn’t be necessary with the increased stabilization.
POV
For the widest field of view, use these modes. Adjust depending on your need for slow-motion.
Aspect Ratio: 8:7 or 4:3 or 16:9
Resolution: 5.3K 8:7-30 | 4K 8:7-60 | 5.3K-60 SuperView | 4K-120 SuperView | 2.7K 4:3-120 | 2.7K 4:3-60 + Max Lens Mod
Lens: MAX SUPERVIEW or SUPERVIEW or WIDE
HyperSmooth: On or Auto Boost
If you’re shooting POV footage, or video that’s mounted where you want more view, shooting in 8:7 modes offer the most amount of view vertically. 5K 8:7 and 4K 8:7 will appear to have a pretty significant jump in quality compared to 2.7K 4:3 at 120FPS, so I typically prioritize shooting 4K 8:7 if I want slow motion, and use 2.7K 4:3 a little more sparingly. If you know you’re going to 16:9 as an end result you have some interesting choices at your disposal. First off, you can replace the 8:7 suggestions with HyperView. Next, HERO11 has 5.3K-60 SuperView and 4K-120 SuperView which are two modes that don’t have an equivalent 4:3 partner, so these can be great options that add additional resolution and quality. Lastly, if you have Max Lens Mod, this still will offer a wider view and better stabilization than 8:7 modes; however it is at the expense of some resolution and detail. If you’re just after a better POV experience, Max Lens Mod still wins here.
Cinematic
For the highest quality with 2x slow-motion use these modes; specifically for a 16:9 timeline.
Aspect Ratio: 16:9
Resolution: 5.3K-60 | 5.3K-60 SuperView
Lens: SUPERVIEW or WIDE or LINEAR
HyperSmooth: On or Auto Boost
These modes will give the best detail and quality at 2x slow-motion. If you want better stabilization, you can shoot in Linear; however L+HL will crop in more on this mode, so I recommend staying at Wide or Linear. If you’re looking for POV content, utilize 5.3K-60 SuperView.
Slow Motion
For 4X slow-motion and above use these modes.
Aspect Ratio: 16:9 or 4:3
Resolution: 4K-120 | 4K-120 SuperView | 2.7K-240 | 2.7K 4:3-120
Lens: SUPERVIEW or WIDE or LINEAR
HyperSmooth: On
Prioritize using 4K-120 over the other two options, as both 2.7K-240 and 2.7K 4:3-120 will see a drop in quality. New in the HERO11 is 4K-120 SuperView which is a great option if you’re editing in a 16:9 timeline. If you want better stabilization, you can shoot in Linear; however L+HL will crop in on these modes, so I recommend staying at Wide or Linear. Something to note is that battery will suffer pretty significantly at these modes so have extra batteries on-hand! The HERO11 changes the battery display percentage based on the mode that you’re using, so you’ll see your battery level drop as soon as you change to these modes. If you need more view vertically for POV, utilize 2.7K 4:3-120.
Best Stabilization
For the best stabilization with the widest view, use these modes. Linear & Linear + HL will have best stabilization overall, but wide in these modes is still very good and almost Boost level.
Aspect Ratio: 16:9 or 4:3
Resolution: 5.3K 4:3-30 | 4K 4:3-60 | 2.7K-120
Lens: WIDE or LINEAR or LINEAR + HL
HyperSmooth: On or Auto Boost
If you’re after the best possible stabilization while keeping the widest field-of-view, these options will be your best bet. I will utilize these options if I know stabilization is my #1 priority, even if I’m shooting POV. Chest-mounted mountain biking is a good example where 5.3K 4:3-30 Wide has better stabilization than 5.3K 8:7-30 due to having more room to move around on the taller sensor. If you’re editing in a 16:9 timeline, you can sub out the 4:3 modes for SuperView equivalents in 16:9.
Lowlight
If you’re looking to film indoors or at night, these modes will offer the best noise reduction and detail.
Aspect Ratio: 16:9 or 4:3
Resolution: 4K 4:3-30 | 4K-30 | 1080-60
Lens: WIDE
HyperSmooth: On
These are the modes in the HERO11 that utilize a process of 3DNR noise reduction algorithms. You’ll see better detail and noise-handling in 4K-30 over using another similar mode such as 5.3K-30. If you need slow-motion, 1080-60 is the only mode that currently supports this 3DNR. Additional related mode that supports 3DNR is 4K-30 Superview.
FPV Drone (with Reelsteady GO)
For the best quality with FPV drone, use these modes in conjunction Reelsteady GO.
Aspect Ratio: 8:7
Resolution: 5.3K 8:7-30 | 4K 8:7-60
Lens: WIDE
HyperSmooth: OFF
ISO Max: 100
I prefer to shoot FPV content with 8:7 for the best flexibility in post. Note that as of HERO11 release, you can now choose your output aspect ratio in Reelsteady, which takes advantage of the larger aspect ratio. I like to change my Max ISO to 100 for drone-use to get smooth motion blur. Also if you intend to use ND filters, make sure you keep your ISO at 100, otherwise you’re introducing unnecessary noise into your image. Lastly, for use with Reelsteady GO, you should have HyperSmooth turned OFF.
TimeWarp
For the best stabilization use higher speeds & Linear or Linear + HL
Resolution: 5.3K 4:3
Lens: LINEAR
Speed: 30x for 10min+, 15x for 5-10min durations, 5x or 10x for 1-5min durations OR AUTO.
ISO Max: 100
I keep ISO Max at 100 to have decent motion blur on my TimeWarps. I always shoot Linear to offer better stabilization, and typically always shoot 10X or above.
Star Trails
Resolution: 5.3K 4:3
Lens: Wide
Trail Length: Long
Shutter: 30s
ISO Min/Max: 800
These settings should get you a pretty great star trails video lapse!
Vehicle Light Trails
Resolution: 5.3K 4:3
Lens: Wide
Trail Length: Long or Short
Shutter: 0.5s or 1s
ISO Min/Max: 100 (or set for the scene)
This mode requires a little bit of playing around to get the trail length correct. Make sure the camera is static.
Light Painting
Resolution: 5.3K 4:3
Lens: Wide
Trail Length: Long or Max
Shutter: 0.5s
ISO Min/Max: 400 (or set for the scene)
This mode is fun to try at a late sunset to get a little bit of surrounding scene in your light painting. Make sure the camera is static.
Night Lapse (Stars & Milky Way)
For the darkest skies, use the following settings.
Mode: Night Lapse Video
Resolution: 5.3K 4:3
Lens: Wide
Shutter: 30s
Interval: AUTO
ISO Max: 800
For full moon or cityscapes lower ISO to 100, 200, or 400 based on the available light – or utilize AUTO shutter as mentioned below.
Night Lapse (Cityscapes, Traffic, Sunrise & Sunset, Holy Grail)
For a Holy Grail timelapse (Night to Day) or anything brighter than a full starry night sky use the following settings.
Mode: Night Lapse Video
Resolution: 4K 4:3
Lens: Wide
Shutter: AUTO
Interval: 10s or 15s or AUTO
ISO Max: 100
Use ISO 200, 400, or 800 to get more light in the scene. If the exposures are short, use AUTO interval to get photos back-to-back quickly.
HERO11 Settings Table
All of the considerations of modes above can be a little confusing so I’ve put together a table below to consolidate the information.
16:9 Modes
| RESOLUTION | FPS | 10-Bit | Linear & Linear + HL Same Crop | Horizon Lock |
| 5.3K 5312 x 2988 | 60 | ✅ | ❌ | ❌ |
| 5.3K 5312 x 2988 | 30 | 24 | ✅ | ✅ | ✅ |
| 4K 3840 x 2160 | 120 | ❌ | ❌ | ❌ |
| 4K 3840 x 2160 | 60 | 30 | 24 | ✅ | ✅ | ✅ |
| 2.7K 2704 x 1520 | 240 | ❌ | ❌ | ❌ |
| 2.7K 2704 x 1520 | 120/60 | ❌ | ✅ | ✅ |
| 1080 1920 x 1080 | 240 | ❌ | ❌ | ❌ |
| 1080 1920 x 1080 | 120 | 60 | 30 | 24 | ❌ | ✅ | ✅ |
8:7 Modes
| RESOLUTION | FPS | 10-Bit | Linear & Linear + HL Same Crop | Horizon Lock |
| 5.3K 8:7 5312 x 4648 | 30 | 24 | ✅ | N/A | ❌ |
| 4K 8:7 3840 x 3360 | 60 | ✅ | N/A | ❌ |
4:3 Modes
| RESOLUTION | FPS | 10-Bit | Linear & Linear + HL Same Crop | Horizon Lock |
| 5K 4:3 5312 x 3984 | 30 | 24 | ❌ | ✅ | ✅ |
| 4K 4:3 4000 x 3000 | 60 | 30 | 24 | ❌ | ✅ | ✅ |
| 2.7K 4:3 2704 x 2028 | 120 | 60 | ❌ | ✅ | ✅ |
In summary, HERO11 brings more view and a whole new level of flexibility in post with 5K 8:7 and 4K 8:7-60. You have better HyperSmooth in more modes, and better image quality throughout with 10-Bit Color, reworked exposure and image pipeline, and higher bit-rate in video. Don’t forget to stack your HERO11 content in preparation for the GoPro Million Dollar Challenge! If you have any questions don’t hesitate to shoot them below! Cheers!