Looking for a guide for a different GoPro? Check out all of my complete guides here:
Updated May 18, 2020
Ah, the HERO8 Black. First do me a favor and watch the product video or “HERO8 Feature Thrill” as we call it internally. It’ll walk you through the basics in 2 minutes, then I’ll take your next 30 or-so minutes as you read through the nitty gritty!
HERO8 Black is sporting a fresh new body, which is a welcomed change after 3 generations of the previous appearance (HERO5, HERO6, & HERO7). The biggest physical change is we’ve finally gotten rid of the need for a mountable frame/housing. The mounting “fingers” are built directly into the body of the camera (don’t worry, they are replaceable, though I haven’t had a problem with durability yet). Yes, the previous batteries are compatible* still. No, the new lens is not replaceable. There’s a few options for protection in case you’re paranoid of breaking the lens – though most shouldn’t really ever worry about that (more on the lens design below). Along with some cosmetic changes, there’s been a lot of under the hood developments to which I would describe as “more & better”: more resolutions with HyperSmooth (all of them), better HyperSmooth, better TimeWarp, and on top of that a whole new user experience with Presets and shortcuts – something I think you all will like.
If you’re just looking for the TLDR [Too Long, Didn’t Read] here’s the quick and dirty:
Show TLDRHyperSmooth 2.0 – New Options!
If you’re reading my blog, you probably have an understanding of what HyperSmooth is, but I’ll give a quick background. HyperSmooth was introduced with the HERO7 and delivered groundbreaking electronic image stabilization (EIS). Stabilization so good you might say that it broke the stigma about EIS being crappy and not comparable to physical stabilization (OIS or gimbal). HyperSmooth being such a huge success, naturally GoPro has been in the labs tinkering with how to make it better. Introducing HyperSmooth 2.0, which is the official name for the suite of HyperSmooth features in HERO8 Black. Exciting names, we know.
HyperSmooth in All Frame Rates & Resolutions
HERO7 topped out at 60FPS for HyperSmooth compatibility. Beyond that, you still needed a gimbal to capture buttery smooth slow motion shots. Now we have HyperSmooth in 1080-240, 1440-120, 2.7K-120, and even 4K 4:3-30. One thing to note is 4K-60 in the ‘Linear’ lens mode does not yet currently support HyperSmooth; however, it will be coming in a near future firmware update. Full table of modes supported can be found down lower in this post.
HyperSmooth, HyperSmooth High, & HyperSmooth Boost
HyperSmooth now has 3 options when you’re toggling it in the menu – On, High, and Boost. Some of these options are dependent on resolution for availability, so you may not see all of these options all the time.
HyperSmooth Boost
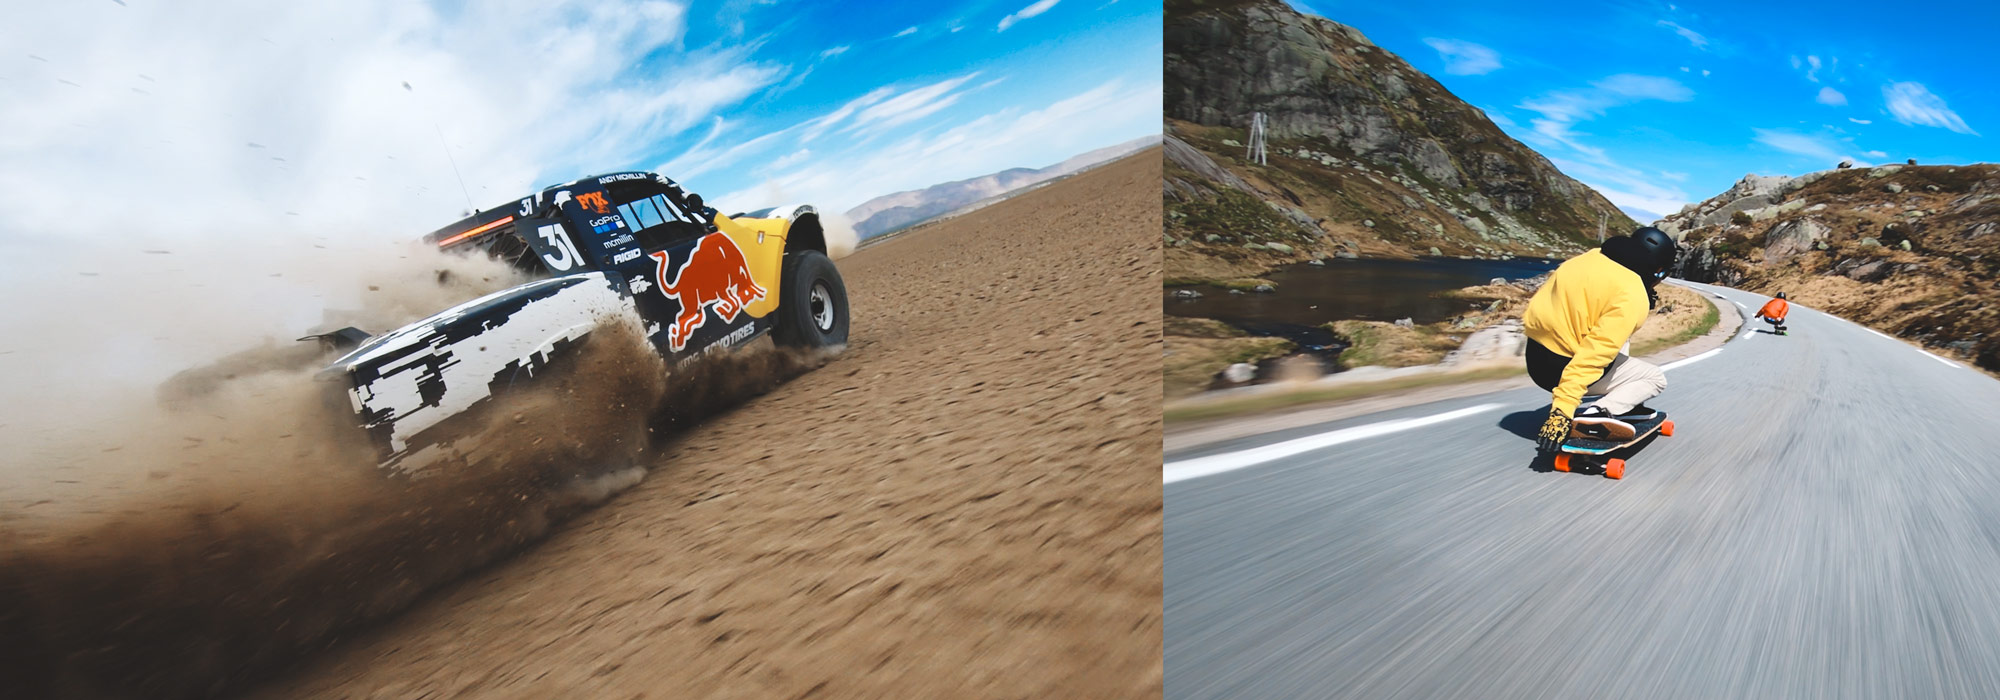
HyperSmooth Boost is a new ultra-high stabilizing mode which crops in on the image more to gain a more stable shot. With EIS, the more you crop in on the sensor, the more ability you have to move the capture around and put out a more stabilized image. When you activate Boost, it’ll take you from ~10% crop in normal HyperSmooth, to around 25%. What happens next feels like straight magic because even with a minor amount of cropping, the image is freakishly stable. Don’t take my word for it, just watch the demo above.
When to use Boost: I’m going to keep my use of Boost for 3rd person shots where I’m following someone else. Follows skiing, skating, and wake-boarding are perfect use-cases to activate Boost. This way you’re not concerned with having the widest field-of-view (FOV), and a little zoom is probably welcome.
HyperSmooth High
HyperSmooth High is one of the more impressive features of this little camera, bringing almost Boost level stabilization without losing any FOV compared with standard HyperSmooth. I should note that it’s not very widely available – find it in 4K-30, 2.7K-60, and 1080-60. If you want to be impressed, film anything in HyperSmooth High, then switch to On/low. The resulting difference is kind of mind-boggling.
When to use High: Because it’s only available in 16:9 modes (Not 4:3, nor SuperView), you’d have to want to prioritize stabilization over having more vertical view. That being said, once you start using High, you may not want to go back. I used to exclusively film in 4:3 modes for anything POV until I saw the results of using High on a chesty on a mountain bike. It was unlike anything I had ever filmed even with a gimbal. Regardless, this mode is great for handheld walking/running shots either selfie style or filming others. Travel, water-sports, POVs are all good use-cases for High.
HyperSmooth On/Low
Base HyperSmooth 2.0 isn’t really called anything – it’s just “On”, so I’ve started calling it “Low” to make it easier to talk about. This is the HyperSmooth that’s available in all modes, and performs very similarly to the HyperSmooth you’re used to in HERO7. GoPro engineers have been busy giving the base algorithm some enhancements (better panning, better reduction in stabilization during low-light, and all around better smoothness), but the amount of motion it allows is around HERO7 HyperSmooth levels. Counterintuitively, in my-humble-opinion, HyperSmooth Low is a great stabilization mode to use for most applications because of how much motion it does allow. Immersive capture and POV warrants a certain level of motion to keep it feeling real. HyperSmooth low captures that by smoothing out any high frequency shakes, but allowing real and natural motion to the larger amplitudinal movements (any physics kids around here? raise your hand in the comments below :)). One thing you won’t see in any of GoPro’s stabilization algorithms are unwanted pops, ticks, and jerks in the motion. This is what GoPro has done really well, and you’ll see competitors don’t handle this quite as well (see video above).
When to use Low: Most POV situations warrant Low. I’ll be using it for any of my 4:3 POV shots (mouth-cam/head-cam). Note that HyperSmooth Low will be more stable if you use the digital zoom. GoPro’s algorithms utilize any extra crop as room to stabilize your video as much as possible (thanks GoPro!).
HyperSmooth Limitations
Stabilization at Night/Lowlight
The way EIS (electronic-image-stabilization) works is by shifting each image around to match the previous frames. When you film at night, video naturally will use longer exposure times to brighten the scene. When you combine long exposure times with a shaky camera, you’ll get blurring from frame to frame. While this doesn’t look out of the norm when the video is not stabilized (because you can tell it’s shaky), it looks quite bad when the video is stabilized. It basically looks like a stable scene, with blur jumping in all different directions. Make sense? Hard to really put it into words! Mechanical stabilization (a gimbal) doesn’t have this same issue because the camera is already smooth while capturing the image in the first place, so it won’t have the same sort of blur jumping around. This becomes more apparent with shakier situations in dimly lit areas such as mountain biking in a dark forest. Technologically, there are two options – add more light to shorten exposure time, or reduce the amount of HyperSmooth lowlight. HERO8 Black recognizes both of these situations and does its best to reduce shutter time as well as reduce overall effects of HyperSmooth if it knows it’s really dark.
How to Help Lowlight HyperSmooth
Normally, I film with ISO Min & Max at 100; however, when using HyperSmooth in lower light situations I’ll bump the ISO to 400 or higher depending on light. With a higher max ISO the camera will use more digital gain to lighten the scene before turning to longer exposures. Keep in mind, the higher you go, the noisier the footage will be. If you really don’t want to leave it to chance, you can even set a Min ISO so it won’t even think about letting exposure time elongate. Experiment with it and see what works, but know that there’s no secret technology that will improve this until either sensors are much better in lowlight or you get optical stabilization. For dark, forest mountain-bike shots, you bikers out there know there’s no replacing a gimbal in that scenario.
Horizon Leveling
Through the GoPro app, you can now turn on ‘Horizon Leveling’ for any video you’ve downloaded from your HERO8 Black. Driving a motorcycle that leans from side to side? The app will steady out the horizon throughout your entire video so it matches the look of a gimbal. It does this by dynamically zooming in and out of the video when it needs to.
Digital Lenses

Left to Right: SuperView, Wide, Linear, Narrow
You might recognize digital lenses as what used to be called FOV. Besides a name change and some marketing love, they’ve been revamped and elevated to be easier and quicker to use. You’d be surprised (or maybe you aren’t) at how many people didn’t know GoPro could spit out a non-fisheye image! The new ‘Digital Lens’ options are SuperView, Wide, Linear, and Narrow <– not to be confused with the old ‘Narrow’ of yesteryear if you were around for the HERO5 days (explained below). GoPro has also given a new lens measurement number to give you an idea of how wide these lenses are, compared to one another, and the world of cameras at large. If a lens has a range (such as wide being 16-34mm) that’s because it has a zoom option associated with it.
SuperView (16mm)
This is still the same classic SuperView you’re used to. Those of you that use it seem to swear by it. SuperView is slightly different than the other lenses in that it actually pulls from the whole sensor (taller view than 16:9 modes), then squishes the video down, and pinches the middle. I explain this whole process and how to do it manually in this blog post. All you need to know is it gives you the most vertical view of the action, while remaining in a 16:9 frame. Use this for POV mostly, otherwise the ‘dynamic stretching’ as we call it, might produce some funky results. HyperSmooth is available in SuperView, but there’s no HyperSmooth High or HyperSmooth Boost (yet).
Wide (16-34mm)
This is the classic GoPro wide-angle, fish-eye look. This hasn’t changed. It comes straight off of the lens of the GoPro with no digital adjustments to it, other than HyperSmooth (if you have stabilization enabled). If you plan on doing professional post work on your GoPro footage such as lens corrections and re-framing, you should use this lens.
Linear (19-39mm)
Choose Linear for a non-fisheye shot that’s still wide angle. It produces a rectilinear image (meaning straight lines) that looks great for architectural scenes, landscapes, and the occasional POV. I say occasional POV because it’s slightly cropped in when comparing against Wide. I found that I loved filming in Linear when using the camera vertically for Instagram Stories. You’ll want to be careful when filming selfies because the subject gets pretty skewed when nearing the edges of the frame. If you can keep yourself in the middle you should be fine. The new iPhone 11 Pro’s wide angle lens is very similar to Linear mode. If I were Apple I probably would have made a lens that was somewhere in-between GoPro’s Wide lens and a full rectilinear lens, but what do I know about POV? When filming with Linear, stabilization will naturally be better because it has a bit more room to reframe due to the crop compared to Wide. Big news for me is Linear is now supported in TimeWarp. Two benefits here are (a) your TimeWarps are even MORE stable with Linear, and (b) Linear just looks better for landscapes and architecture, which most TimeWarps seem to be.
Narrow (27mm)
Narrow is a newly designed lens that is about the same zoom and distortion as your standard iPhone camera (non-wide and non-zoom). It’s got a nice rectilinear look to it, so no fisheye look whatsoever. Keep in mind as you go narrower, details may appear slightly softer and noise more apparent due to the cropping in on both the lens and the sensor. I’d ensure you have a good amount of light present to film with Narrow. When filming in Narrow+HyperSmooth, it’ll default you to Boost because it’s already cropped in to Boost levels.
Presets, Shortcuts, & ProTune
Presets & On-Screen Shortcuts

Presets and shortcuts together are amazing new additions to the HERO8 Black that greatly speed up the process of switching settings. Presets allow you to save up to 10 custom video modes, each with their own ProTune settings to be used later with a quick tap of the idle screen. Presets are present in Photo and Time Lapse modes as well. Once you setup a preset, you can choose up to 4 on-screen shortcut controls that take you directly to specific settings pertaining to the mode you’re in. The hope is that once you setup a preset, and the associated shortcuts, you should never have to jump into a lengthy menu system. This will greatly reduce your fiddle time out in the field and no one likes a fiddler when you’re trying to shred.

For video some of the shortcuts include slow-motion, white balance, and ISO. For photo & TimeWarp there’s also incredible new shortcuts like Output (SuperPhoto vs RAW vs Standard), TimeLapse interval, TimeWarp speed, and more! You can switch presets and access your shortcuts when the camera is in the vertical orientation. In HERO7 if you were in portrait mode, you’d have to get the camera horizontal to access any settings – which is sometimes hard when the camera is mounted! Note that currently the HyperSmooth shortcut is used to toggle Boost on and off, though my hope is that it will be able to toggle all HyperSmooth settings in the near future.
One minor annoyance is that you can’t have custom preset names – you’re forced to choose from a list of canned names and their associated icons. The naming scheme is pretty fine for video, but kind of miserable for photo and time lapse presets. Hopefully this’ll get improved in a future update (Naming + Icon support through the App sounds like a reasonable way to go).
UI Shortcuts
In the event that you need to swap some settings, a shortcut to the menu is a simple press and hold of the settings pill from the home screen. If you’d like to swap the on-screen shortcuts, press and hold any of them on the home screen and it’ll bring up the menu with the whole list. Keep in mind any settings you adjust whether it’s through the full menu or using the on-screen shortcuts will save into that preset for later use. For example, if you change your WB to 5500K using an on-screen shortcut, the next time you turn on your camera, the WB in that preset will still be at 5500K.
Exposure Lock & Spot Meter
When idle or filming press and hold on the back screen – it will bring up the touch to expose controls. Note that these controls take a few seconds longer to pop on-screen vs. HERO7. This is to reduce accidental adjustments for most that don’t use advanced tools! Spot meter comes up first. Tap the middle of the spot to lock the exposure. You can move this around in the scene by tapping in other places before you lock. To get the most professional looking content, I suggest locking exposure in situations when you’re in a consistent source of light (outdoors). It helps by keeping the exposure consistent when the camera is looking at the sky or the ground, which can sometimes fluctuate to accommodate varying brightnesses of the perceived scene. You can also use this exposure lock technique for TimeWarp, photos, and time lapses!
Grid Lines
With the HERO8 you can enable on-screen grid-lines for all modes. Not much to say about this other than it’s awesome for framing for all things but especially TimeWarp!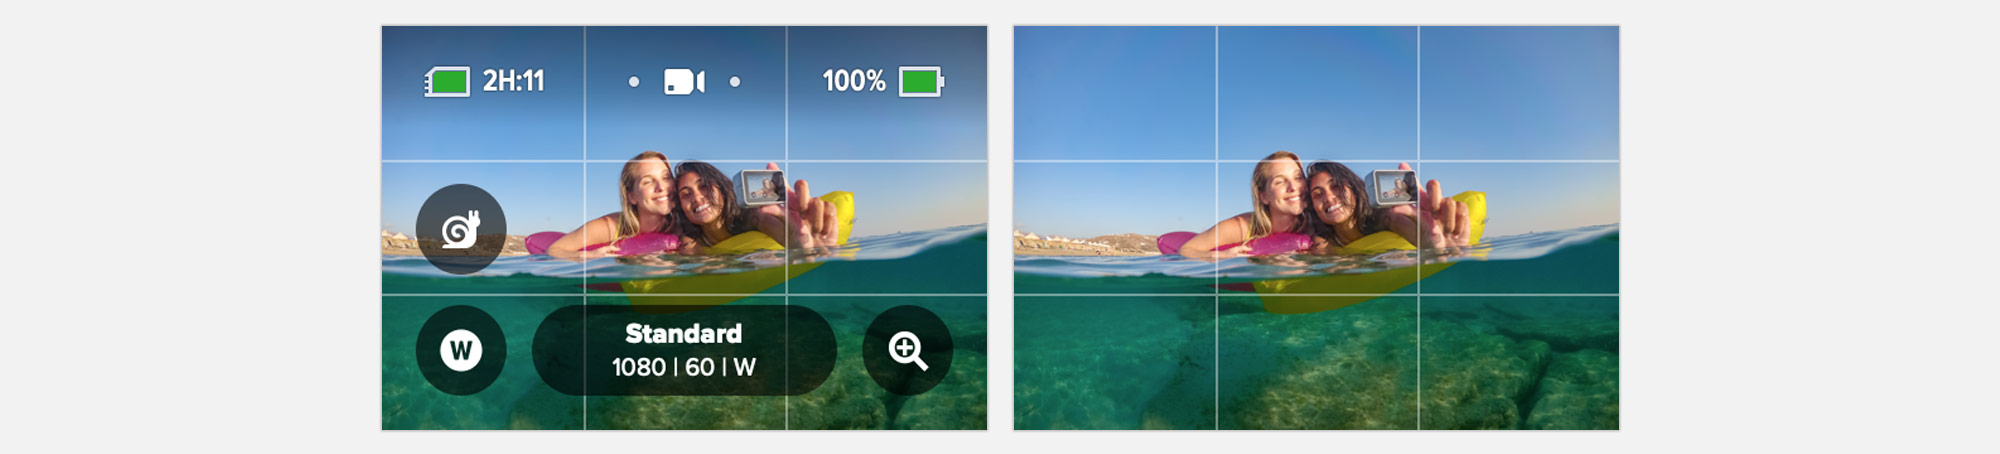
HERO8 Video Modes

While the actual speeds and feeds haven’t changed much between HERO7 and HERO8, there’s a bunch of new updates to compatibility with HyperSmooth + digital lenses. Also huge in the HERO8 is a new High Bit Rate option up to 100 Mbit HEVC. It produces amazingly sharp images that are crystal clear. See the charts below: new updates to the HERO8 Black vs. HERO7 are highlighted in green – you’ll see a lot has been added!
HERO8 Black 16:9 Modes
| Resolution | Frame Rate | HyperSmooth | HS - High | HS - Boost | Lens | Zoom | File Type | |||
|---|---|---|---|---|---|---|---|---|---|---|
| 1080 | 24 | HyperSmooth | Boost | Wide | Linear | Narrow | Superview* | Zoom | H.264 or HEVC | |
| 1080 | 30 | HyperSmooth | Boost | Wide | Linear | Narrow | Superview* | Zoom | H.264 or HEVC | |
| 1080 | 60 | HyperSmooth | High | Boost | Wide | Linear | Narrow* | Superview* | Zoom | H.264 or HEVC |
| 1080 | 120 | HyperSmooth | Boost | Wide | Linear | Narrow* | Superview* | Zoom | H.264 or HEVC | |
| 1080 | 240 | HyperSmooth | Wide | N/A | HEVC | |||||
| 2.7K | 24 | HyperSmooth | Boost | Wide | Linear | Narrow* | Superview* | Zoom | H.264 or HEVC | |
| 2.7K | 30 | HyperSmooth | Boost | Wide | Linear | Narrow* | Superview* | Zoom | H.264 or HEVC | |
| 2.7K | 60 | HyperSmooth | High | Boost | Wide | Linear | Narrow* | Superview* | Zoom | H.264 or HEVC |
| 2.7K | 120 | HyperSmooth | Wide | N/A | HEVC | |||||
| 4K | 24 | HyperSmooth | High | Boost | Wide | Linear | Superview* | N/A | H.264 or HEVC | |
| 4K | 30 | HyperSmooth | High | Boost | Wide | Linear | Superview* | N/A | H.264 or HEVC | |
| 4K | 60 | HyperSmooth | Wide | Linear* | N/A | HEVC |
Superview* – High & Boost not available
Narrow* – Shown with * if High or Boost not available
4K-60 Linear with HyperSmooth* – Will be added as a firmware update in the near future
HERO8 Black 4:3 Modes
| Resolution | Frame Rate | HyperSmooth | HS - High | HS - Boost | Lens | Zoom | File Type | ||
|---|---|---|---|---|---|---|---|---|---|
| 1440 | 24 | HyperSmooth | Boost | Wide | Linear | Narrow | Zoom | H.264 or HEVC | |
| 1440 | 30 | HyperSmooth | Boost | Wide | Linear | Narrow | Zoom | H.264 or HEVC | |
| 1440 | 60 | HyperSmooth | Boost | Wide | Linear | Narrow* | Zoom | H.264 or HEVC | |
| 1440 | 120 | HyperSmooth | Wide | Zoom | H.264 or HEVC | ||||
| 2.7K 4:3 | 24 | HyperSmooth | Boost | Wide | Linear | Narrow* | Zoom | H.264 or HEVC | |
| 2.7K 4:3 | 30 | HyperSmooth | Boost | Wide | Linear | Narrow* | Zoom | H.264 or HEVC | |
| 2.7K 4:3 | 60 | HyperSmooth | Boost | Wide | Zoom | H.264 or HEVC | |||
| 4K 4:3 | 24 | HyperSmooth | Wide | Linear* | N/A | H.264 or HEVC | |||
| 4K 4:3 | 30 | HyperSmooth | Wide | Linear* | N/A | H.264 or HEVC |
Narrow* – Shown with * if Boost not available
Abe’s Explanation & Review of the Modes
The following list is my personal review of each major mode that appears in the HERO8 Black – If you’re up for it, learning when and how to use each mode will guarantee a higher quality final output.
Explanation of Terms
POV: Cameras mounted to your head, chest, or other point of view of action.
Mounted: Similar to POV but usually refers to cameras mounted to physical objects (cars, skis, bikes, etc).
B-Roll: Any other camera mount (handheld, pole follow-cam, glide-cam, interview cameras)
4K-60 Wide & Linear – HyperSmooth
The picture clarity is stunning, and the 60 FPS allows for incredible versatility when filming. This is my go-to mode when intending to do post-work on my footage beyond tossing on Instagram. Having the highest resolution with slow motion and HyperSmooth is a winning combo for anything handheld or mounted. *Note 4K-60 Linear will be released in an upcoming firmware update.
Uses:
Mounted non-POV, auto, B-Roll, drones, pole-cam, diving, etc. Use this mode as an all around standard for everything if you are looking for quality and slow motion.
4K – 30 Wide, Linear, Narrow – HyperSmooth, High, Boost
I’ve got this up here because it’s the highest resolution that supports HyperSmooth High & Boost. Unfortunately we don’t have slow-motion capabilities here with High & Boost (see 2.7K-60 below), but there’s still some great value to be had! One of the main uses of this mode is vlogging! It will be as steady as you want because you can choose from all 3 levels of HyperSmooth, and you can utilize any Lens here. No need for slow-motion in that scenario.
Uses:
Vlogging or anything POV that’s extremely shaky that doesn’t warrant filming in slow motion. For me that’s chest mounted mountain bike because it’s always quite shaky and I always want to watch it back in real-time.
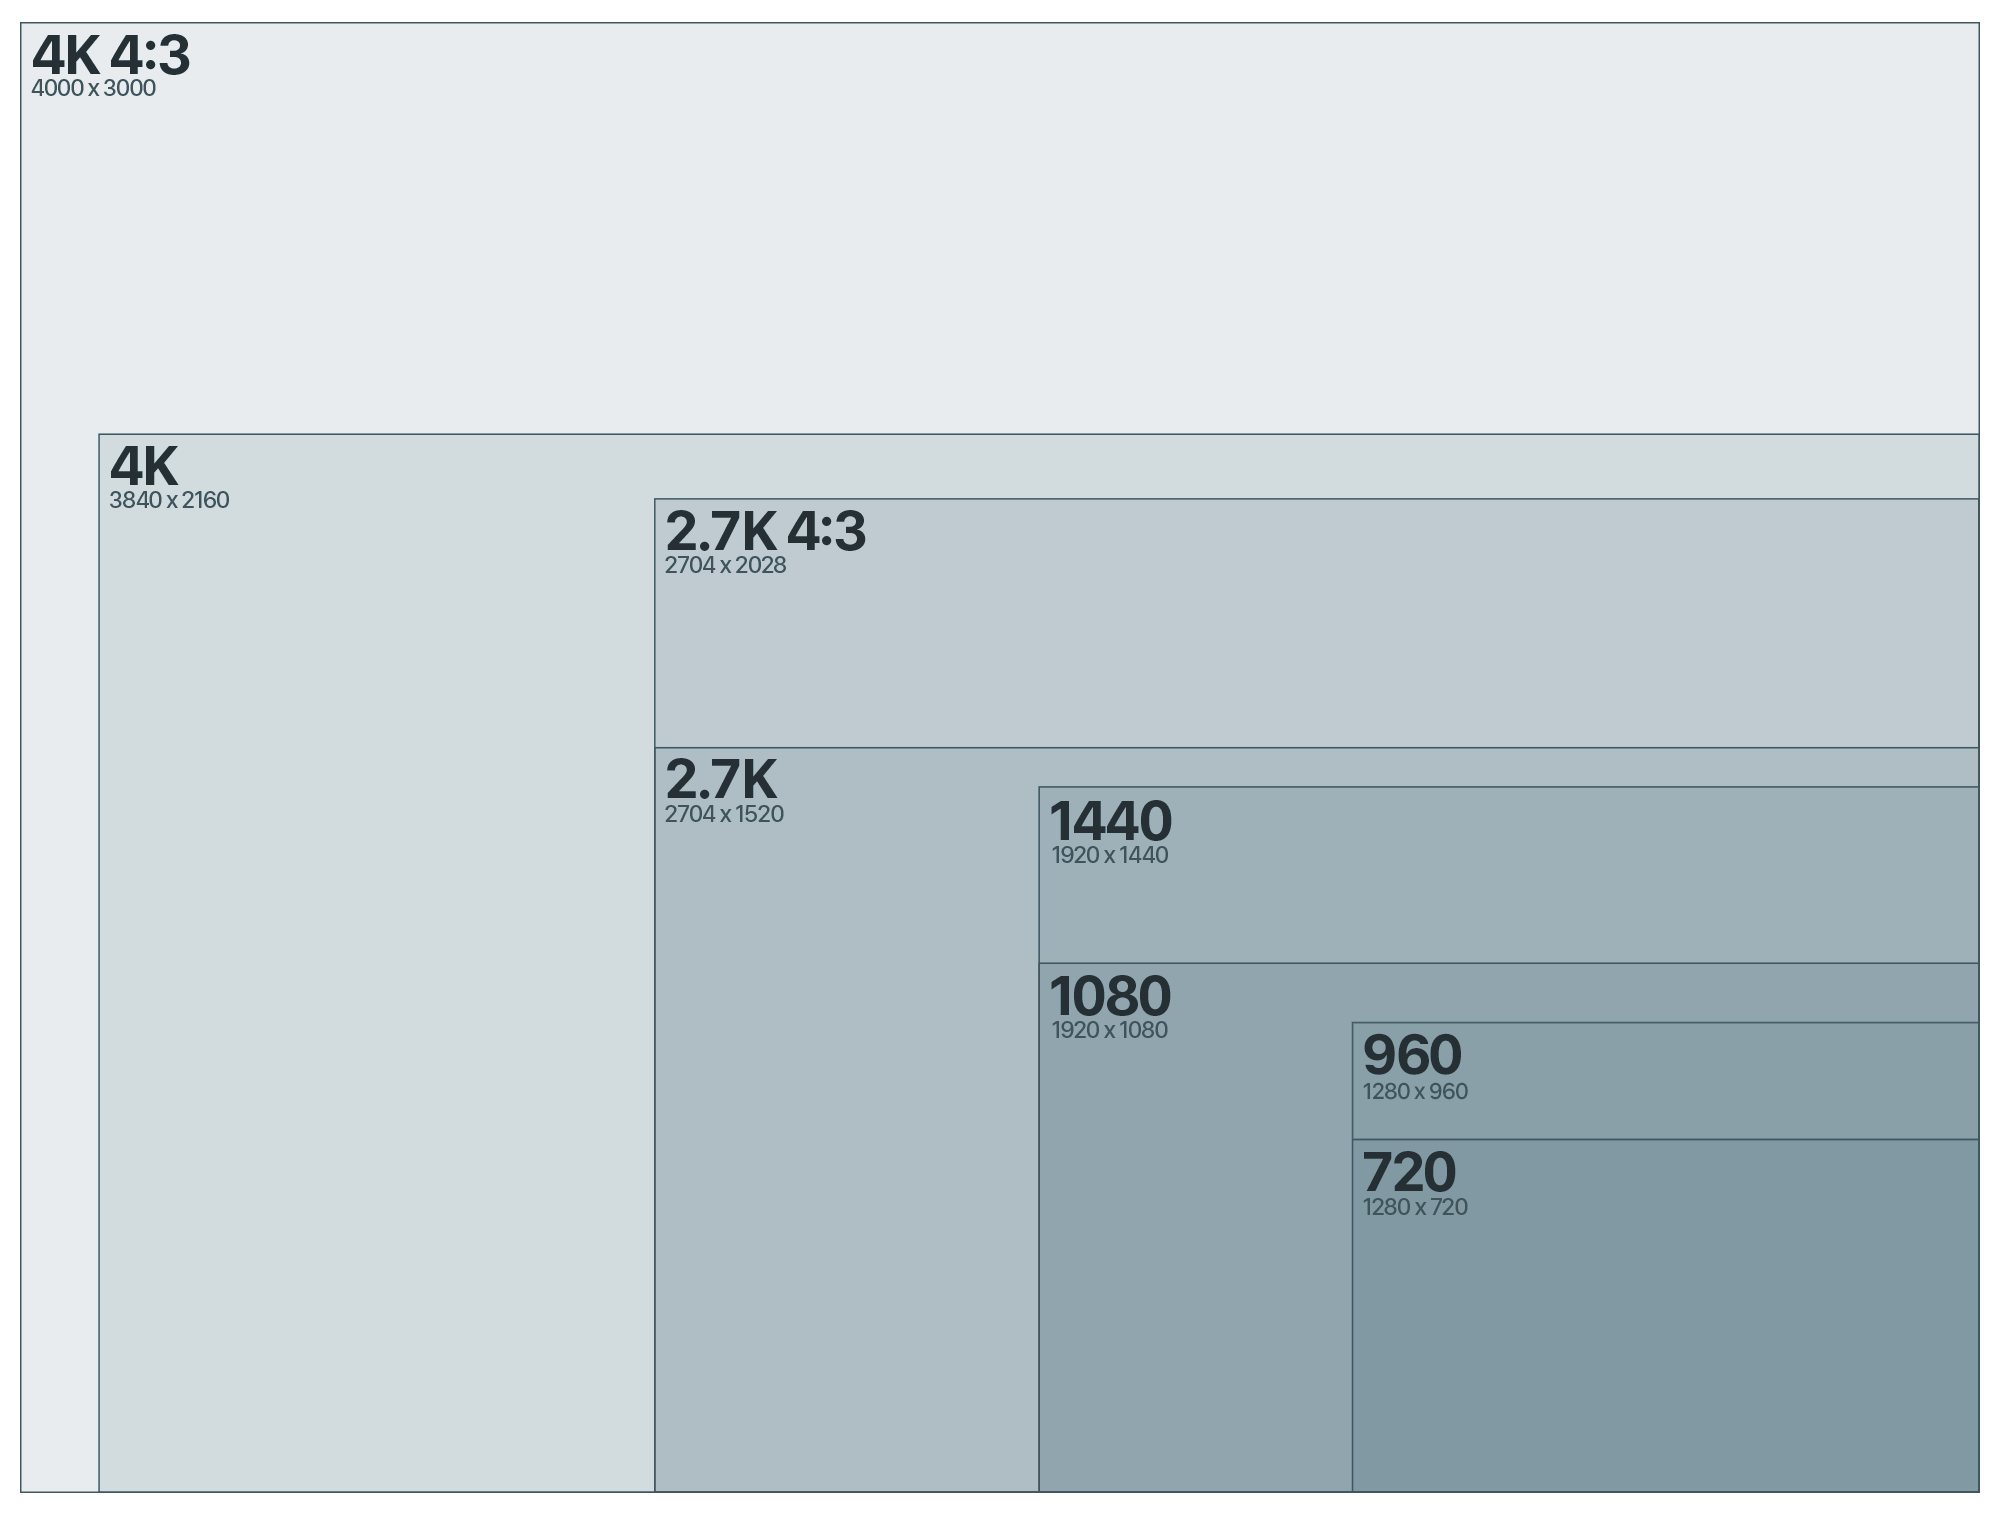
4K 4:3 – 30 Wide & Linear – HyperSmooth
Every frame is the full GoPro sensor at 4000px by 3000px, which is the same dimensions as the 12MP GoPro photos. It’s slightly wider than 4K video, and much taller since it’s in the 4:3 aspect ratio. I use this anytime I want to capture the most real, immersive, and real-time POV (no slow motion). Best of all, it now has a Linear lens option plus HyperSmooth in both Wide and Linear lenses! I utilize dynamic stretch techniques or optics compensation to pop it into a 16:9 frame when editing, or simply crop into whatever area is most interesting to you in the frame.
Uses:
Anything in general that doesn’t need slow motion. Since you’re capturing the whole sensor in 30 FPS, your ability to crop and re-frame in post is greatest in this mode. This is great for wearing on your chest or head to capture daily life, behind the scenes work, car driving, etc. Works well indoors & outdoors. I sometimes use this mode with HyperSmooth OFF to capture photos during action activities. You can pull frame grabs right on your phone through the app while it’s connected to the camera.
2.7K – 120 Wide – HyperSmooth
This is the best combination of ultra slow motion and clarity in the HERO8, and it’s now useable without a gimbal thanks to HyperSmooth support!
Uses:
Mounted, race drone, auto, B-Roll, pole-cam, diving, skiing, skateboarding, etc.
2.7K 4:3 – 60 Wide – HyperSmooth & Boost
This mode delivers incredibly immersive 4:3 aspect ratio video with the ability to slow down by 50%. It has the same width dimensions as 2.7K but is taller with a height of 2028 px. I utilize dynamic stretch techniques or optics compensation to pop it into a 16:9 frame when editing, or simply crop into whatever area is most interesting in the frame. This is one of the best all around modes to use when you’re unsure of what to use, especially combined with HyperSmooth. I use this mode to film vertically as well for social media. I don’t use it combined with Boost for POV, but I will sometimes use Boost when using handheld for social media (vertically).
Uses:
Anything POV that you may want to slow down in editing, or anything that you’re uncertain of your framing on capture. There’s plenty of room to crop and re-frame in post, while retaining a very high level of clarity.
2.7K 4:3 – 30 Wide, Linear, Narrow – HyperSmooth & Boost
I use this mode quite a lot specifically for social media sharing (in vertical or horizontal modes). It’s got a ton of compatibility meaning it supports all of the lenses, as well as HyperSmooth Boost. It’s quicker to transfer to the phone, and many times when sharing to social media I won’t need slow motion. You can now swap between 60FPS and 30FPS quickly with the on-screen slow-motion shortcut (more on this below)!
Uses:
Anything POV that you don’t want to slow down, or anything that you’re uncertain of your framing on capture. There’s plenty of room to crop and re-frame in post, while retaining a very high level of clarity.
2.7K – 60 Wide, Linear – HyperSmooth High
This mode is suddenly only really relevant because it’s the highest resolution available with slow-motion that supports HyperSmooth High. Remember, High consists of stabilization levels similar to Boost without losing any field-of-view. I most likely won’t use this mode but good to know what the benefits are. High is supported on Wide & Linear.
Uses:
High action POV or handheld in situations where you care most about having slow motion combined with the highest stabilization combined with the widest lens. So in practice – extremely shaky POV or handheld shots you want to slow down.
1080 – 240 Wide – HyperSmooth
1080-240 is an awesome mode to use because of the slow-motion. I use this mode quite a lot vertically for social media! You can slow the footage down to 12.5% while still retaining full 30 FPS, giving you fluid slow motion. When zooming in on the footage you’ll notice some aliasing and jagged edges. To reduce this effect, I recommend setting Sharpness to ‘Low’. This now has HyperSmooth support which is amazing for handheld and follow-cam use-cases without a gimbal!
Uses:
Anything you want to experience in ultra slow-motion. Try vertically and transferring to your phone for the gram story! Because of the fast shutter speed, avoid low-light or dark indoors.
1080 – 120 Wide, Linear, Narrow, Superview – HyperSmooth & Boost
This is another mode that’s relevant because it’s more widely supported with different lens and HyperSmooth options. This is the slowest motion option that supports Linear, Narrow, and Superview lenses. Similarly, this is the slowest motion mode that supports Zoom and HyperSmooth Boost. The great news is that this mode is crystal clear and looks amazing (with enough light). This will be a go-to mode for transferring to social. Blow minds with clarity and slow-motion in your Grams.
Uses:
Anything you want to experience in slow-motion. Try vertically and transferring to your phone for the gram story! Because of the fast shutter speed, avoid low-light or dark indoors.
1440 – 120
This mode looks awesome, and is great if you need ultra slow-motion POV. If you’re looking for more clarity, stick with 2.7K 4:3-60 or 4K 4:3.
Uses:
High action POV that you want to capture super slow-motion. Generally you’ll want to stick to outdoors; avoid using this in lowlight or dark indoor areas.
All lower resolution modes share similar image quality attributes as the higher resolution versions. For example, 1440-60 is a scaled down version of 2.7K 4:3-60. 1080-60 is a scaled down version of 2.7K-60. The benefit of shooting lower resolution is mostly about SD card size and computer/mobile compatibility.
Abe’s Go-To Video Modes for Maximum Image Quality:
Anything without Slow Motion:
- 4K 4:3 – 30
Anything Slow Motion:
- 4K – 60 Wide & Linear
- 2.7K – 120 Wide
- 1080 – 240 Wide
POV with Slow Motion:
- 2.7K 4:3 – 60 or 2.7K Super 60
- 1440 – 120 or 1080 Super 120
Super Stabilized Modes (HyperSmooth High):
- 4K – 30
- 2.7K – 60
Versatile Modes (Lenses & HyperSmooth Options):
- 2.7K – 60
- 1080 – 120
Abe’s Go-To Preset Settings (Video Modes)
Listed below are the presets I have set on my HERO8 in the video modes. It looks a little overwhelming at first but once you’re setup, you should be dialed. This pretty much covers 90% of my filming.
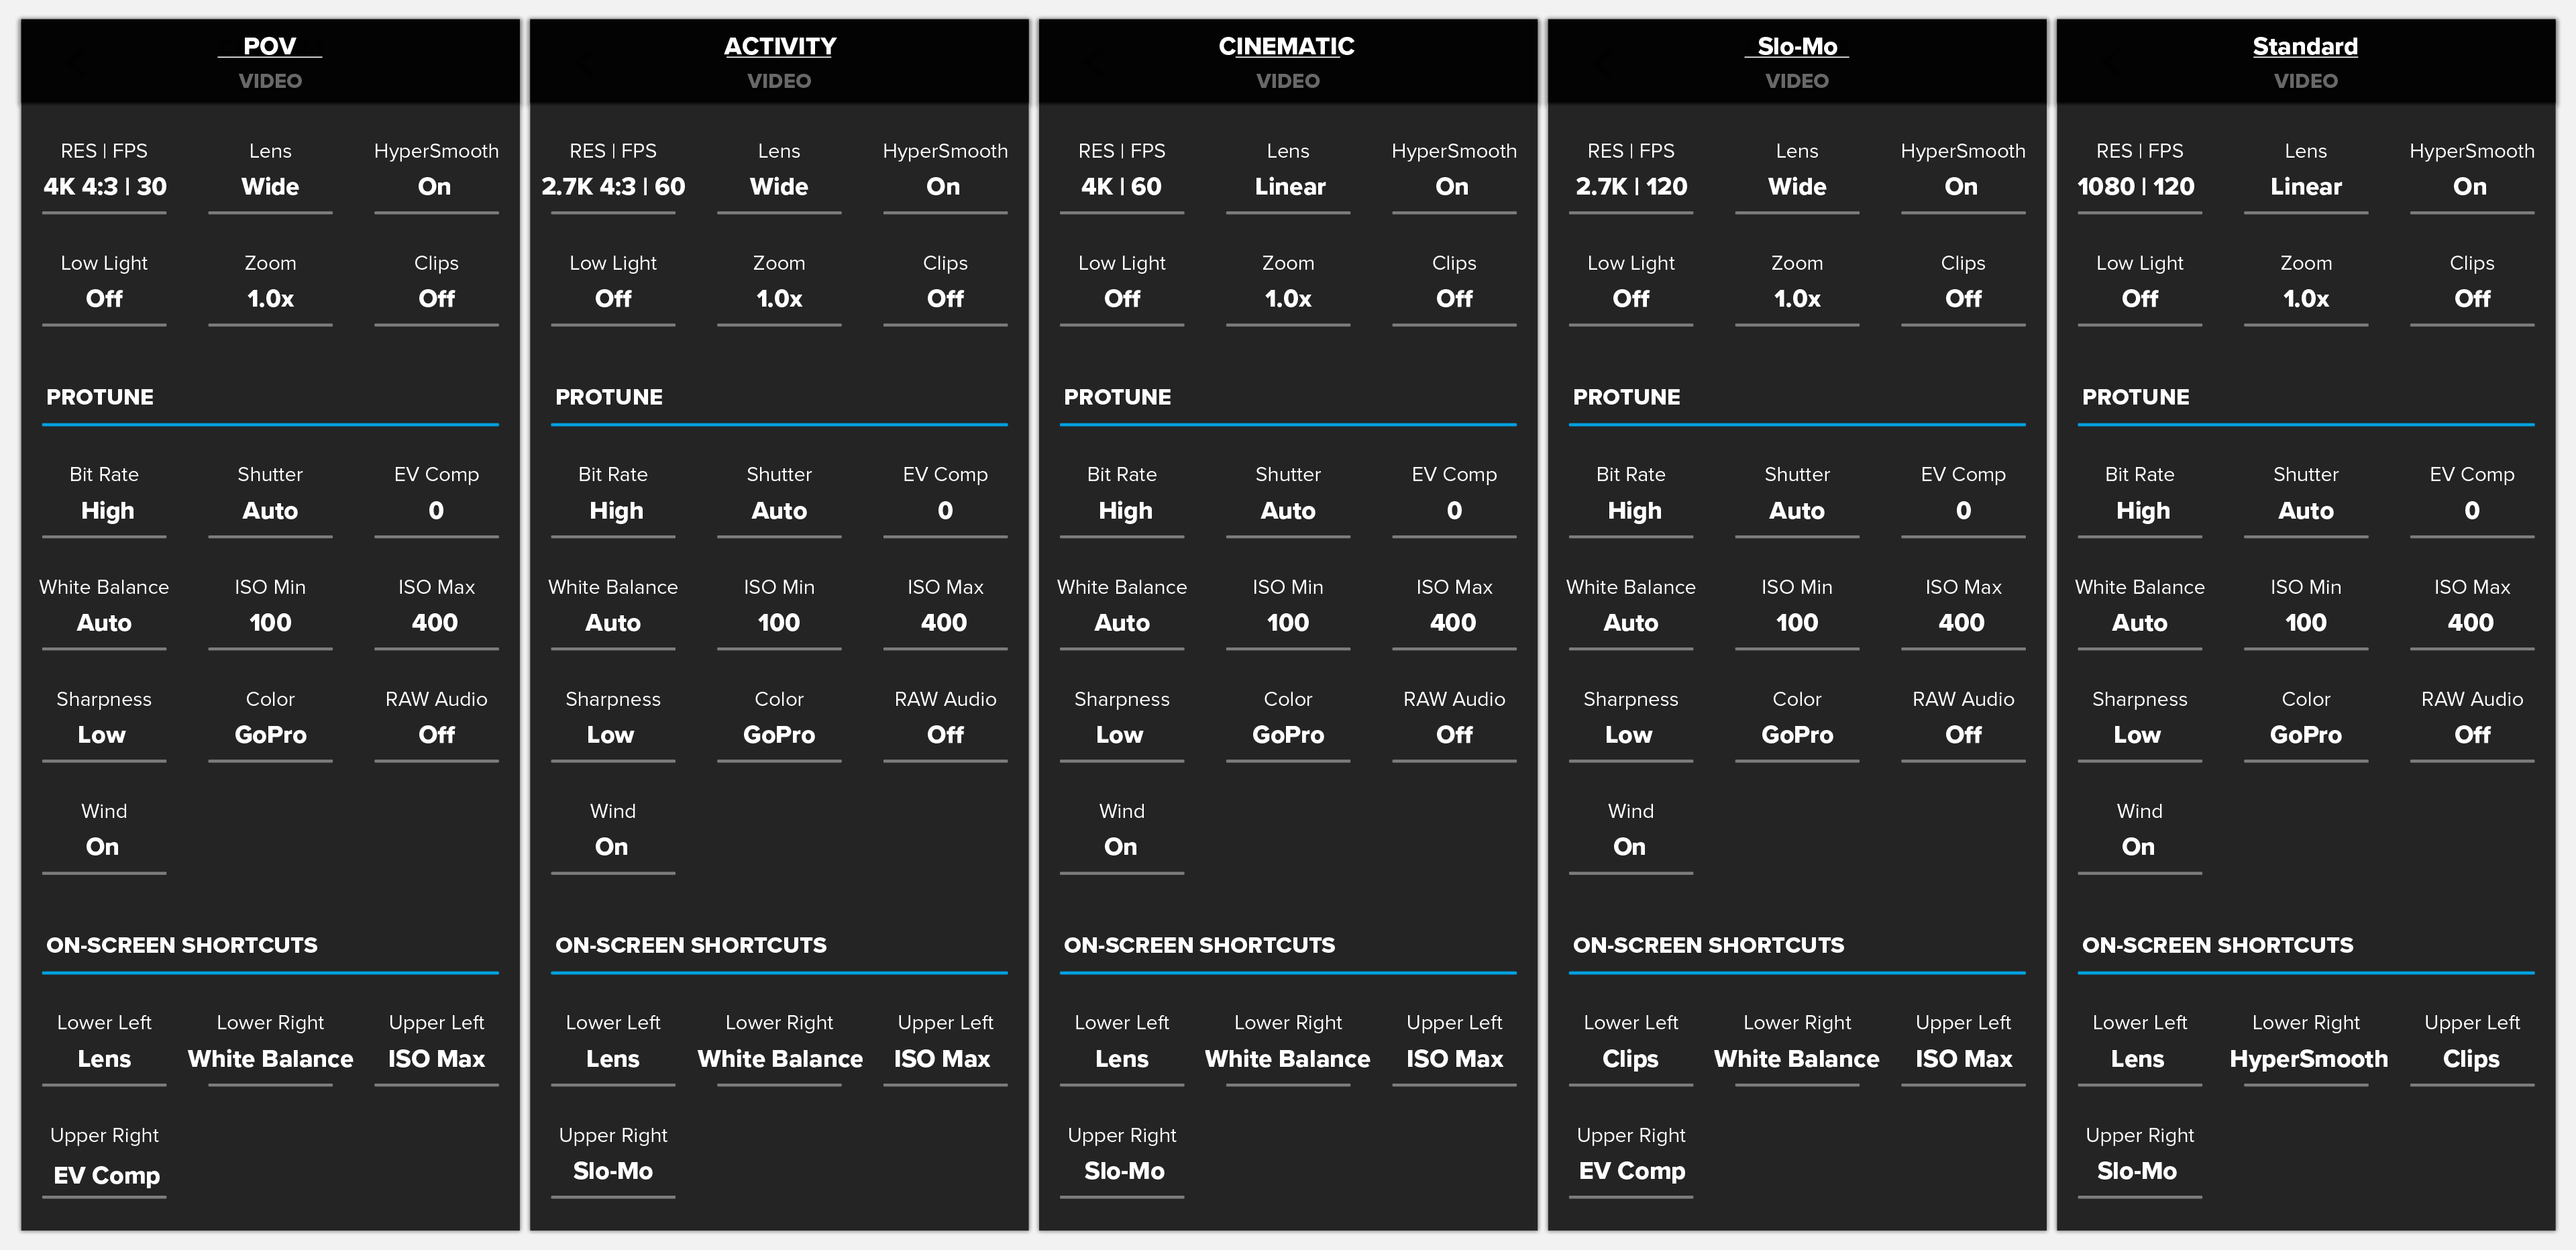
Click to Enlarge
For a full break down of all of these presets, when to use them, and why I choose each of these settings, please see My HERO8 Black Preset Settings!
TimeWarp 2.0, Night Lapse, & Time Lapse
Uncolored Handheld TimeWarp – Linear, Locked WB, Locked Exposure, 15x
TimeWarp was one of my favorite new features in HERO7, and it’s been vastly improved in HERO8 due to new lens options and ProTune controls! It’s also got some new updates such as ‘Auto’ speed option – which basically dynamically adjusts the output speed of your video based on how much it thinks is going on, as well as a new ‘Tap to Real Speed’ button. You’ll see this button on-screen as soon as you start any normal TimeWarp. If you tap it, your video will slow down and film in real-speed video until you either stop the video or tap it again to speed up. You can speed up and slow down as many times as you want in one clip!
TimeWarp 2.0 Speed Uses
| Speed | Original Record Time | TimeWarp Time | Use-Case | Examples |
|---|---|---|---|---|
| Auto | ??? | ??? | Pretty much anything where you want to capture a dynamic representation of your activity, or when you don't know what speed to use! | Handheld, head mounted, any sort of activity. |
| 2x | 1 min | ~30 sec | Faster moving vehicles/activities where camera will only be looking in one direction. Small shakes/unsteady mounting is OK | Chest/Head mounted on bike, car mounted |
| 5x | 3 min | ~30 sec | Faster moving vehicles/activities where camera will be looking in one direction OR steady intentional hyperlapses such as gimbal. Shakes/unsteady mounting is OK | Car mounted, boat mounted, gimbal hyperlapses, skateboard mounted |
| 10x | 5 min | ~30 sc | Slower moving activities where camera is generally pointed in one direction | Head mounted running, kayaking, gimbal hyperlapses |
| 15x | 7.5 min | ~30 sec | Slower moving activities with more instability and shake - camera will remove much of unwanted motion | Chest/head mounted running, walking, paddleboarding, river floating, handheld hyperlapses while walking |
| 30x | 15 min | ~30 sec | Slowest moving activities with the most instability | Chest/head mounted running, walking, hiking, handheld hyperlapses walking/running |
TimeWarp + ProTune
When TimeWarp was first introduced last year with HERO7, I think GoPro must have thought it wasn’t going to be as popular as it was. I spent my year begging for ProTune in TimeWarp and it finally paid off (let’s be honest, they probably would have done it regardless). My biggest needs were being able to lock white balance and decrease the sharpening so the footage would match all my other content. Now I have the ability to control noise with lowering max ISO settings, lock WB for sunset TW shots, and lock exposure with the on-screen press+hold exposure lock.
TimeWarp + Digital Lenses
This is extremely underrated in my opinion and has transformed TimeWarp into a much more powerful tool for creating unique content. When you switch into Linear, Narrow, or use the on-screen zoom controls the HERO8 utilizes the extra crop room to stabilize even more. I almost exclusively use Linear with my TimeWarp shots because of how much more stabilized the end results are. Also, most architectural TimeWarp shots feel much better with a Linear lens.
Night Lapse

4K Night Lapse video screen grab
Night lapse got a major upgrade in HERO8 by adding direct to video output. In all previous GoPros you had to copy off your hundreds or thousands of photos onto a computer, use an editor such as Premiere to painstakingly stitch a night lapse together. Now it’s straight out of the box and it’s even better than ever. Don’t worry, you still have the option to use the photo flow. When you select video as an output, the camera no longer has to wait between photo captures to save the photo to the card. The result is a MUCH more fluid lapse that looks almost like video if you have your interval set to auto. One great aspect is you can use Night Lapse during the day as well if you want to try to get a day to night transition.
Time Lapse
Time Lapse in HERO8 by default saves directly to a video. I personally use Time Lapse photo mode almost exclusively for capturing action photos. Press the shutter button and it will start capturing photos until you press the shutter button to stop. This will provide you with hands-free photo capture for all of your activities! Because of this I recommend adjusting the default Time Lapse preset to output to photos instead of video, then create a new preset for video Time Lapse! One major enhancement on Time Lapse photos is live preview on the rear display while you’re taking photos! In HERO7 it used to go black as soon as you started capturing so you couldn’t see what it was snapping if you were trying to capture either POV or other people. It’s incredibly handy. As for Time Lapse Video, it now has ProTune controls, something that was missing in HERO7. Sharpness, White Balance, ISO settings, and the rest of the ProTune settings are present, which is very key when creating professional/quality time lapses. I recommend almost always locking WB when creating lapses.
Abe’s Go-To Preset Settings (Time Lapse Modes)
Listed below are the presets I have set on my HERO8 in the Time Lapse modes. I’ll explain below how I utilize each one.
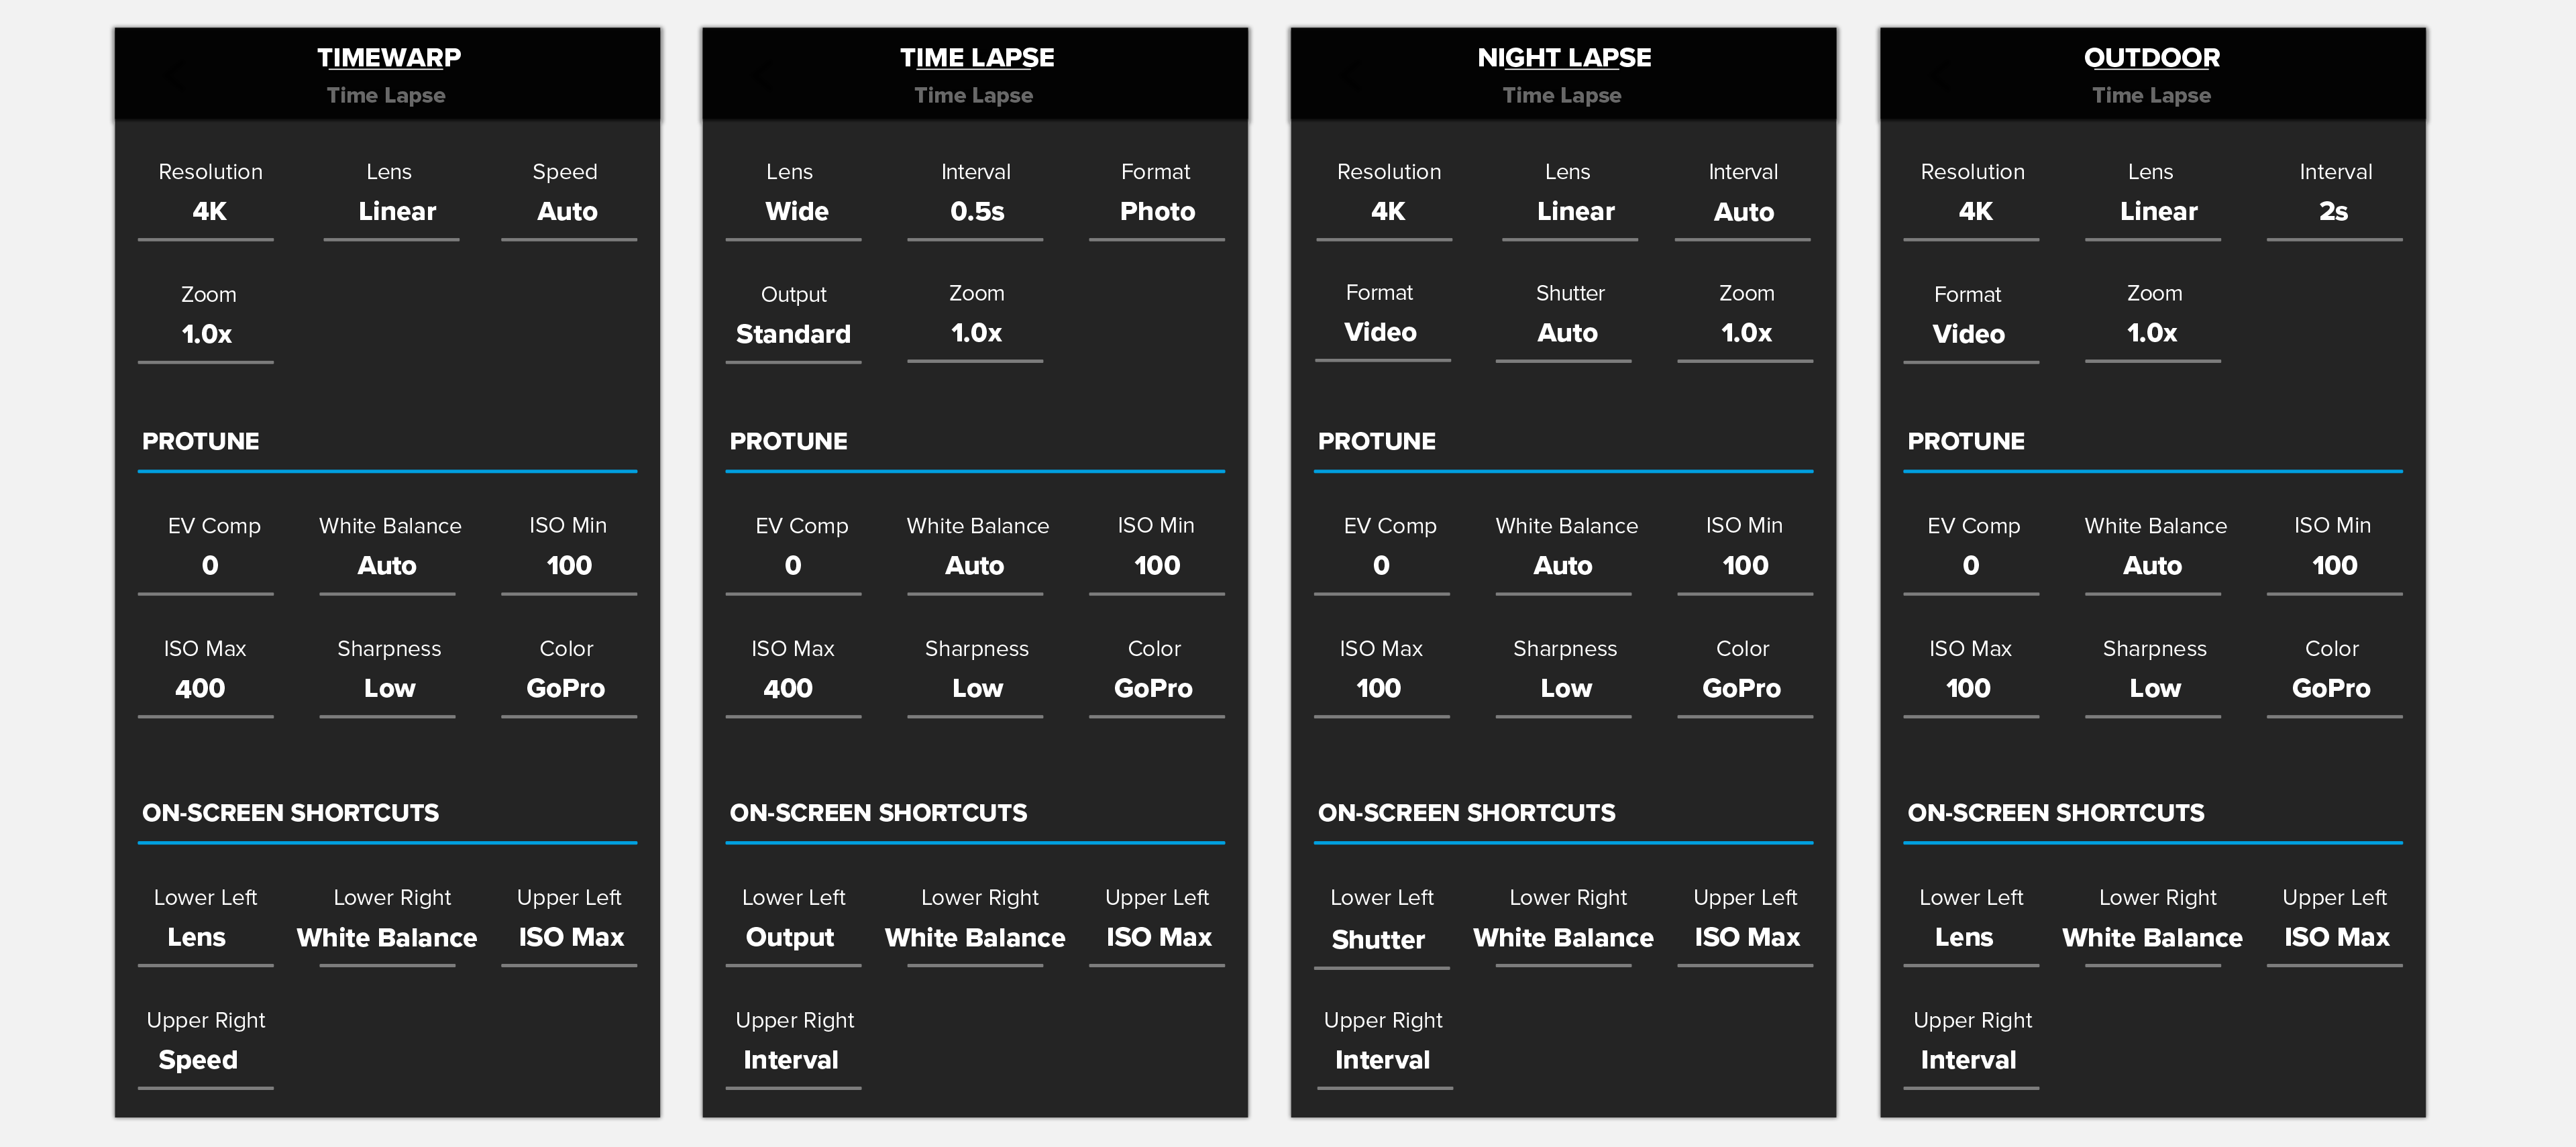
Click to Enlarge
For a full break down of all of these presets, when to use them, and why I choose each of these settings, please see My HERO8 Black Preset Settings!
RAW Photo, Burst Rate, LiveBurst

If you like to edit your GoPro photos to make them look all snazzy, there’s some updates that will make you happy!
RAW Photo in Burst
RAW photo capture is now available in all photo burst rates that capture 30 photos or less (30/10, 30/6, 30/3, 30/1, 10/1, 5/1, 3/1, & Auto). One caveat is that saving RAW files after the burst is shot takes…well…forever. Worst case scenario is 30/1 which takes approx. 60 sec from when the burst finishes. In comparison, non-RAW takes just around 4.2 sec to save. If you fire 30/10 in RAW, it’ll take around 55 sec to save, compared to standard being ready immediately when the photos finish snapping. Most of the time I’m shooting bursts it’s going through the air off jumps so just know that if you’re going to be using RAW, leave ample time to not be annoyed. If you need to reduce this save time, experiment with lowering the amount of photos being taken. 5/1 takes just around 10 seconds to save, which may be all you need for your application.
New Burst Rates
Sometimes burst is the best way to capture that perfect action photo. HERO8 adds a few new burst rates:
- 60/10 (6 photos per second for 10 seconds)
- 30/10 (3 photos per second for 10 seconds)
- 60/6 (10 photos per second for 6 seconds)
By adding longer durations, and combining burst with 3 second timer or voice control, I can usually manually fire it off and still have time to focus on whatever I’m trying to do.
LiveBurst
Set your GoPro into LiveBurst and it’ll be ready to snap 90 photos or a 3 sec video. Interestingly, it captures half of those before you snap the shutter button, and half after. Pick the best photo out of the bunch using the GoPro app, or share the video clip. The photos are 8MP, so not as high-quality as actual Burst photos. I can see this being fun for boomerangs and such…if the GoPro app supported it. I guess call me when the GoPro app has more features for this mode beyond sharing a single photo or video (I know, not everything is made for a power user like you and me.)
Abe’s Go-To Preset Settings (Photos)
Listed below are the presets I have set on my HERO8 in the Photo modes. I’ll explain below how I utilize each one.
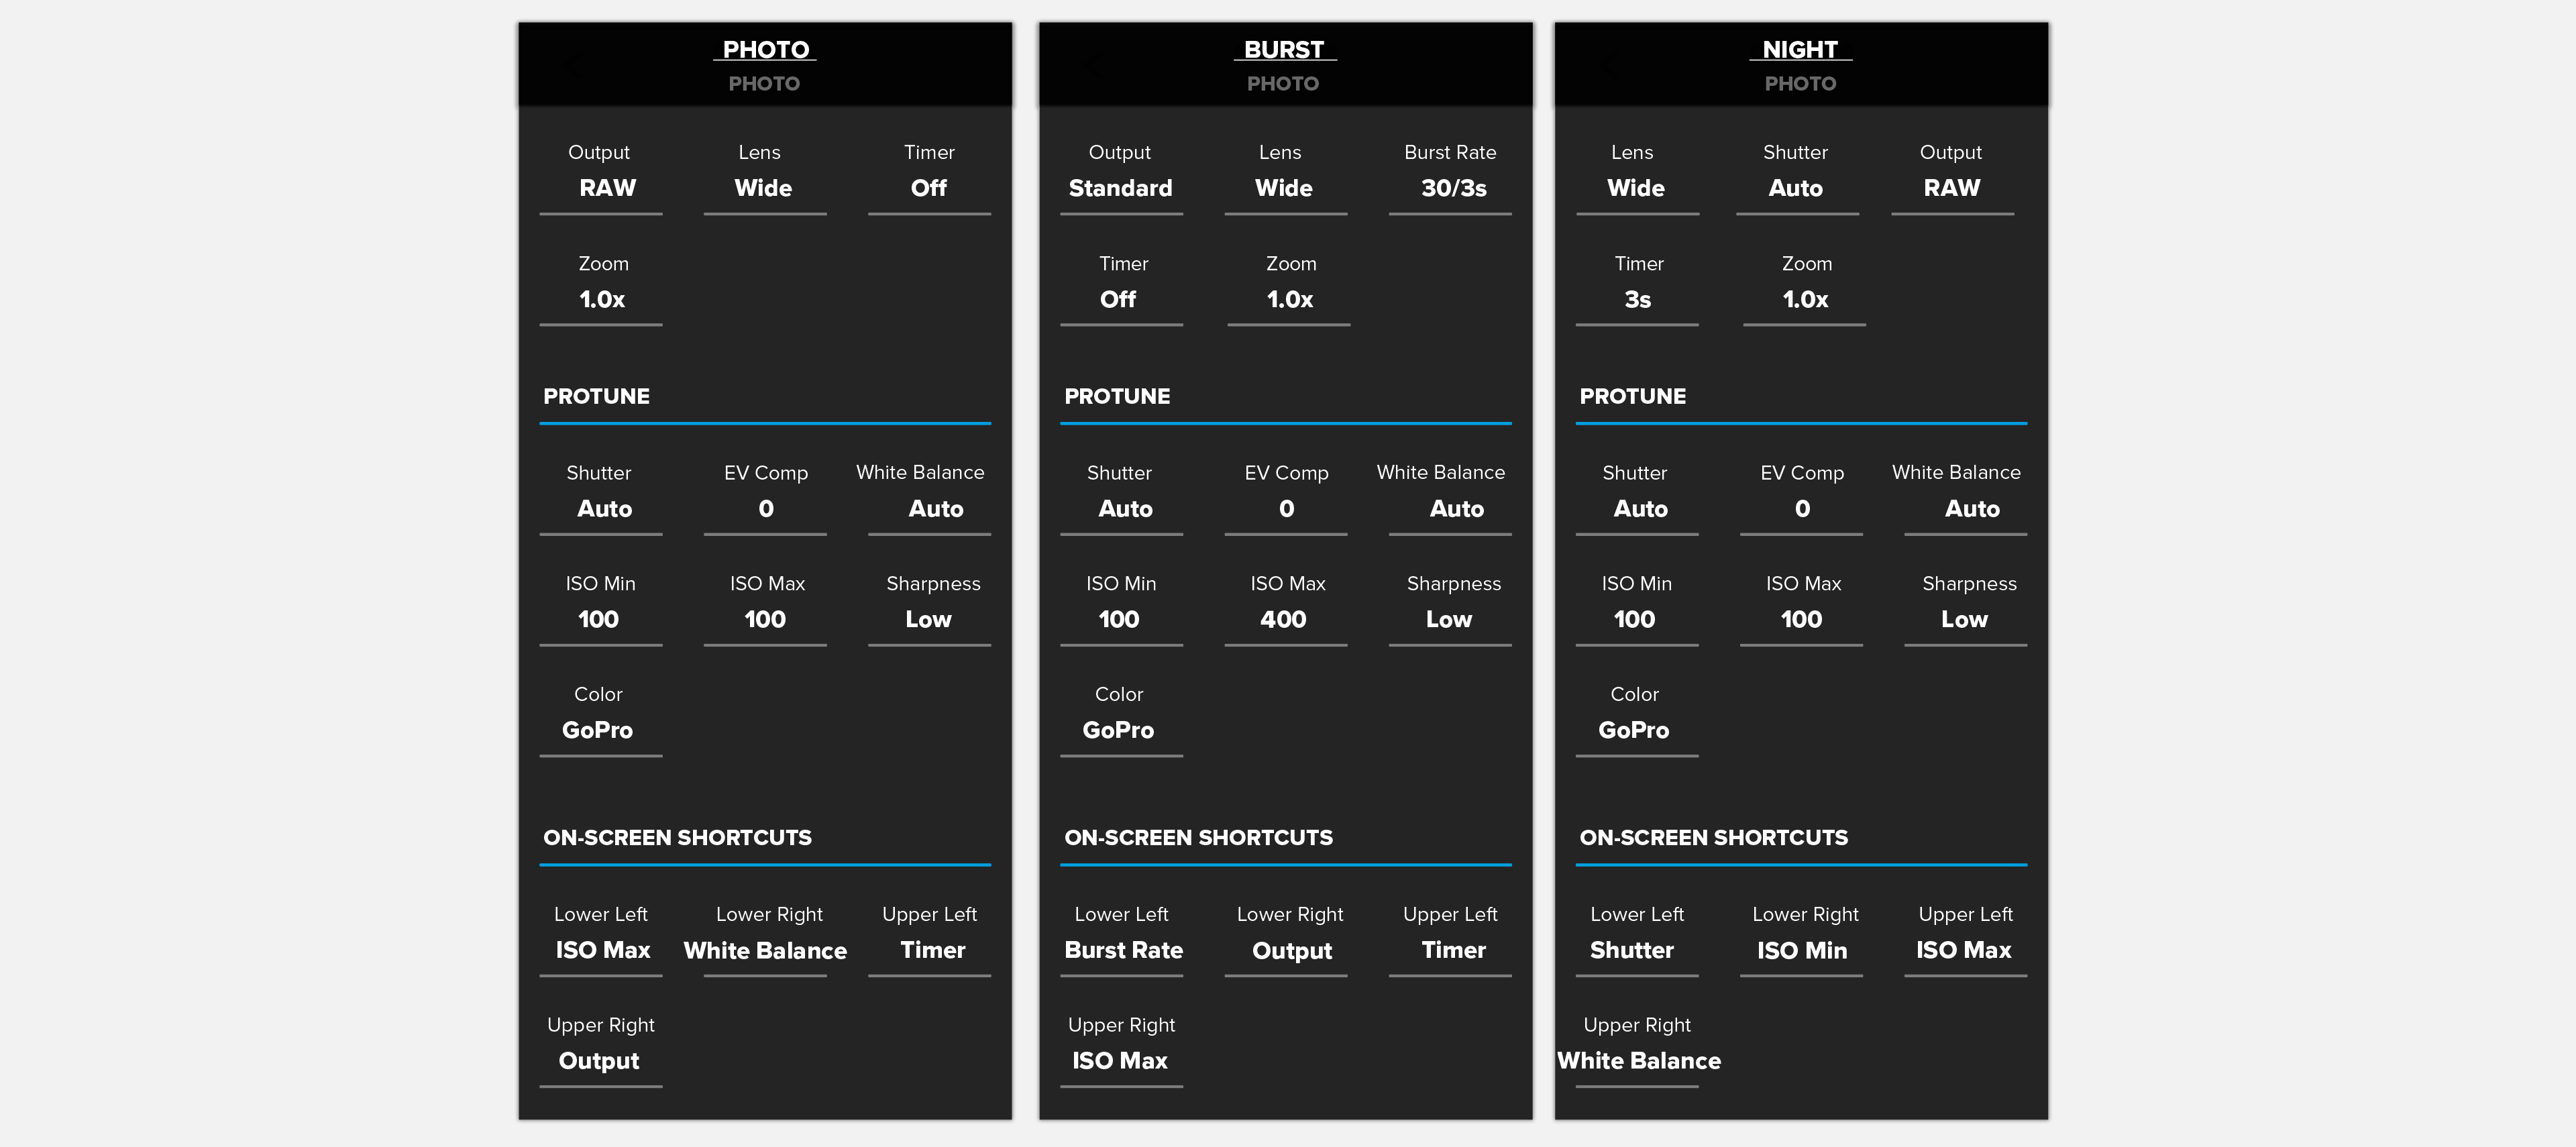
Click to Enlarge
For a full break down of all of these presets, when to use them, and why I choose each of these settings, please see My HERO8 Black Preset Settings!
HERO8 Mods
GoPro will be releasing a set of “Mods” in the coming months to turn your HERO8 into a pretty solid vlog setup. One of the most common asks I saw last year was to add a 3.5 microphone jack on the GoPro to plug in an external microphone – or improve the dongle that exists. That’s fully addressed with the media mod “frame.” Not only does it have all of the ports you need, but it also has a shotgun mic built right in. There’s also a front facing display that can be added atop the frame, as well as an LED light array. You can read all the specifics on the GoPro site. What I can tell you is the Media mod frame feels very compact and very sturdy. The built-in shotgun mic can be compared roughly to the quality of one of these which is pretty awesome to have in a compact solution. All of the mods have their own power solutions so it doesn’t take away from your camera’s longevity; however, we’ll find out how it feels in practice to have a bunch of battery powered things all independent of each other. As for the light mod – it’s quite a clever setup that comes with mounts for both the cold-shoe port on the media mod, as well as fingers for standard GoPro mounts. This means that you can use the light on all your little handles, tripods, or head straps. Get this light and replace your headlamp and flashlight for camping trips!
Integrated Mounting, New Lens, Enhanced Audio, Battery, Colored Sleeve
Integrated Mounting Fingers
The most notable thing about the new HERO8 body design is the fact that you no longer need a frame. The mounting fingers fold out from the bottom of the camera, and even have a little magnetic feel to them as they clip up into the camera (they are metal). They feel solid, like when you satisfyingly close the lid to your AirPods (I know you like that feeling). In practice you’re just dealing with less “stuff”. No more frame means taking your GoPro places is easier. Anytime I’m leaving the house, I feel like I’m forgetting something because my set of GoPro things is that much smaller. If you’re worried about the fingers breaking off, there are replaceable ones, though I haven’t experienced anything that should indicate that they’ll snap.
New Lens, Integrated Cover Glass, 2x Thicker Glass
There’s 3 big changes about the lens design in the HERO8 – one of which is probably the most controversial part of this new camera design. Let’s cover the others first and we’ll get to the topic of the non-removable cover glass. No one seems to be talking about the brand new lens design inside the camera. When looking at footage in the HERO8 it comes out looking sharper than lenses in the past. There’s a new process of building the lens system in the factories that’s producing higher quality optics. You’ll notice there’s some new lens flares present due to a new lens design. Flares are obviously totally subjective whether you like them or not. If you’re watching in slow-motion the new flares can look super cinematic; however, sometimes they can be distracting if you’re shooting at sunset and directly into the sun. It hasn’t really been an issue for me, but something I’ve noticed. Next on the list is the actual cover glass over the lens. Its thickness has been doubled compared to previous lens covers. Apparently impact tests were done using rocks with direct hits at over 70MPH and the lens was fine. On the plus side, the body of the camera is much more sleek, and it reduced the overall depth of the camera by over 4.5mm when comparing against HERO7 Black. There’s a lot of talk about how a non-removable lens cover sucks, and I can totally see where that sentiment comes from. It’s the same reason I have a case on a beautiful iPhone. It’s more about the perception of not being replaceable that’s getting in people’s heads regardless of if the lens can take the beating or not. For those worried there’s 3 main solutions. First GoPro has made high quality glass protectors for both the rear LCD and the lens cover. The second is using the new Protective/Dive housing if you’re really putting it in harms way, and the third is getting GoPro Plus. GoPro plus subscribers get a “no questions asked” replacement policy, plus a host of other benefits such as 50% off mounts and unlimited cloud storage. It’s about 4 bucks a month, so if that eases your peace of mind, it might be worth the stress factor reduction.
Enhanced Audio & New Front Mic
Audio is VERY much improved on HERO8. There’s a new front mic that clearly picks up audio of people talking and the sounds of your activities. More than that; the new wind-noise reduction setting is kind of mind boggling. I never used these settings on the cameras before, but I now keep my audio wind suppression to “on”. I was skating into the wind the other day talking to the camera kind of as a joke saying “if you can hear me, that would be insane.” I came back and the audio was crystal clear void of ugly wind noise – I’ll look at uploading and posting below. Audio is one of those things where you don’t know how good it can be until someone shows you something better. I thought HERO7 actually did a pretty good job, but the HERO8 is on another level.
HERO8 Battery Compatibility
HERO8 battery is the same capacity and shape as the batteries from HERO5, 6, and 7. The one difference is the new one has the ability to offload more power. What GoPro says is that old batteries will work in HERO8, but it may cause slight instabilities in the higher modes with HyperSmooth such as 2.7K-120, 1080-240, and any of the high resolution modes combined with HyperSmooth High/Boost. I can’t comment too much on on the validity or consequences of this – but I have been using older batteries with no issue on my end. I’d definitely be wary when you are using older batteries. Start and stop recording often if you plan on using the higher end modes, and check your video back on the camera that it’s recording with stabilization applied. Sometimes if the camera doesn’t have enough power, it may turn off HyperSmooth and it’s quite hard to notice until you get back home and realize your content isn’t smooth. If you plan on using this camera in the snow and the cold, I would definitely recommend sticking with the new battery, as it should hopefully help with keeping those high power modes on and recording.
Colored GoPro Sleeves for HERO8
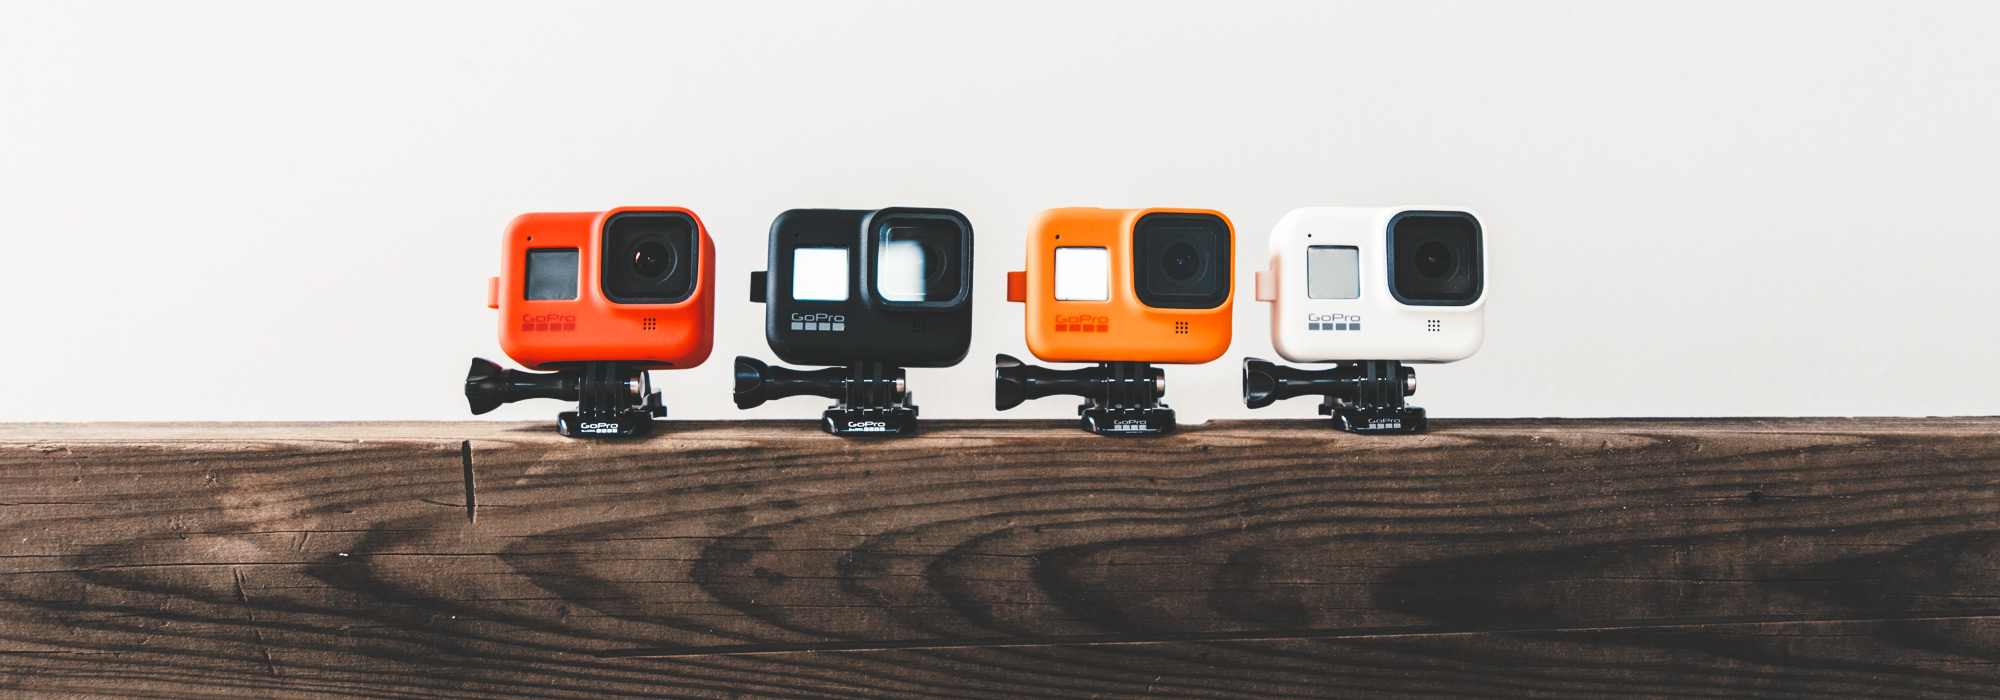
These were introduced last year with HERO7, but because there was a frame around the camera for mounting, they only could be used if you weren’t planning on mounting the camera. Now that the mounting fingers are integrated in the camera, you can use the silicone covers while the camera is mounted! It’s something small, but it’s pretty rad to customize the color of your GoPro in a sleek way, and add a little bit of protection at the same time!
ND Filters by PolarPro
Left: Johnny FPV Drone HyperSmooth + ND16 || Right: Headcam HyperSmooth + ND32
I was super excited when I learned that we teamed up with PolarPro to have ND filters available for HERO8 at launch. PolarPro has been killing it with the grassroots filmmaking scene by pumping out quality filters for everyone’s needs. These new filters come with a sleek frame that slips over the corner of the HERO8 and around the lens. Once the frame is on, high powered magnets in both the frame and the filter keeps the ND in place. Swapping filters couldn’t be easier now.
ND filters, for those that don’t know, are basically like sunglasses for a camera. It makes scenes darker, thus forcing the shutter speed to go longer. Typically motion blur is the desired result. I use them all the time for photos to get smooth motion blur on my action shots. For video, I was always afraid to mix ND filters with HyperSmooth until I saw that Johnny FPV (one of the best FPV filmmakers out there) uses ND filters with HyperSmooth for all of his videos. I was pretty surprised so I did some testing, and sure enough, you can get some amazing results. It works well for car mounted or POV shots where there’s not a ton of intense shake.
Closing Thoughts
PolarPro ND providing that nice background motion blur!
There’s a few common questions I’ve been getting, I’ll try to hit those here because I know some of you will ask!
Get this or MAX?
It’s a tough call when there’s two very compelling products that speak to the same thing, but also very different things at the same time. Here’s my take: I’ve been using MAX a lot, and I’ve been loving what I can do with it, mainly because it’s new and fresh. I’m able to create content that no one has really seen yet. You aren’t going to get the same high resolution or slow motion modes that the HERO8 has, but you will get incredible stabilization (as good or better than HyperSmooth 2.0) and an amazing wide angle lens. This is on top of the already rad 360 aspect of it. It comes down to what you’re trying to create and what gets you excited. If you don’t already have a standard GoPro, or you’ve got the HERO5 or below, I’d probably say go with the HERO8. It’s the camera you don’t have to worry about when throwing in a bag. It takes amazing photos, and you’ll always be stoked if you have it on you. MAX still has the aspect of pretty exposed lenses, and it’s just a little more to “think about”. If you have a HERO7 already and you’re looking for something new and exciting – try out MAX!
I have a HERO7, do I need this?
I’m probably the wrong person to ask, seeing as how I had my iPhone 6 until this year. If you’re happy with your workflow and the way you’re able to capture content with the HERO7, you can feel good about holding onto it – it’s an amazing camera. That being said, with the Trade Up program just announced, you can nab a HERO8 for under $300 bucks. If you’re the kind of person that wants the latest and greatest, you could probably sell the HERO7, do the Trade Up program with something old lying around, and come away a pretty happy camper.
This seems like all software enhancements, why aren’t you updating the HERO7?
Spec sheets can be misleading. There’s a number of people that see that on-paper “nothing has changed,” so why isn’t this all ported to the HERO7 to give the people what they want? There’s a couple things going on here. First, I know for a fact that GoPro pushes every product as far as they can to offer the best for the customer. I know this because many times it’s me asking these questions – “why can’t we do this?” “well can it at least do this?”. When you’re dealing with small, powerful electronics, the number one enemy is power and thermal management. As soon as the camera can’t dissipate enough heat, the whole system becomes unstable and things just don’t work. The new camera body is redesigned from the ground up with entirely different thermal properties to deal with these high power modes, with high powered stabilization.
Secondly, building new software for one specific hardware platform isn’t always easily ported to other hardware. There’s thousands of development hours on the new system that’s very specific to that hardware. With a new lens, every single video mode has to be redesigned, re-calibrated, and re-mapped to the new properties of the lens so things like stabilization, shading, and colors can work. As you saw in my giant table of modes – it’s no small task to rebuild all of these! Things like the UI improvements and presets could probably physically work on the old system, but those are all development hours that may not exist within the resources that are available. You have to remember GoPro is a real business, with real engineers, at real desks cranking as hard as they can to bring new products to life. Major hats off to our engineering team! It’s amazing to see how people react when they don’t see every new feature imaginable in a new camera, as if money and development hours weren’t a thing. Not every company can lose as much as Tesla or Uber :). You know I want a camera that does 4K-120 more than anyone, but that technology literally doesn’t exist yet – we’re in an era of swift developments and change. People have forgotten that everything isn’t just sitting there waiting to be thrown in. If I could explain limitations behind 1″ sensors and wide angle lenses, you’d come away realizing why the GoPro is what it is. Behind closed doors GoPro is always striving to make the best possible product.
Lastly, hypothetically, if all of HERO8 could exist on HERO7, it still would require a whole team of engineers to bring it to life – which are resources GoPro unfortunately may not have. You have to make a choice when dealing with a real business that needs to make money – stay in business and keep innovating or go under. That doesn’t make a company “money hungry,” it makes it a real company that provides real goods and services to the world so it can keep doing what it’s doing. I’d like to see GoPro continue to make awesome and innovative products well into the future for all of us to be able to capture and share our lives. Rant over !
I’ve read through everything – Why should I really buy HERO8 Black?
Glad you asked! I’m pretty pragmatic when it comes to purchasing things. In a world of consumerism I like to measure whether I need something or not based on what it provides. HERO8 Black has some features that genuinely allow me to create content that I otherwise would not be able to create. TimeWarp with ProTune and Linear lens has allowed me to creatively push myself and my usefulness when creating content. All of the modes that now support HyperSmooth has me creating more engaging content that looks more professional without the need of extra gear. If you have a gimbal and you’re fine with that flow – keep it rocking! Burst mode with RAW support is allowing me to capture RAW action photos, which I have never been able to previously do. The clear audio and wind-noise suppression has been game changing for being able to hear voices and talking even during down-hill mountain bike runs. I’m going to be utilizing all of the Mods over the coming months to really increase my production quality as well. Lastly all of the little things that save me time and energy (no frame, presets, shortcuts) are invaluable to being present and in the moment when it really counts. Now, if that’s not enough – throw out the pragmatic side of you and think about how cool you’ll be with the latest and greatest! 😉
Thanks for Reading & Supporting GoPro
Thanks for your continued support! The GoPro brand and family wouldn’t be what it is without all of you, so let’s foster this awesome community! Hope all of this helps you make an informed decision about the new gear, as well as getting you dialed once you get your camera! Give me a shout below if I’ve missed anything major. Since you’ve made it this far here’s a sweet 4K desktop background for those that want it – let me know in the comments below if you found it! Lastly, if you haven’t watched our HERO8 + Max Launch video, check it out!
Products Mentioned in this Post
I don’t have any affiliates, but here’s everything in one place if you’re interested!
GoPro HERO8 Black
GoPro MAX
GoPro Media Mod
GoPro Display Mod
GoPro Light Mod
GoPro Protective Housing
GoPro Lens & Screen Protectors
GoPro Sleeve + Lanyard
PolarPro ND Filters for HERO8