Looking for a guide for a different GoPro? Check out all of my complete guides here:
Updated May 18, 2020
HERO7 is here – I’ll be taking you through all of the details from big to small. If you haven’t watched our launch spot that I (along with a talented team of GoPro media gurus) created, check it out. It’ll walk you through the basics in just 2 quick minutes! See if you can spot me 🙂
While it might look similar to a HERO6 in terms of shape, size, and internal hardware, the HERO7 has a few distinctive additions that enable many of the new features – starting with more memory. Additional RAM greatly helps the camera process multiple tasks at once as well as use more robust software algorithms to deliver the new features. Software tech under the hood is playing an increasingly bigger role in the way imaging is being done across all areas of camera technology. Using a plethora of sensors and imaging algorithms, the HERO7 produces a game-changing experience in the form of stabilization, quality, and connectivity. On top of that, users familiar to GoPro will notice many much appreciated usability changes.
If you’re just looking for the TLDR [Too Long, Didn’t Read] here’s the quick and dirty:
Show TLDR
HyperSmooth & Supported Video Modes
HyperSmooth is what GoPro is calling its ‘next-generation’ image stabilization. What GoPro nailed with HERO7’s HyperSmooth is what I would call “flow stabilization”. Much of GoPro use is mounted or used for shots that flow through space. GoPro created tech from the ground up to cater to its use-cases. HyperSmooth gets rid of most of the ticks and jolts that you might have seen in previous generations of image stabilization. For those that aren’t familiar with how digital stabilization works: it crops in on the image a set amount so it has room within the frame to move left, right, up, down, and roll so that it can attempt to match the scene in every frame. It matches frames using accelerometer and gyro data. HERO6 was really great at stabilizing small shakes and vibration mainly pointed in one direction; however, as soon as you started moving the camera all around, it would reach the “edge” of the available image, and have to re-center itself (hence, you’d see a sort of digital “tick”). If you compare stabilization side by side between 6 and 7 on a straight forward mounting, they may look the same – but as soon as the camera is moving and flowing through space, HERO7 will shine. HERO7 really nails a much needed natural movement in the camera while retaining the same level of crop as HERO6.
When looking at tests with every action-cam, along-side industry leading phones with both optical and digital stabilization, HyperSmooth blows pretty much everything else out of the water in the most extreme use-cases. Sony X3000 with their OIS comes close with small shakes, but starts to jolt quite a bit as soon as the shakes become more extreme. GoPro has done some really amazing work with the lens profile so that even though the stabilization is entirely digital, you’ll never see an ounce of warping or weird image fluctuations across the image that many are used to. HERO7 uses a unique mix of image analysis real-time to produce next-level stabilization results (how’s that for fluff? aka – I’m not allowed to talk about the technology under the hood).
HyperSmooth allows me to ditch a gimbal for everyday film tasks and most sports applications where I want to capture content to share with friends or on social media. Additionally, I’m now able to stabilize things that I previously couldn’t use a gimbal for such as high speeds on cars/helicopters, or in the water on surfboards/wakeboards, etc. Also, I’m able to capture content vertically with stabilization with the intention to share on social media – something I couldn’t do with a Karma Grip. Through the lens of a professional filmmaker (who uses GoPro in all applications), I won’t be ditching my Karma Grip anytime soon for a few select reasons. I want to make sure you know the limitations of HyperSmooth to help aid in getting the most out of your HERO7. Just as the Karma Grip has limitations (high speeds, water, heavy and bulky, etc), HyperSmooth has a couple minor caveats. That being said – it is an insanely good addition of technology and I find myself amazed each and every day with every new application I throw at it.
HyperSmooth Limitations
Stabilization at Night/Lowlight
The way EIS (electronic-image-stabilization) works is by shifting each image around to match the previous frames. When you film at night, video naturally will use longer exposure times to brighten the scene. When you combine long exposure times with a shaky camera, you’ll get blurring from frame to frame. While this doesn’t look out of the norm when the video is not stabilized (because you can tell it’s shaky), it looks quite bad when the video is stabilized. It basically looks like a stable scene, with blur jumping in all different directions. Make sense? Hard to really put it into words! I highly recommend turning off HyperSmooth while filming at night. Mechanical stabilization (a gimbal) doesn’t have this same issue because the camera is already smooth while capturing the image in the first place, so it won’t have the same sort of blur jumping around. In HERO6, it was able to tone down stabilization at night; however, HyperSmooth is a different technology that’s all or nothing.
Stabilization while utilizing ND Filters
Similar to the explanation above – ND filters basically put sunglasses over the GoPro lens to force a longer exposure time during the day (for a professional/artistic look). If the video isn’t too shaky in all directions you can get away with using these two in conjunction; however if it’s a really shaky scene such as mountain biking chesty, I would not recommend combining HyperSmooth with ND filters.
How to Help Lowlight HyperSmooth
You’ll want the camera to use digital gain instead of longer exposures to brighten a scene. Typically I film with ISO min & max at 100; however, when using HyperSmooth even during the day I set my max ISO to 400. With a higher max ISO the camera will use more digital gain to lighten the scene before turning to longer exposures. If I’m filming at dusk or in dark shadows and have to use HyperSmooth, I might set my max ISO up to something like 800 or even 1600. Keep in mind, the higher you go, the noisier the footage will be. Though when using HyperSmooth I think a noisier image looks better than blur jumping all around.
High Frame Rate Modes
Until we have more processing power in the GoPro, some modes are still off limits with HyperSmooth (1080-240, 2.7K-120). Because mechanical stabilization doesn’t affect processing power, you’re able to stabilize any resolution and any frame-rate using the Karma Grip.
Slow Horizontal Panning
The way the algorithm works, the one use-case that gets left in the dust is slow horizontal panning – meaning you’re steadily moving the camera laterally from left to right or vice-versa. It will attempt to “grab on” to the scene, and realize it has to keep moving so you’ll get those tell-tale pops and jumps. For these uses I would turn off HyperSmooth. If the pan is quick enough such as mounted on your head, it has no problem knowing where it should be.
The HERO7 features both HyperSmooth and standard HERO6 level stabilization: the latter found in some of the higher resolution/high frame-rate modes. The good news is pretty much all of my favorite filming modes have HyperSmooth, including 4K-60 and 2.7K 4:3-60. The tables below outline which modes are supported, and what kind of stabilization is offered. The amount of image cropping between both HyperSmooth and standard stabilization is identical at 10% overall. Something to note: using linear mode or touch zoom of any amount will increase the stability of HyperSmooth.
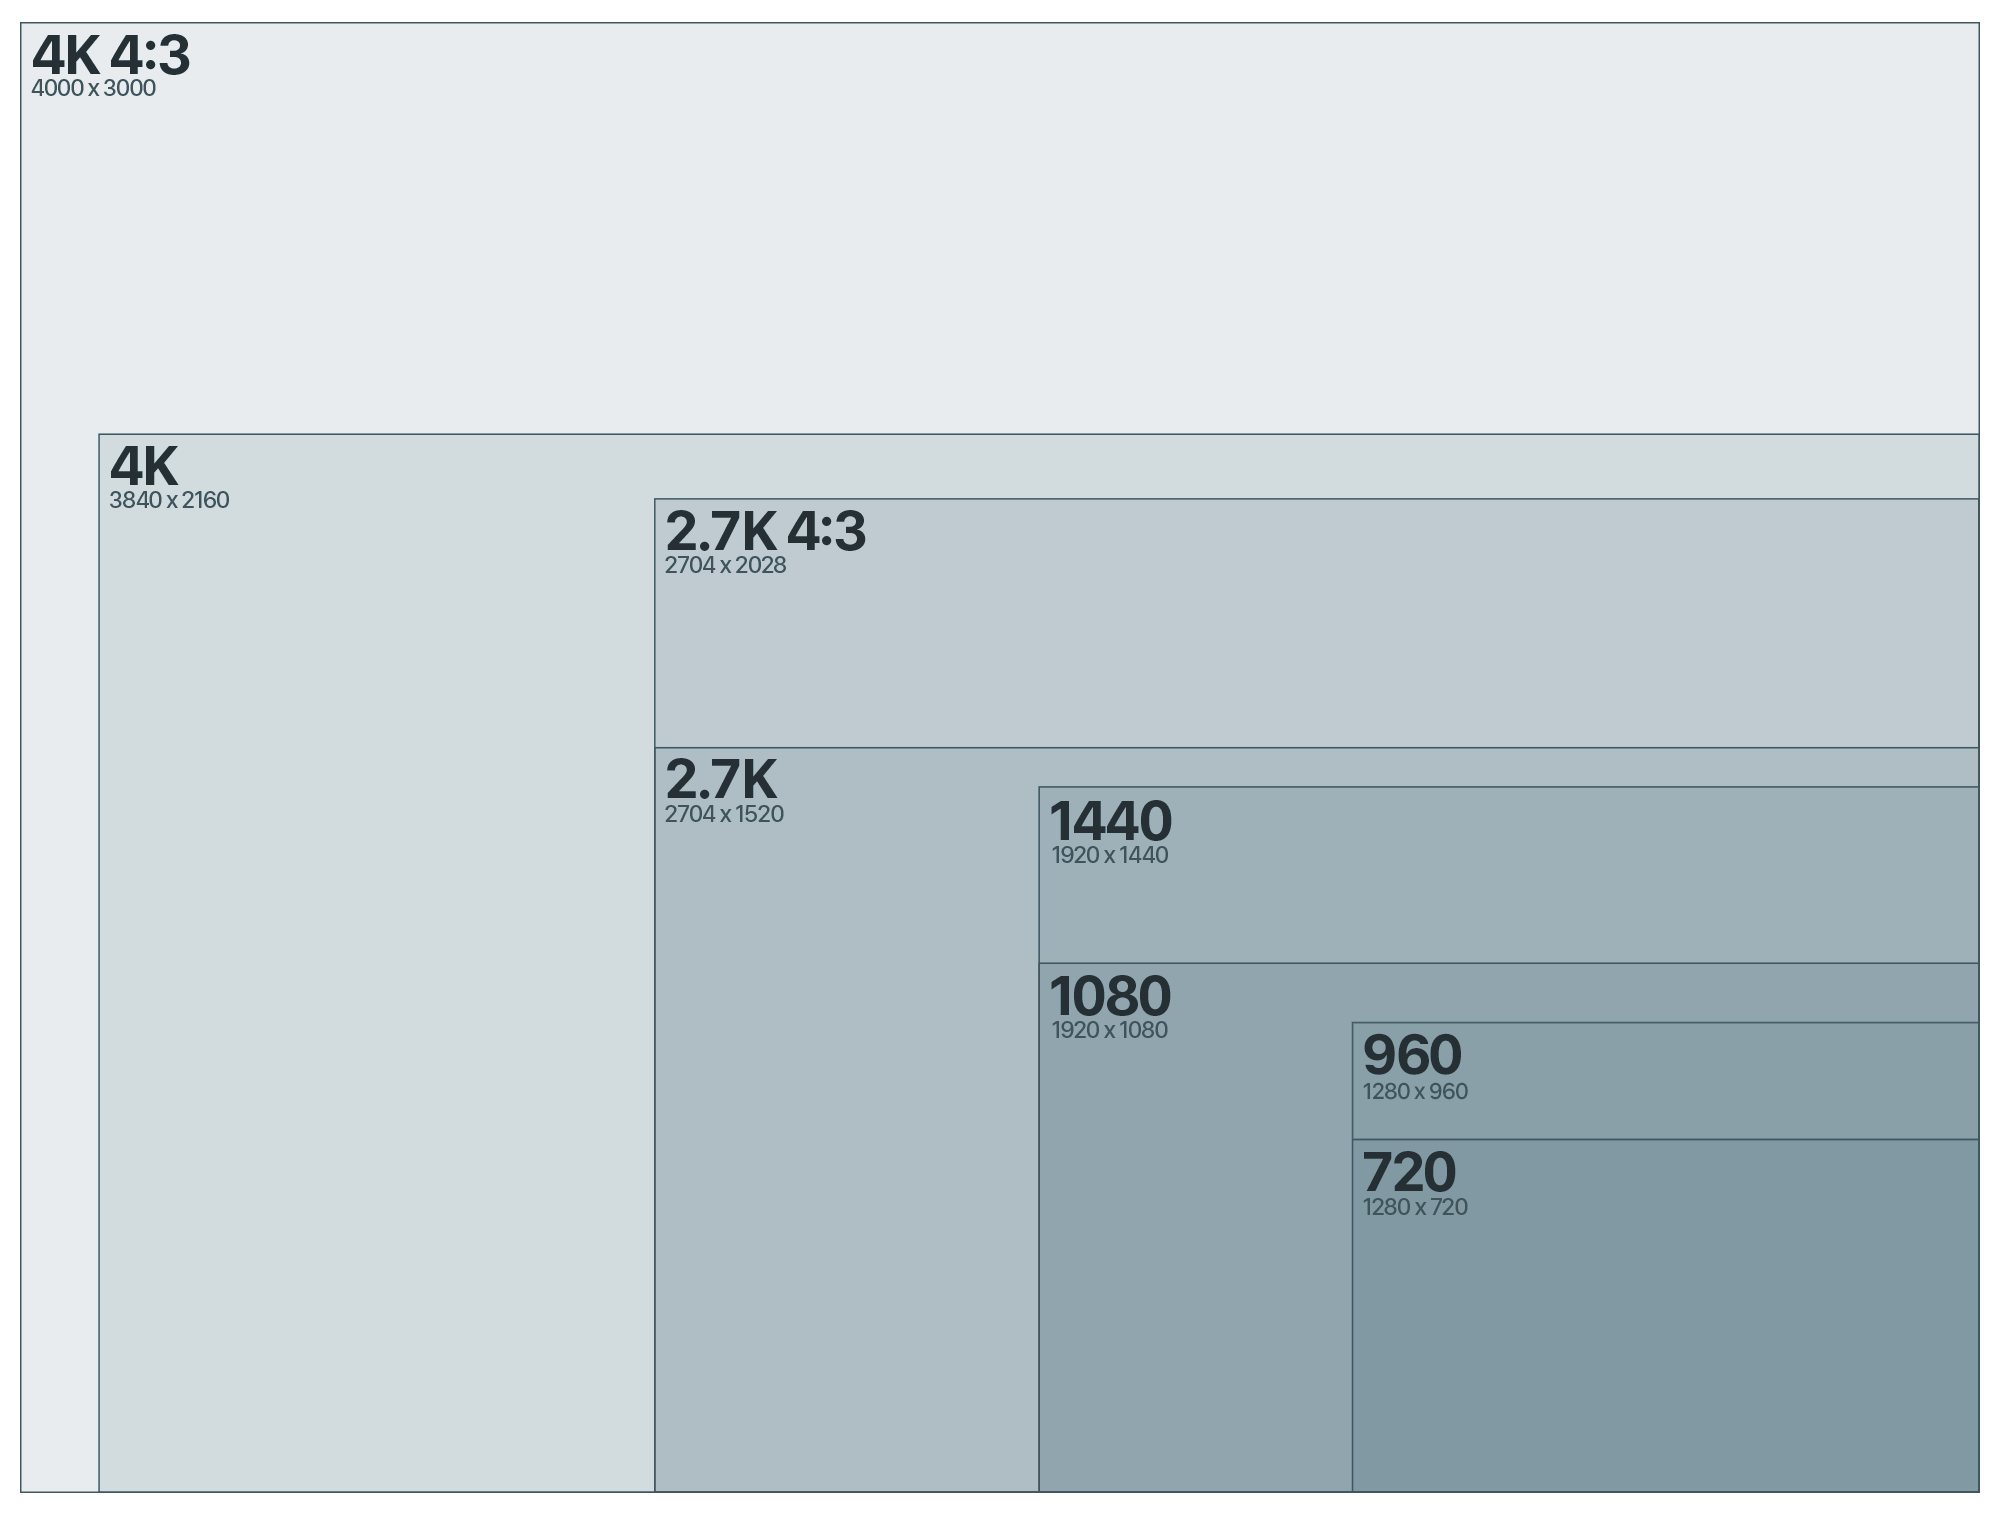
HERO7 Video Modes
New updates to the HERO7 Black vs. HERO6 are highlighted in yellow. Modes that are highlighted in green are all new modes or bigger jumps from HERO6. For example, 4K-60 HyperSmooth is highlighted in green because it went from no stabilization in HERO6 directly to HyperSmooth (skipping over standard stabilization). Similarly, 1440-120 is highlighted in green because it is an entirely new mode for HERO7. For the H.264 vs HEVC file type column, this represents the default compression the camera will shoot. You can force HEVC for all modes with a setting in the camera – more on that below. Lastly – a note about zoom: Give it a try – combined with HyperSmooth, any additional levels of zoom will give HyperSmooth more room to stabilize, thus even smoother video. I’ve shot some cool moments using zoom, and it looks quite good.
HERO7 Black 16:9 Modes
| Resolution | Frame Rate | Stabilization | Lens Type | Zoom | File Type |
|---|---|---|---|---|---|
| 720 | 60 | HyperSmooth | Wide, Linear | Zoom | H.264 |
| 720 | 240 | N/A | Wide | N/A | H.264 |
| 1080 | 24 | HyperSmooth | Wide, Linear, Superview | Zoom | H.264 |
| 1080 | 30 | HyperSmooth | Wide, Linear, Superview | Zoom | H.264 |
| 1080 | 60 | HyperSmooth | Wide, Linear, Superview | Zoom | H.264 |
| 1080 | 120 | Standard Stabilization | Wide, Linear, Superview | Zoom | H.264 |
| 1080 | 240 | N/A | Wide | N/A | HEVC |
| 2.7K | 24 | HyperSmooth | Wide, Linear, Superview | Zoom | H.264 |
| 2.7K | 30 | HyperSmooth | Wide, Linear, Superview | Zoom | H.264 |
| 2.7K | 60 | HyperSmooth | Wide, Linear, Superview | Zoom | H.264 |
| 2.7K | 120 | N/A | Wide | N/A | HEVC |
| 4K | 24 | HyperSmooth | Wide, Superview | N/A | H.264 |
| 4K | 30 | HyperSmooth | Wide, Superview | N/A | H.264 |
| 4K | 60 | HyperSmooth | Wide | N/A | HEVC |
HERO7 Black 4:3 Modes
| Resolution | Frame Rate | Stabilization | Lens Type | Zoom | File Type |
|---|---|---|---|---|---|
| 960 | 120 | Standard Stabilization | Wide | N/A | H.264 |
| 960 | 240 | N/A | Wide | N/A | HEVC |
| 1440 | 24 | HyperSmooth | Wide, Linear | Zoom | H.264 |
| 1440 | 30 | HyperSmooth | Wide, Linear | Zoom | H.264 |
| 1440 | 60 | HyperSmooth | Wide, Linear | Zoom | H.264 |
| 1440 | 120 | Standard Stabilization | Wide | N/A | HEVC |
| 2.7K 4:3 | 24 | HyperSmooth | Wide, Linear | Zoom | H.264 |
| 2.7K 4:3 | 30 | HyperSmooth | Wide, Linear | Zoom | H.264 |
| 2.7K 4:3 | 60 | HyperSmooth | Wide | Zoom | HEVC |
| 4K 4:3 | 24 | Standard Stabilization | Wide | N/A | HEVC |
| 4K 4:3 | 30 | N/A | Wide | N/A | HEVC |
As you can see, the big story with HERO7 is 4K-60 HyperSmooth and 2.7K 4:3-60 HyperSmooth. Some much needed high frame-rate 4:3 modes were also added for activities like surfing and snowboarding. 1440-120 and 960-240 means you can film high action scenes with the most view, something HERO6 was lacking.
Abe’s Explanation & Review of the Modes
The following list is my personal review of each major mode that appears in the HERO7 Black – If you’re up for it, learning when and how to use each mode will guarantee a higher quality final output.
Explanation of Terms
POV: Cameras mounted to your head, chest, or other point of view of action.
Mounted: Similar to POV but usually refers to cameras mounted to physical objects (cars, skis, bikes, etc).
B-Roll: Any other camera mount (handheld, pole follow-cam, glide-cam, interview cameras)
4K-60 Wide
The picture clarity is stunning, and the 60 FPS allows for incredible versatility when filming. HyperSmooth will cause this to look a bit softer overall with the 10% loss in crop, but this is still my go-to mode. Having the highest resolution with slow motion and HyperSmooth is a winning combo for anything handheld.
Uses:
Mounted non-POV, auto, B-Roll, drones, pole-cam, diving, etc. Use this mode as an all around standard for everything if you are looking for quality and slow motion.
4K 4:3 – 30
Every frame is the full GoPro sensor at 4000px by 3000px, which is the same dimensions as the 12MP GoPro photos. It’s slightly wider than 4K video, and much taller since it’s in the 4:3 aspect ratio. I use this anytime I want to capture the most real, immersive, and real-time POV (no slow motion). I utilize dynamic stretch techniques or optics compensation to pop it into a 16:9 frame when editing, or simply crop into whatever area is most interesting to you in the frame. HyperSmooth is not available in this mode.
Uses:
Anything in general that doesn’t need slow motion. Since you’re capturing the whole sensor in 30 FPS, your ability to crop and re-frame in post is greatest in this mode. This is great for wearing on your chest or head to capture daily life, behind the scenes work, car driving, etc. Works well indoors & outdoors. Lately I’ve been using this mode to capture photos during action activities where I don’t want to have to fire off a photo such as surfing or mountain biking. New in the HERO7 is the ability to pull frame grabs right on your phone through the app while it’s connected to the camera.
2.7K – 120 Wide
This is my go-to action mode for GoPro when I’m using a gimbal or have it on a steady mount. There’s no stabilization available in this mode but it’s still amazing for slow motion action and clarity.
Uses:
Karma Grip, Karma, mounted, auto, B-Roll, pole-cam, diving, skiing, skateboarding, etc.
2.7K 4:3 – 60
This mode delivers incredibly immersive 4:3 aspect ratio video with the ability to slow down by 50%. It has the same width dimensions as 2.7K but is taller with a height of 2028 px. I utilize dynamic stretch techniques or optics compensation to pop it into a 16:9 frame when editing, or simply crop into whatever area is most interesting in the frame. This is one of the best all around modes to use when you’re unsure of what to use, especially combined with HyperSmooth. I use this mode to film vertically as well for social media.
Uses:
Anything POV that you may want to slow down in editing, or anything that you’re uncertain of your framing on capture. There’s plenty of room to crop and re-frame in post, while retaining a very high level of clarity.
2.7K 4:3 – 30
I find myself using this mode combined with HyperSmooth quite a lot specifically for social media sharing (in vertical or horizontal modes). It’s quicker to transfer to the phone, and many times when sharing to social media I won’t need slow motion.
Uses:
Anything POV that you don’t want to slow down, or anything that you’re uncertain of your framing on capture. There’s plenty of room to crop and re-frame in post, while retaining a very high level of clarity.
2.7K – 60 Superview
This mode utilizes the full 4:3 aspect of the sensor, but dynamically stretches it down to a 16:9 frame by pinching the middle and stretching the sides. Use this mode if you want the added view on top and bottom, but don’t want the 4:3 frame like 2.7 4:3-60.
Uses:
High action POV that you want to capture slow motion with ultra-clarity in a 16:9 frame.
1080 – 240 Wide
1080-240 is an awesome mode to use because of the slow-motion. I actually use this mode quite a lot vertically for social media! You can slow the footage down to 12.5% while still retaining full 30 FPS, giving you fluid slow motion. When zooming in on the footage you’ll notice some aliasing and jagged edges. To reduce this effect, I recommend ProTune ‘ON’, and Sharpness set to ‘Low’. I’ve noticed this mode looking slightly better in HERO7 vs. HERO6. Not sure if it’s tuning or placebo in my brain – either way, stuff looks rad!
Uses:
Anything you want to experience in ultra slow-motion. Try vertically and transferring to your phone for the gram story! Also combine with Karma Grip for unique small moments that become awesome slow-motion scenes. Because of the fast shutter speed, avoid low-light or dark indoors.
1440 – 120
We’ve been missing 4:3 high-frame-rate modes since HERO5, which had 1440-80 and 960-120. This mode looks awesome, and is great for slow-motion POV.
Uses:
High action POV that you want to capture super slow-motion. Generally you’ll want to stick to outdoors; avoid using this in lowlight or dark indoor areas.
1080 – 120 Superview
This mode utilizes the full 4:3 aspect of the sensor, but dynamically stretches it down to a 16:9 frame by pinching the middle and stretching the sides. When looked at 100% it can have a little aliasing artifacts but generally this is a great mode to use if you need the ultra-slow motion immersive POV angle.
Uses:
High action POV that you want to capture super slow-motion. Generally you’ll want to stick to outdoors; avoid using this in lowlight or dark indoor areas.
960 – 240 Wide
960-240 is pretty much made specifically for surfers to capture barrels in ultra-slow motion. Surfers don’t mind low resolutions, especially for social media sharing, if they can capture the full scene (more top and bottom on the frame).
Uses:
Surf, skate, snowboard POV in ultra-slow motion.
Lower Resolution Modes
All lower resolution modes share similar image quality attributes as the higher resolution versions. For example, 1440-60 is a scaled down version of 2.7K 4:3-60. 1080-120 is a scaled down version of 2.7K-120. The benefit of shooting lower resolution is mostly about SD card size and computer/mobile compatibility.
Abe’s Go-To Video Modes for Maximum Image Quality:
Anything without Slow Motion: 4K 4:3 – 30
Anything Slow Motion: 4K – 60 Wide, 2.7K – 120 Wide, 1080 – 240 Wide
POV with Slow Motion: 2.7K 4:3 – 60 or 2.7K Super 60, 1440 – 120 or 1080 Super 120, 960-240
Stabilized Modes (HyperSmooth): 4K – 60, 2.7K 4:3 – 60, 2.7K 4:3 – 30
Abe’s Go-To ProTune Settings for Maximum Image Quality:
White Balance: Auto or 5500K (for daylight)
Color Profile: GoPro (Flat if you prefer detailed manual grading – I prefer Flat, but I’m a colorist.)
ISO Min: 100
ISO Max: 100 (400-1600 if using HyperSmooth or filming at night)
Sharpening: Low
EV Compensation: 0 or -0.5 (to save highlights)
Abe’s Pro-Tips for Professional Videographers using GoPro:
White Balance: 5500K for daylight activities, switch to what looks best for scene in other conditions
Color Profile: Flat
ISO Min: 100
ISO Max: 100 (400-1600 if using HyperSmooth or filming at night)
Sharpening: Low
EV Compensation: -0.5 (to save highlights)
Exposure Lock: When idle or filming press and hold on the back screen – it will bring up the touch to expose controls. Spot meter comes up first. Tap the middle of the spot to lock the exposure. You can move this around in the scene by tapping in other places before you lock. To get the best, most professional looking content, I suggest locking exposure as often as possible. HERO6 and HERO7 have very quickly adjusting exposure fluctuations to accommodate going in and out of dark/light scenes; however, I find you’ll get a much more professional looking feel if exposure is locked to a good level for any given scene.
Below is a detailed setup of what I typically use for Video, Photo, and Time Lapse Photo modes:
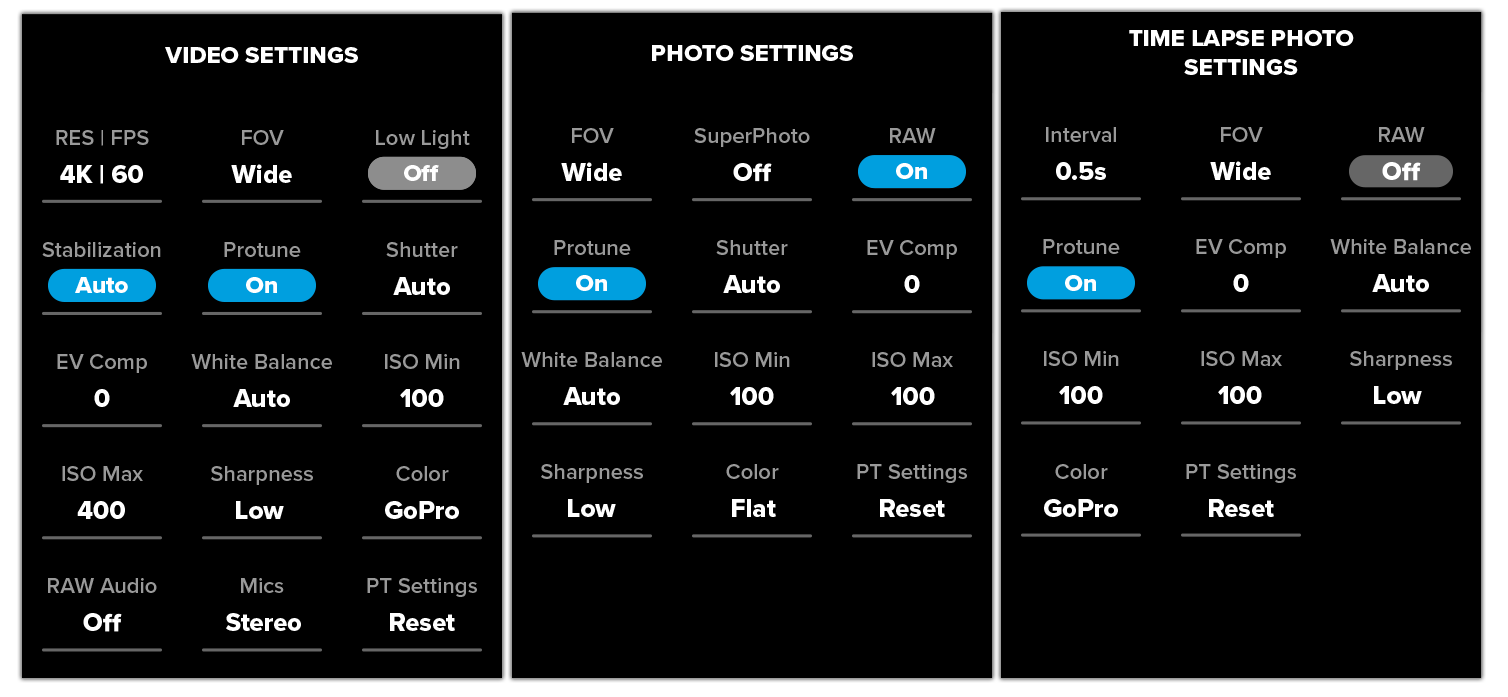
Video Settings:
I’m going to briefly run through each setting and why I choose it. Some of this may be over your head, so if you have a question ask below! Low Light is set to ‘Off’ because I don’t want it to change the frame-rate on me when it gets dark. If it gets dark I will manually adjust settings (either raise ISO or lower frame-rate.) Next, if I’m using HyperSmooth I’ll switch Stabilization to ‘Auto’, which just means it will use HyperSmooth on the modes that it’s available, and regular stabilization on the other modes. I keep EV Comp at either ‘0’ or ‘-0.5’ (‘-0.5’ if I feel like it’s a dynamic scene where whites could get blown out). For White Balance a lot of the time I will set it to ‘5500K’ so my colors are consistent across cameras when filming with a few. ‘5500K’ looks great for skiing, snorkeling, etc. If you don’t want to worry about it, just use ‘Auto’. As I mentioned above I keep my ISO Min at ‘100’ so I get dark, clean blacks. If HyperSmooth is on I keep ISO Max on ‘400’ or above (based on how low the light is). If I’m not using stabilization I keep ISO Max at ‘100’. Sharpness I always keep ‘Low’ because I prefer the look (less digital feeling). For Color, I personally have been using ‘Flat’ since the introduction of HERO6 and the new color style. I find I can get more out of the image when it’s ‘Flat’, but it takes some skill to color. I recommend using ‘GoPro’ color. Lastly, for the Mics, I prefer ‘Stereo’ so it’s not doing any kind of noise reduction processing on my audio.
Photo Settings:
Single photo usually means I’m intentionally snapping a photo using either timer mode, voice-control, or both. It’s typically selfies, photos with friends, or landscapes. For this reason I like to turn RAW ‘On’, because they are usually photos I’ve purposely taken with the intention of sharing at some point. I’ve been playing with SuperPhoto a little bit, but I like having the freedom of RAW. For those that don’t edit their photos on a computer, I recommend SuperPhoto (more on that below). White Balance I keep on ‘Auto’ or ‘5500K’ for daylight photos. I like to keep my ISO Min and ISO Max at ‘100’ – which makes the photo super clean. The only thing you need to watch out for is lowlight motion blur. I typically make sure my camera is very steady if I’m using ISO Max at ‘100’. Raise it up if you’re worried about motion blur. I always keep Sharpness on ‘Low’ and add it later in Photoshop/Lightroom. Lastly I keep Color on ‘Flat’; however if shooting RAW it really doesn’t matter. Lightroom will apply the GoPro color preset to the photo regardless. The benefit is I have a flat colored JPEG in addition to the RAW GPR file.
Time Lapse Photo/Burst Settings:
Time lapse photo or burst are typically the photo modes I use for action shots. Many of the settings and reasonings are the same as above. You can’t use RAW in time lapse under 5 sec; however, a trick is that if you really want to shoot RAW as quickly as possible, you can use Night Time Lapse Photo mode, set the interval and shutter to ‘Auto’ and turn RAW on. Since the shutter is set to ‘Auto’, it will expose properly during the day. It will take the next photo as soon as the previous is done processing on the camera. I’ve noticed you can get sequential RAW photos to snap around every 3 seconds. Next, with ISO Min and ISO Max at 100, you really have to watch out for motion blur in the photos. I like keeping it at this level because I like a little motion blur in my action shots. You need to know how to take GoPro photos to get the right blur – but it’s a sweet look that enhances the feeling of speed for a lot of shots. I keep Sharpness on ‘Low’ for that natural look, and will add it later in post-editing. Lastly I actually typically have my Color set to ‘Flat’; however, it’s a tough task to color properly. I recommend ‘GoPro’ color for most people.
TimeWarp
TimeWarp is a new feature in the HERO7 based around creating stabilized motion time lapses, otherwise known as Hyperlapses. How does this differ from a time lapse? Well, Time Lapse Video mode (or TLV) isn’t stabilized! Typically you’d only want to use TLV when the camera is stationary or mounted to something that isn’t moving relative to the camera (such as a car or train). Now with TimeWarp, you can capture many dynamic activities and not worry about how stable the camera is. TimeWarp opens up new opportunities to capture long-form activities as short, shareable moments. For example, a 30 minute kayak down a river from a head mounted camera in TimeWarp would give an entirely new perspective of the flow of a river run.
The stabilization in TimeWarp is truly ground-breaking. TimeWarp offers speed options between 2x and 30x. Because of the way TimeWarp works, each faster speed option becomes increasingly more stable. Imagine the camera is bouncing from left to right. An unintelligent time lapse would capture frames at set intervals, no matter where the camera is pointing. When it gets put together it looks chaotic because some frames are looking left, some frames are looking right, and some are straight. TimeWarp looks for consecutive video frames that will match using the accelerometer and gyro. If the video is sped up by 30x, it has a lot more opportunity amongst dropped frames to find the right one that will match the previous frame (facing straight ahead). While in 2X it’s only dropping half the frames, so it will naturally retain some of the original movement. Because of this, I rarely use speeds below 10X while doing anything handheld. If my camera is mounted to something steadily moving such as a car or bike, I can look to try 2x or 5x.
TimeWarp Speed Uses
| Speed | Original Record Time | TimeWarp Time | Use-Case | Examples |
|---|---|---|---|---|
| 2x | 1 min | ~30 sec | Faster moving vehicles/activities where camera will only be looking in one direction. Small shakes/unsteady mounting is OK | Chest/Head mounted on bike, car mounted |
| 5x | 3 min | ~30 sec | Faster moving vehicles/activities where camera will be looking in one direction OR steady intentional hyperlapses such as gimbal. Shakes/unsteady mounting is OK | Car mounted, boat mounted, gimbal hyperlapses, skateboard mounted |
| 10x | 5 min | ~30 sc | Slower moving activities where camera is generally pointed in one direction | Head mounted running, kayaking, gimbal hyperlapses |
| 15x | 7.5 min | ~30 sec | Slower moving activities with more instability and shake - camera will remove much of unwanted motion | Chest/head mounted running, walking, paddleboarding, river floating, handheld hyperlapses while walking |
| 30x | 15 min | ~30 sec | Slowest moving activities with the most instability | Chest/head mounted running, walking, hiking, handheld hyperlapses walking/running |
TimeWarp is available in 4K and 1080 at 30fps for 16:9, and 2.7K 4:3 and 1440 at 30fps for a 4:3 mode. Currently there is no ProTune options for TimeWarp, and it does not utilize HEVC. If you think you’d want ProTune for TimeWarp, leave a comment below so I can make a strong case for engineering to add it as an update. You can lock exposure of your TimeWarp by pressing and holding on the back screen to initiate the touch exposure controls while you’re idle or recording. It will bring up a spot meter box where you hold – press in the center of that spot meter and it will switch to a lock button. Hit the check mark to confirm!
Live Streaming
The HERO7 Black is capable of live-streaming from the camera to the web using the GoPro App. Currently it’s available for FaceBook by default, as well as any streaming platform that will take an RTMP URL. This means you can stream into private groups on FaceBook, YouTube, Twitch, and Vimeo. Obviously Instagram is high on the priority list, and I’ll be the first to let you know when that will be available. Live stream works by connecting your camera’s Wi-Fi to a Wi-Fi hotspot that has internet. You can connect to your phone’s personal hotspot if you’re moving around, or your Wi-Fi internet hotspot you use at home. The camera will remain paired to your phone via Bluetooth during the stream. You can stream in 720P which looks great online. When you stream you also have an option to save your video to your SD card, which will be in 1080P 60FPS. When live streaming, the camera will remain in default video settings with HyperSmooth on and no ProTune. Also note that you cannot have the camera upside down or vertically in portrait mode during live streaming. Currently Facebook does not have the ability to read the GoPro orientation metadata.
Usability Updates
Portrait Orientation, Slow-mo Playback, Short Clips, Photo Timer, Optional HEVC, MFI Integration

HERO7 has a host of welcomed usability updates that I feel are a bigger story than some of the touted features. Overall the UI is much improved, with clearer flow between actions. Resolutions are now organized in different buckets based around aspect ratio, so the options feel much more simplified. For each aspect ratio (4:3 vs 16:9) you now have 4 options of resolution, instead of seeing the whole list of 8 in a row at once. Below are some of the more major features that are also included in the HERO7 Black!
Portrait Orientation
One of my favorite new features is the ability to shoot any piece of content in a vertical format. You might say – “Abe you could already do that, just turn the camera…” which is true; however, now the files save to the card in the vertical orientation, so it makes sharing direct to social WAY easier. If you’ve ever shot a vertical video on a GoPro and tried to post it to Instagram stories, you’ll know the tedious process involving multiple apps. It’s great to have high quality, unique content that’s able to go straight to Instagram stories from the GoPro app. Using a GoPro vertically gives an awesome wide view that otherwise isn’t really possible on your phone. In addition to standard videos and photos, you can also use TimeWarp vertically. If you’d rather not have vertical content, in settings there’s a portrait orientation lock. Otherwise when you’re shooting, keep an eye on the camera when you start recording. I’ve made the mistake of intending to have a vertical clip but started with the camera down at my side, horizontally. You can tell the clip will be vertical if either the front screen or back screen is rotated 90deg. If you’re in time lapse photo mode the entire lapse will be in the orientation that you start recording in.
Short Clips
There’s a new quick button on the back of the camera when you’re in video mode called short-clips. When enabled it’ll set video to only record either 15 or 30 seconds. This is a great way to film short, shareable moments. The back screen will show you a red progress bar around the outer edge of the screen to let you know how much time is left, while the front display will show a countdown timer. For hands free action content, combine this with voice control to get little snippets of action that are easy to share. It’s easy to hit record on a GoPro and accidentally leave it on for way too long, which requires sifting through lengthy clips and trimming to share moments to the gram. If I have moments already picked out at 15s each, it becomes easy to pop those over to my story after a day skiing.
Playback and Slow Motion
Playback is one of the biggest areas of improvement in the HERO7 usability. Overall it’s much faster to load content and quicker to seek through video. If you want to review footage on your HERO7 Black quickly, swipe up on the idle back screen to see the last photo or video taken. Swipe down to go back to the idle screen, or swipe left to go to the previous clip. Next, we finally have a way to play content in slow-motion directly on the camera. When playing back video shot in slow motion there’s a speed button that will drop the frame rate down to 30FPS from whatever it was recorded at – so it will play at 1/2 speed if shot at 60FPS, 1/4 speed if 120FPS, and 1/8 speed if 240FPS. If you need to scrub through a longer video clip, there’s a new button to seek through video that works much better than before.
HEVC for All Modes Setting
HEVC is the higher quality h.265 compression setting that was introduced in HERO6. By default, only the high-resolution/high frame-rate video modes utilize HEVC, while the rest use h.264. In the HERO7 there’s an option to turn on HEVC for all video modes (except TimeLapse Video and TimeWarp). From the idle screen, swipe down from the top to reveal the settings. Click on ‘Preferences’ > ‘General’ > ‘Video Compression’ > HEVC. Apple enabled HEVC support with their latest OS version, High Sierra. If you haven’t updated, I recommend it. As for PC, I can’t quite speak on the compatibility subject.
Photo Timer
In any of the photo modes (single photo, burst, night photo), there’s a new button on the left idle screen for a photo timer. You can have photos or bursts snap after 3 or 10 seconds. It’s a very very basic addition, but it’s insanely handy for things like selfies, action shots, or snapping unique handheld photos that you need to get the right orientation for. Also the front screen displays a countdown timer so you know just when that selfie is going to pop.
App Connectivity & MFi Chip
I can’t speak for the Android app experience, but I must say, the app connectivity is finally fast and easy. First of all, GoPro added a MFi chip to the HERO7 line, which is Apple’s made for iPhone certification. Your GoPro will remember your preferred Wi-Fi network, letting you live stream and send stuff to the cloud more easily and quickly. Also, in the App, the connection handshake is very seamless. Many people will be happy to know you can once again re-name your camera’s Wi-Fi network (this goes for old GoPros too!). You’ll see a prompt as soon as you connect your camera to the app for the first time. Another welcomed change is the GoPro App no longer has a forced login. There used to be a “no internet” bypass, but now it’s completely optional.
Audio Changes
I can’t speak extensively on audio simply because it’s not my area of expertise. What I’m told is the following: The HERO7 has an all new membrane design covering the microphones. This along with new tuning improves audio clarity and adds depth. I will try to give you guys an update as soon as I speak to some audiophiles that play with this camera alongside HERO6. I typically turn my audio to “Stereo” to reduce the amount of audio processing the camera does. I prefer it to pick up whatever sounds are happening vs. try to use smart algorithms to parse out what it thinks is audio vs. wind.
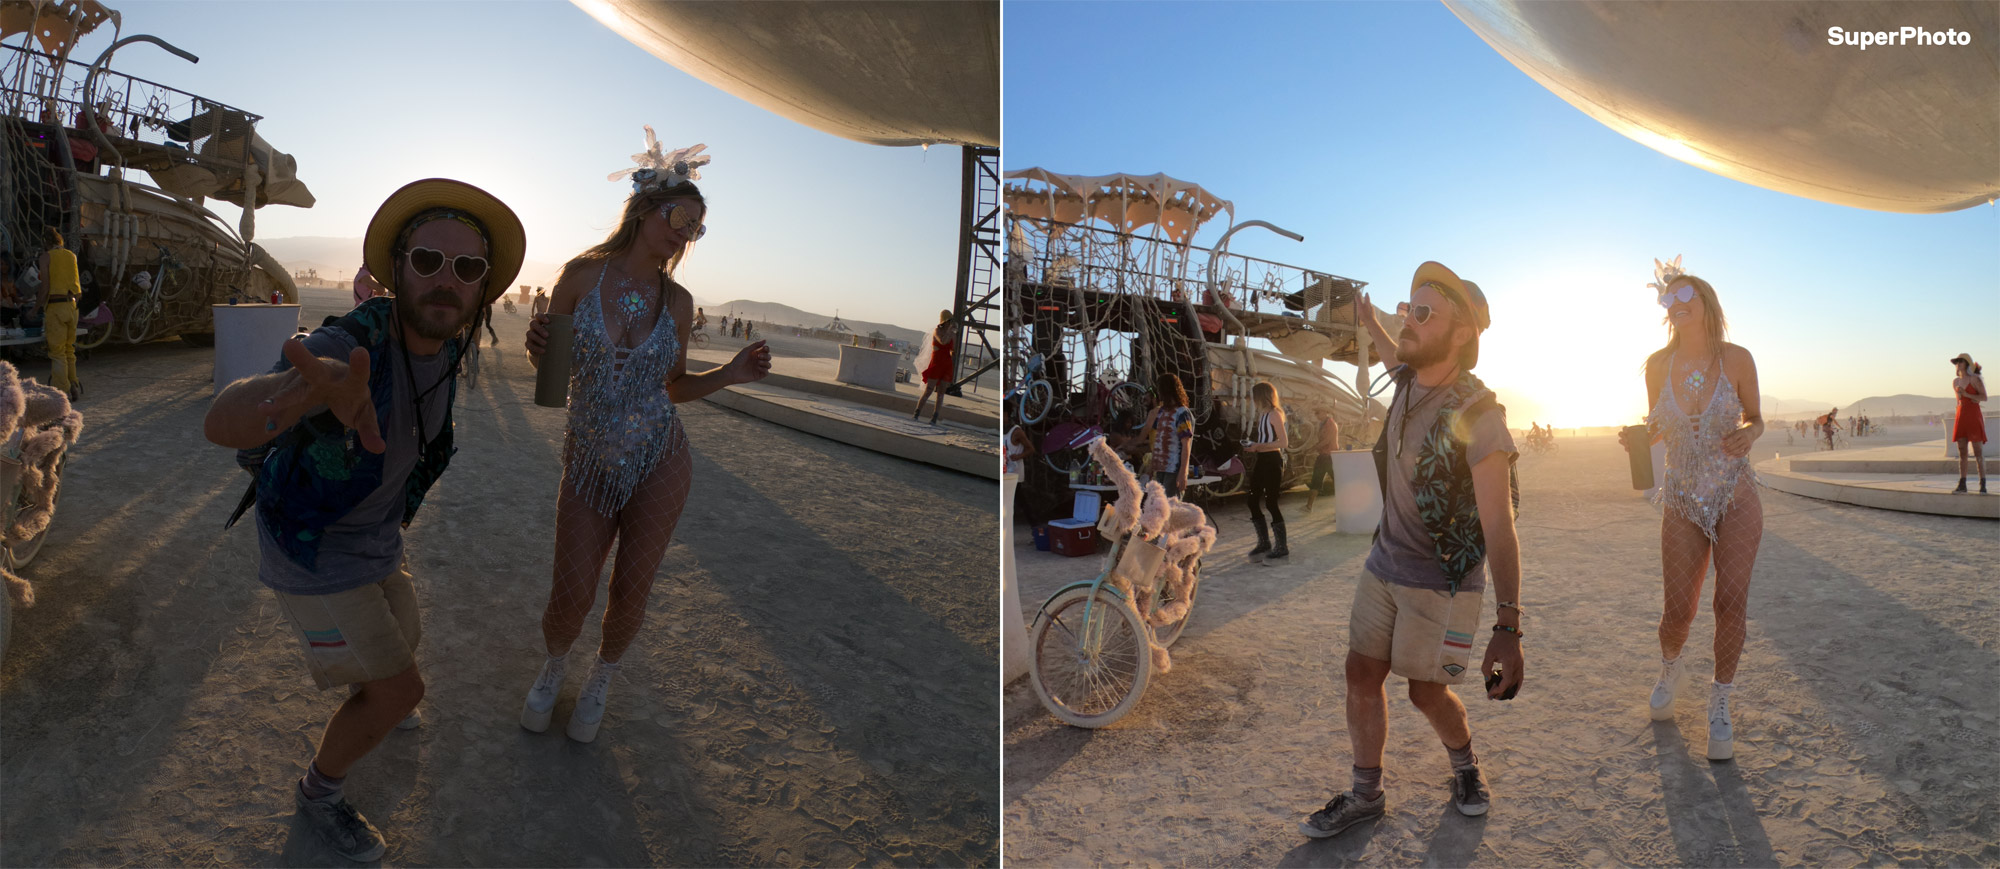
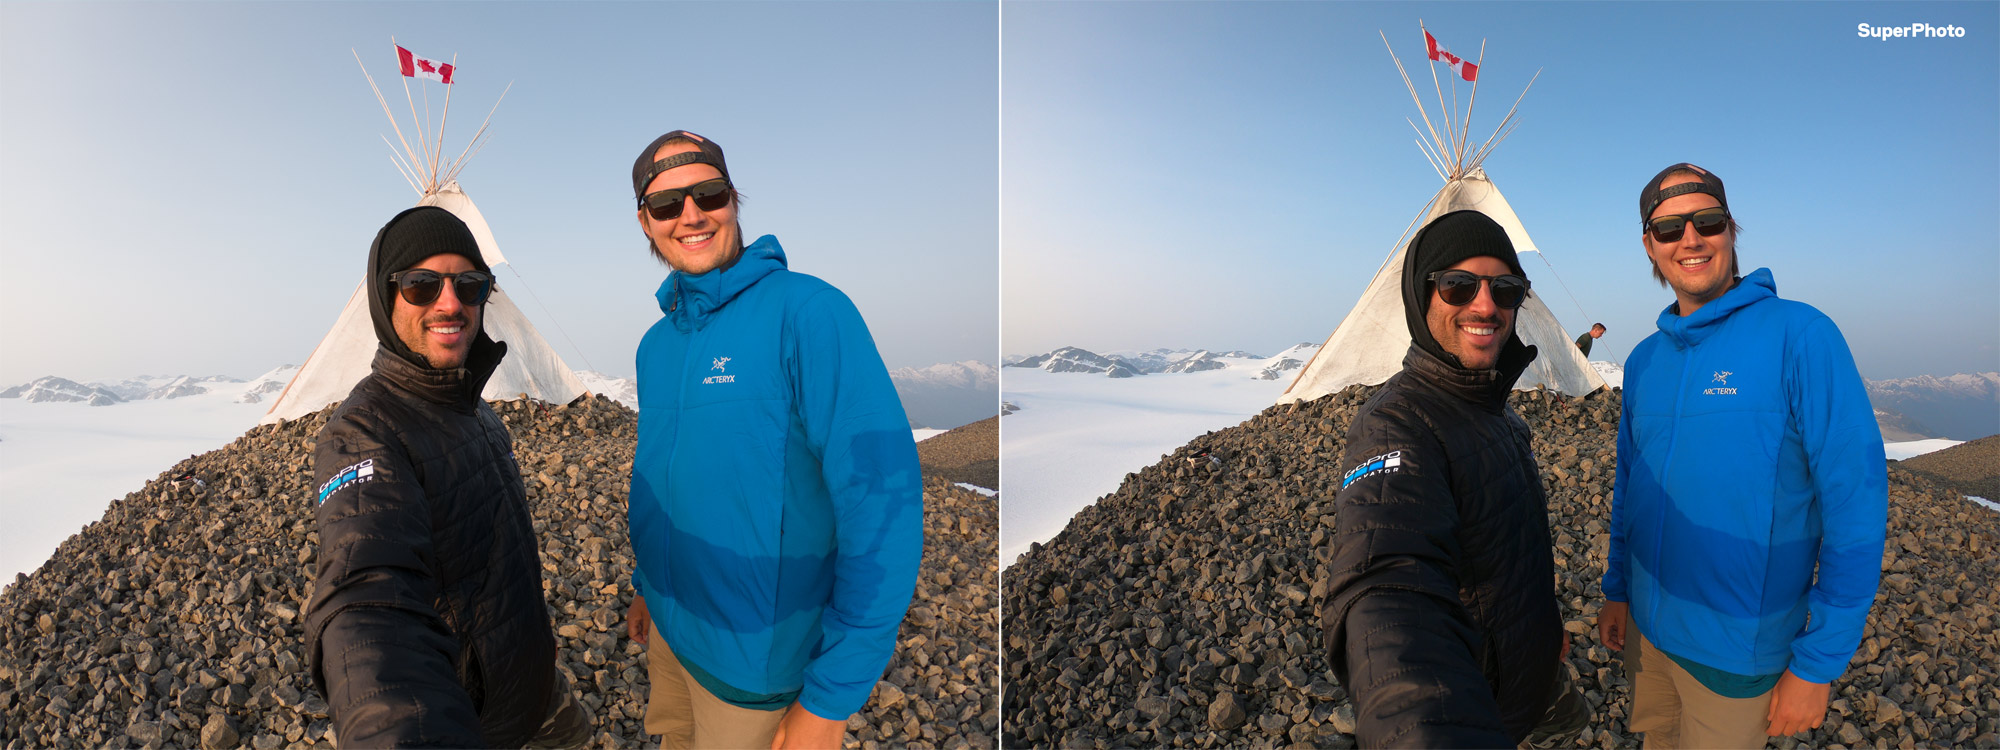
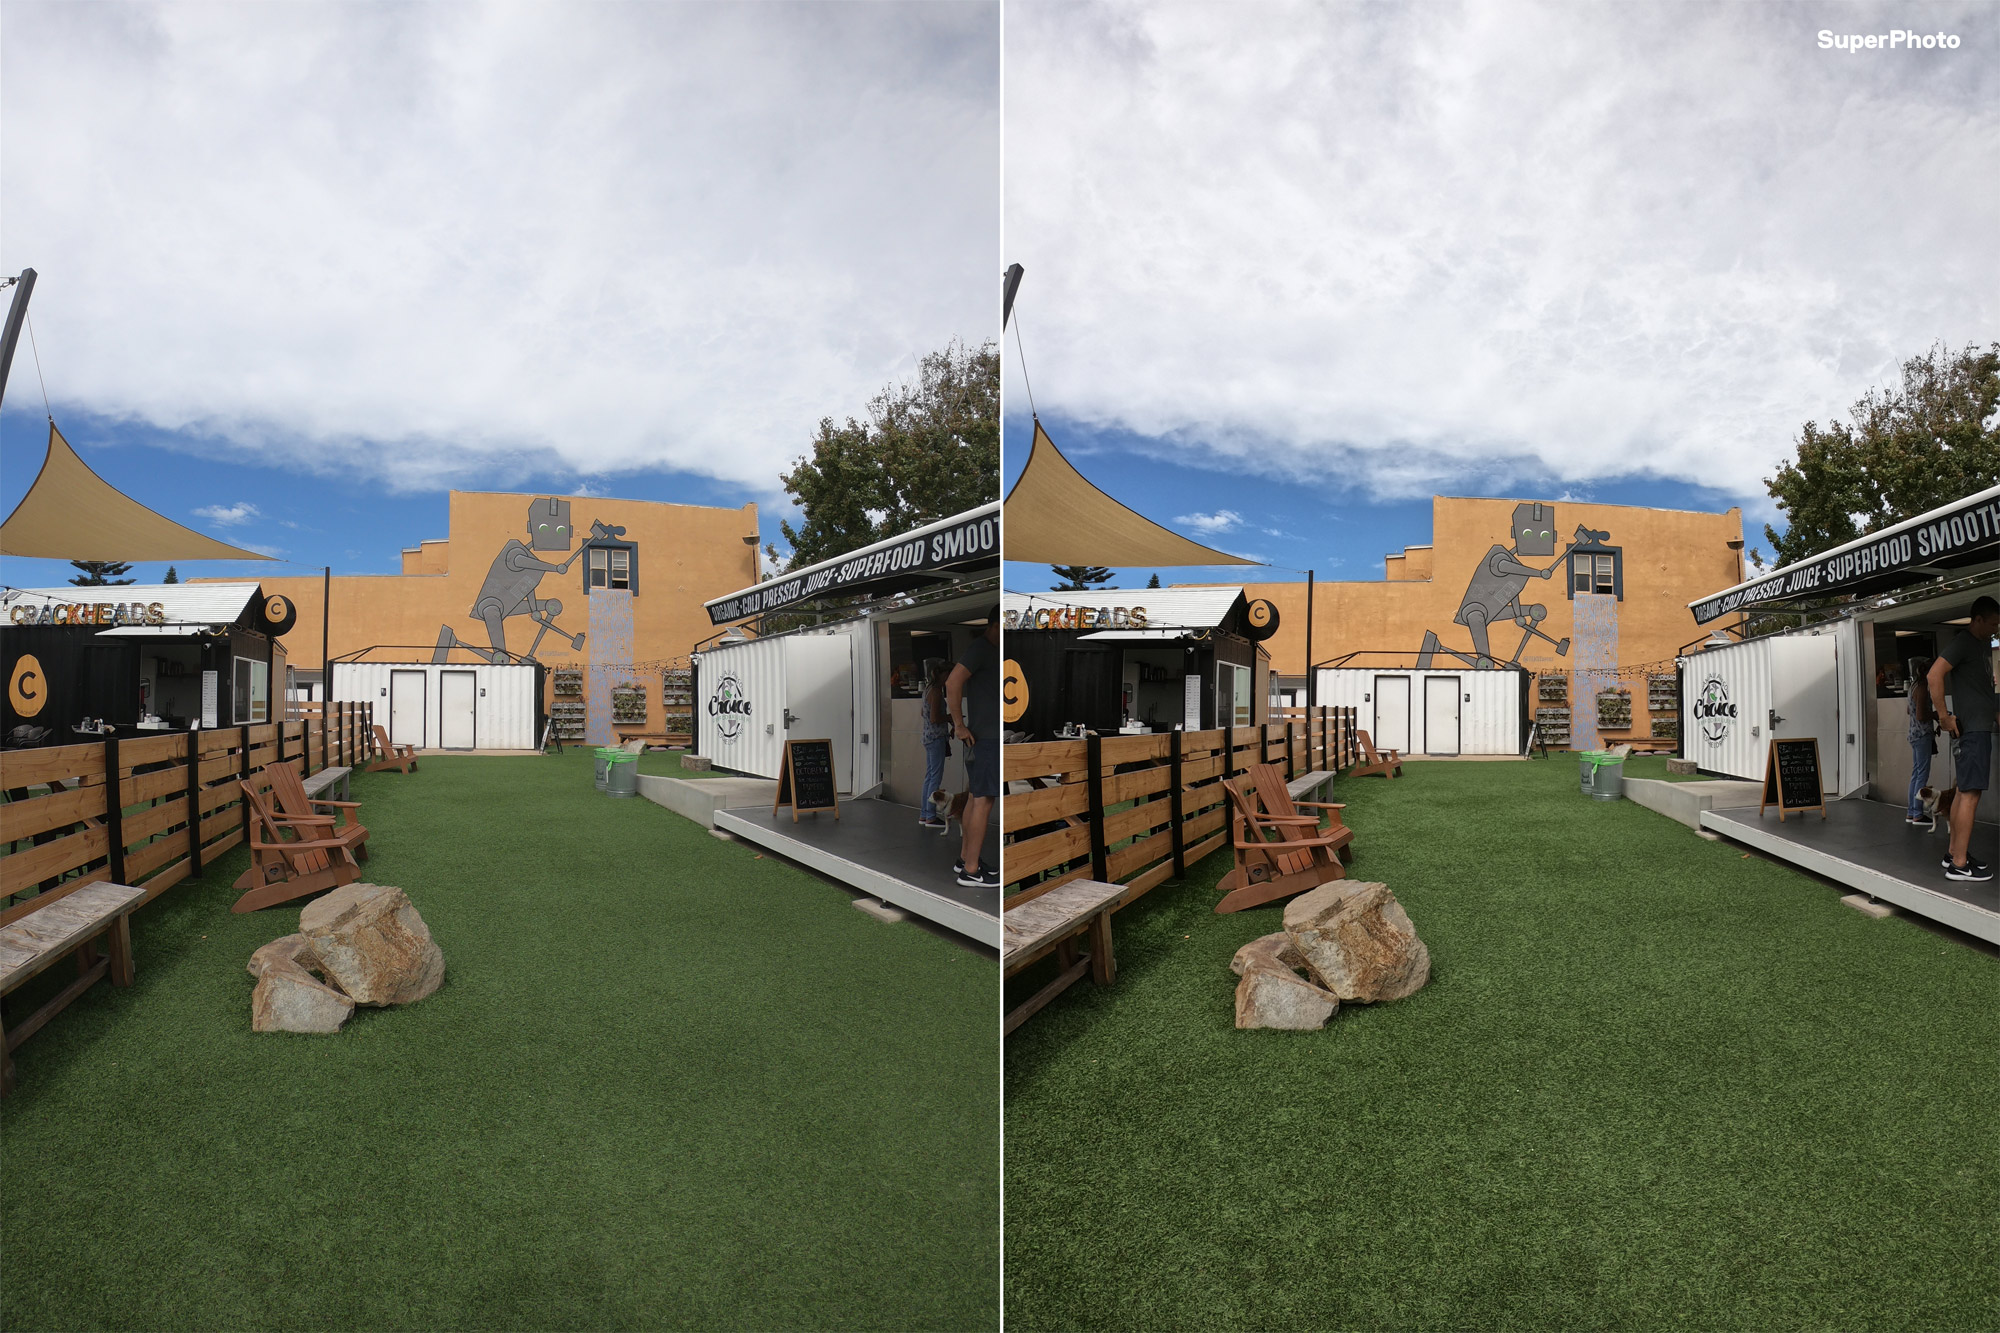
SuperPhoto
SuperPhoto is the one addition to the photo side of the HERO7 Black. It’s always been an amazing stills camera, but a lot of people ask me “why don’t my photos look like yours?” Well, with SuperPhoto now your photos might look a little closer 🙂 . It’s basically a “Smart HDR” wherein it’ll take multiple types of photos at once and decide which one is the best for the situation. HDR (high dynamic range), MFNR (multi-frame noise reduction), and LTM (local tone mapping) are all of the different types of photos it snaps, then spits you out the best looking one for the scene. SuperPhoto can only be used in single photo mode; however, you can use it for action shots if you use either the new photo timer, or voice control, or both.
Accessories Compatibility, Batteries, and Battery Life
HERO7 is the same size and shape as its predecessor. The frame is also the same, except for a 7 printed on the side so everyone can know you have that new-new, even when mounted. This means HERO7 is compatible with all previous GoPro mounts as well as Karma Grip and Karma Drone. In the drone the only new feature you will not be able to take advantage of is TimeWarp – it has not been ported over to have Karma (drone) support. The cover-lens on the HERO7 has a slightly more rounded look to it; however, it’s the same footprint, so things like PolarPro ND filters still work fine. As for batteries – good news – batteries are the same size and form factor as HERO6 and HERO5, so everything is backwards compatible in that regard. The not-so-good news is that batteries are the same size and form-factor – meaning no improvement to battery life that I can tell. There’s no official word on battery longevity, but I would assume you’d get about the same (or slightly less) battery life as HERO6 unless you’re using HyperSmooth or TimeWarp, in-which I’ve noticed about a 20% shorter battery life. I suggest ordering an extra battery or two so that doesn’t become a limiting factor for your adventures.
Would I buy it?
The HERO7, while not a huge shift in specs or basic video quality, feels like one of the biggest jumps in camera experiences we’ve had in the history of the GoPro lineup. I always take note of how my close friends react to using new cameras for the first time. All of them have been ecstatic, calling or texting me to tell me how impressive HyperSmooth is, along with the other welcomed usability updates. If you’ve been holding out and have anything before a HERO5, it’s a “definitely upgrade”. If you have a HERO5 and are looking to up your quality from all perspectives, this is a definite buy as well. HERO5 is a great camera, but color, slow-mo capabilities and quality got a huge improvement with HERO6. Lastly, if you have a HERO6 and a Karma Grip and are kicking yourself for not waiting for a HERO7, don’t! That’s a winning combo. If the features and updates I spoke about above sound game changing to you then look into upgrading. I’ve been genuinely very amazed at the kind of content I’m able to create completely handheld, or mounted to mounts that are nowhere near useable for any previous generation of GoPro (shaky and unstable).
Thanks for your continued support! Hope all of this helps you make an informed decision about the new gear, as well as getting you dialed once you get your camera! I always go through about 3 months of trial and error, so I’m happy to pass off my learnings to all of you out there! Give me a shout below if I’ve missed anything major. I haven’t talked much about photo settings in here because it’s not a big story of the HERO7, and settings are very similar to what you’d use in HERO5 and HERO6. Last but not least – all the photos in this blog post were shot on HERO7 obviously!