Presets and shortcuts together are amazing new additions to the HERO8 Black that greatly speed up the process of switching settings. Presets allow you to save up to 10 custom video modes, each with their own ProTune settings to be used later with a quick tap of the idle screen. Presets are present in Photo and Time Lapse modes as well. Once you setup a preset, you can choose up to 4 on-screen shortcut controls that take you directly to specific settings pertaining to the mode you’re in. The hope is that once you setup a preset, and the associated shortcuts, you should never have to jump into a lengthy menu system. This will greatly reduce your fiddle time out in the field and no one likes a fiddler when you’re trying to shred. For video, some of the shortcuts include slow-motion, white balance, and ISO. For photo & TimeWarp there’s also incredible new shortcuts like Output (SuperPhoto vs RAW vs Standard), TimeLapse interval, TimeWarp speed, and more! You can switch presets and access your shortcuts when the camera is in the vertical orientation now. In HERO7, if you were in portrait mode you’d have to get the camera horizontal to access any settings – which is sometimes hard when the camera is mounted! Note that currently the HyperSmooth shortcut is used to toggle Boost on and off, though my hope is that it will be able to toggle all HyperSmooth settings in the near future.
Abe’s Go-To Preset Settings (Video Modes)
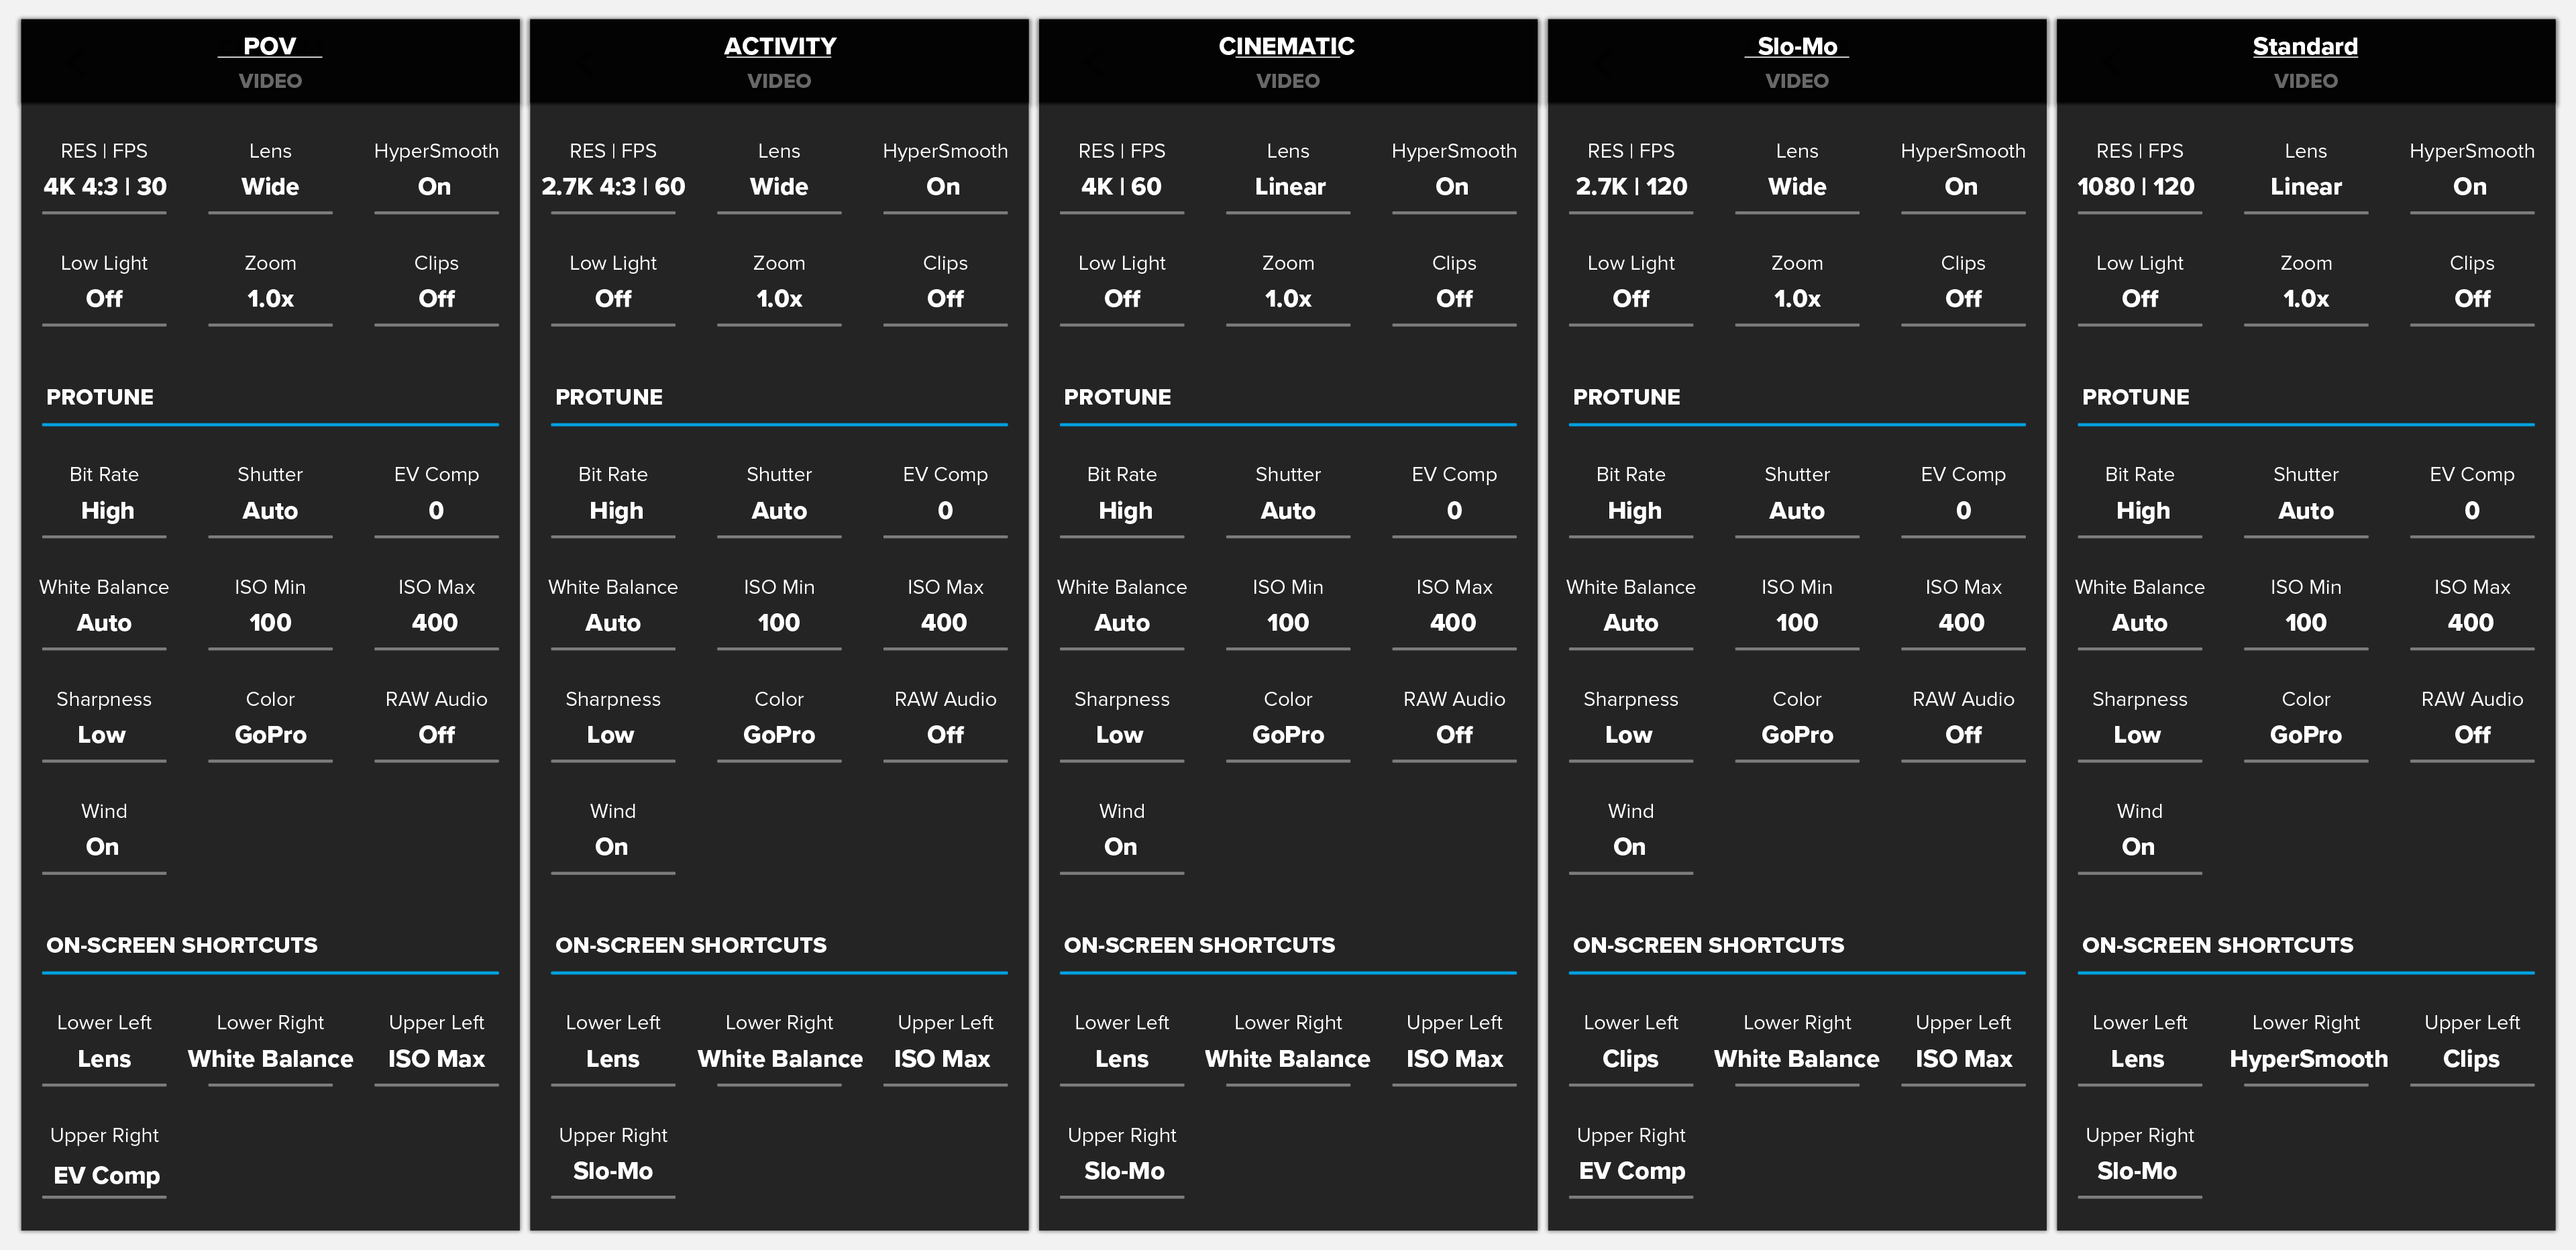
Listed below are the presets I have set on my HERO8 in the video modes. It looks a little overwhelming at first but once you’re setup, you should be dialed. This pretty much covers 90% of my filming – I’ll explain below how I utilize each one. I would suggest setting your camera up in these modes, and then walking through my explanations below while you’ve got your camera in front of you. It’ll be a little easier to digest.
Click to Zoom
Video Presets Explanation, Uses, and Walkthrough
To start, I’ll just note that ProTune settings across all my video presets are identical. See ProTune walkthrough below.
POV Preset
This is my main preset if I’m filming high resolution content that I don’t need to slow down. This is for things like POV walk-throughs, interactions with people, etc. My on-screen shortcuts are Lens, White Balance, ISO Max, and EV Comp. Lens will allow me to switch between Linear and Wide quickly – WB for keeping my colors correct for the scene – ISO Max to adjust based on the available light (lower to 100 for full sunlight, raise to 1600 for darkest scenes), and EV Comp just to have in there because I didn’t need any other on-screen controls.
ACTIVITY Preset
I use this for pretty much anything activity based or for social media sharing. My shortcuts on-screen are Lens, White Balance, ISO Max, and Slo-Mo. Explanations of shortcuts are similar as above. Difference here is the Slo-Mo button which will pop you between 30 and 60FPS. For social, many times I don’t need 4K high-resolution and I don’t need slow motion so this is a great all around use for that. One thing to note is Linear is not available in 60FPS in this mode, so you’ll have to change to 30FPS with the on-screen shortcut before switching to Linear.
CINEMATIC Preset
This is my go-to preset for 3rd person and follow cam type shots. The lens shortcut allows me to switch between Wide and Linear, while the Slo-Mo shortcut allows me to quickly swap between 30 and 60FPS. *4K-60 Linear with HyperSmooth is not currently available but will be released shortly with a firmware update.
SLO-MO Preset
Perfect for what it’s said it’s for! HyperSmooth and crystal clear ultra-slow motion. I have the ‘Clips’ shortcut so I can easily spit out 15 or 30 sec nuggets for social media sharing.
STANDARD Preset
I keep this at the bottom of my list, but it’s perfect for social media. I have shortcuts to Lens, HyperSmooth, Clips, and Slo-Mo. I have access to all of the lenses in this mode and we can utilize HyperSmooth Boost here. Clips is great to have preset video lengths of 15 and 30 sec, and lastly Slo-Mo can toggle me between 120FPS and 60FPS.
ProTune Settings
Some of this may be over your head, so if you have a question ask below! I keep Bit Rate on ‘High’ all the time because who wants lower quality video? Shutter is set to Auto. If I want to lock exposure, I use the on-screen press and hold to lock. I keep EV Comp at 0 which means it’s exposing normally at all times (not under or over exposing anything). For White Balance I keep it at ‘Auto’; however, I will adjust this using my on-screen controls quite often. For most daylight cases you can set it to ‘5500K’ so colors are consistent through changing colors and scenes – also so colors match across multiple cameras when filming with a few. I keep my ISO Min at ‘100’ so I get dark, clean blacks. I start with ISO Max on ‘400’; however I will constantly adjust this using the on-screen shortcuts depending on amount of available light. If it’s daylight sun, I will keep this at 100, if it gets darker I may raise it all the way to 1600. Sharpness I always keep ‘Low’ because I prefer the look (less digital feeling). For Color, I’ve been having great luck with ‘GoPro’, though if you find it too punchy, feel free to try out ‘Flat’. Lastly, for the Wind, I prefer ‘On’ because the HERO8 does such a good job of reducing wind noise but keeping external noises alive!
TimeWarp, Time Lapse, Night Lapse
Abe’s Go-To Preset Settings (Time Lapse)
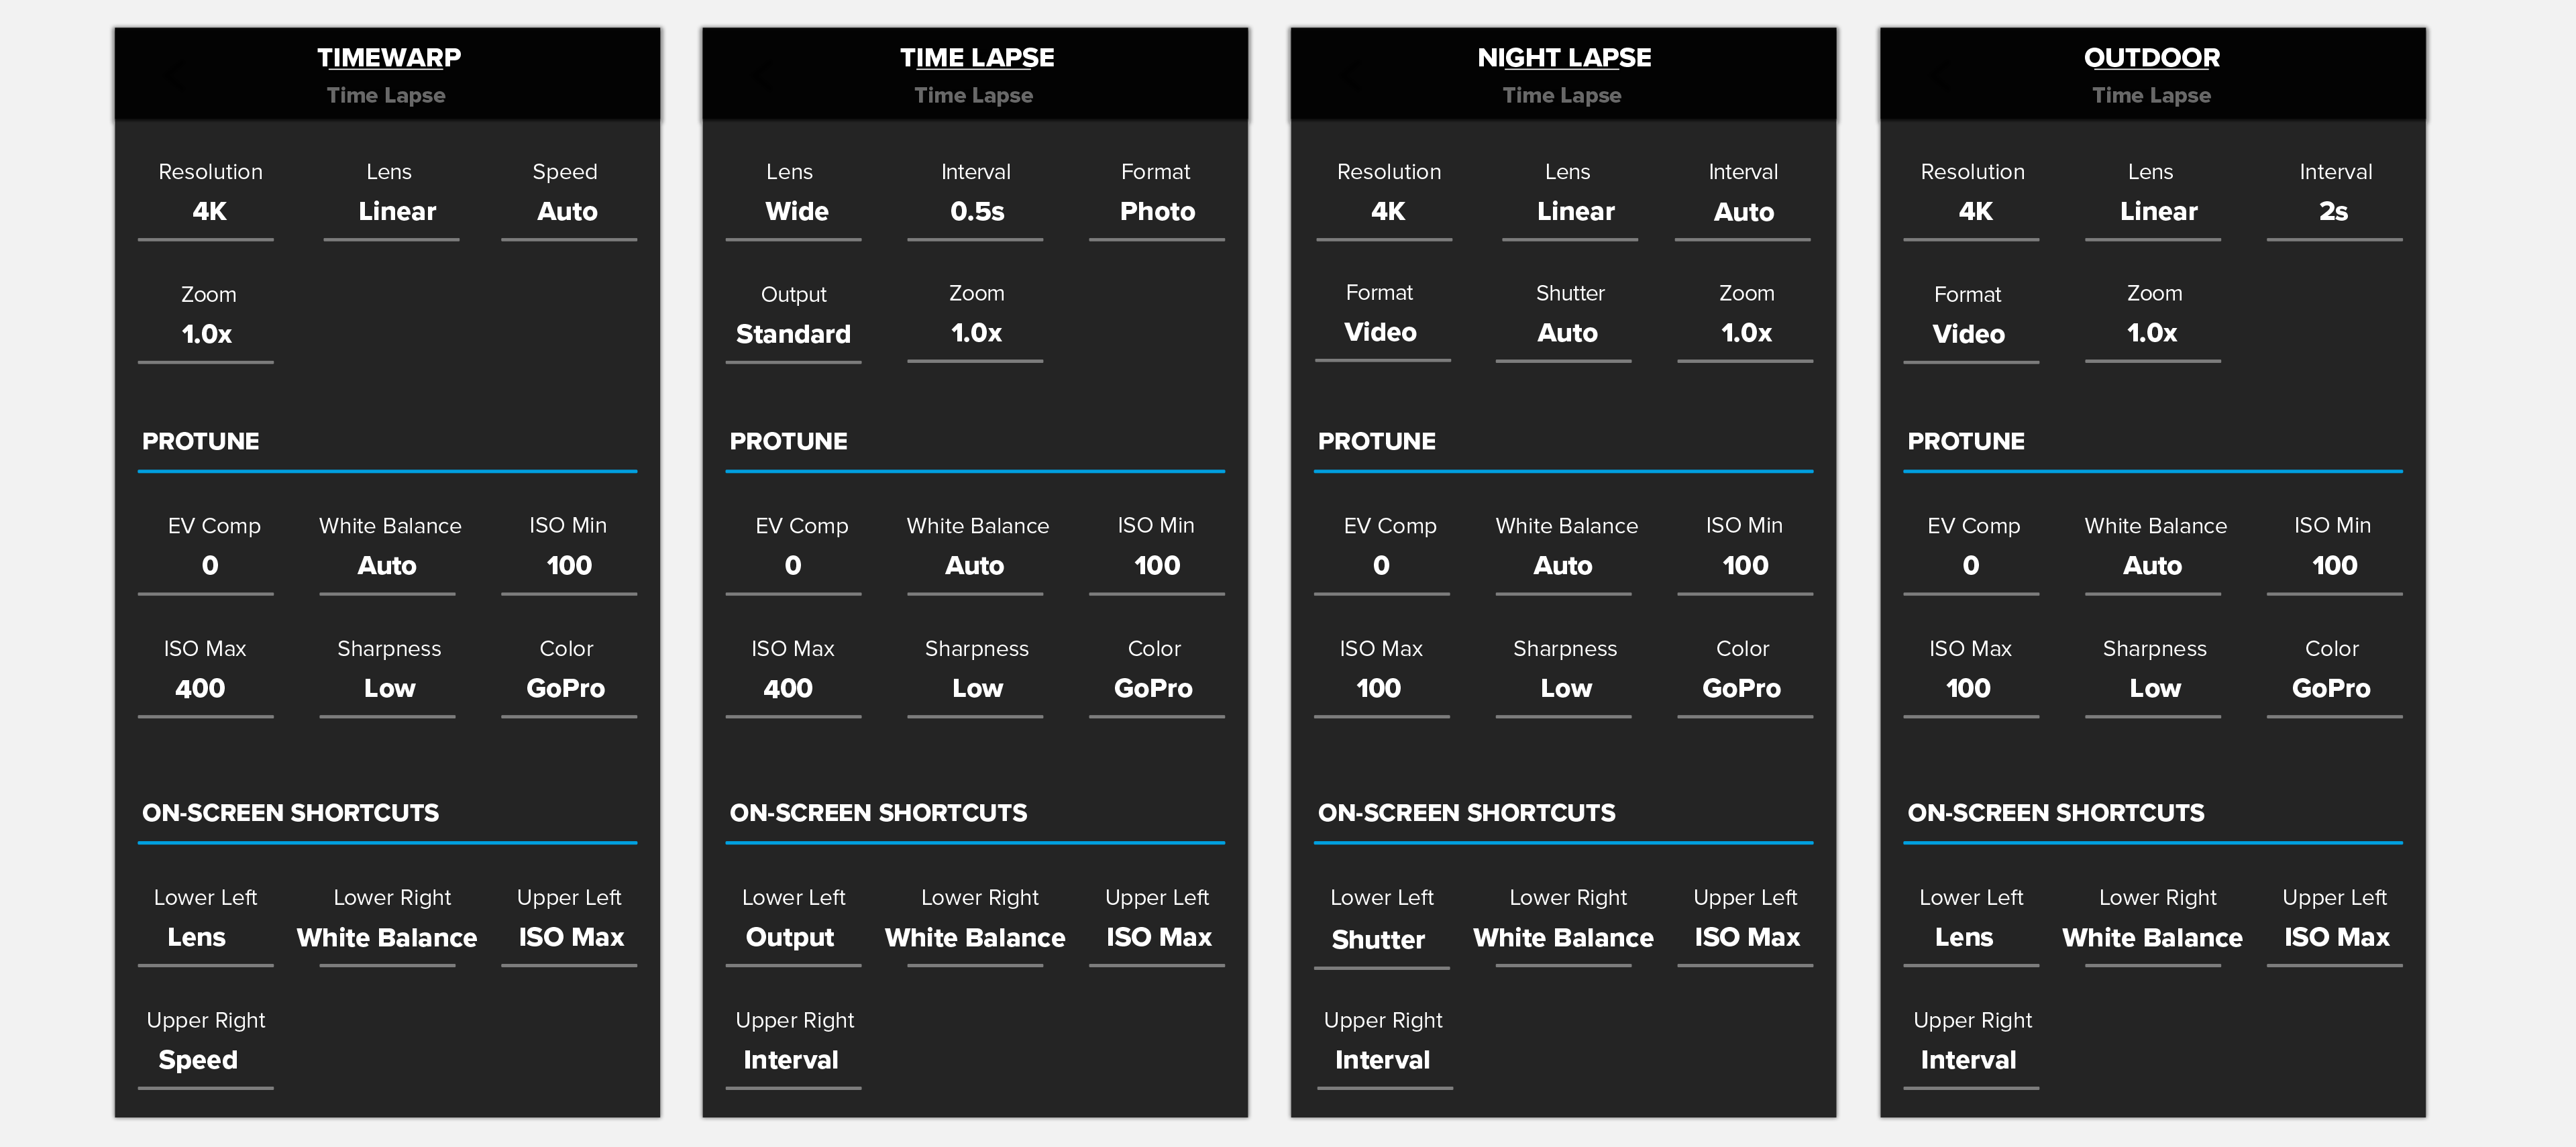
Listed below are the presets I have set on my HERO8 in the Time Lapse modes. I’ll explain below how I utilize each one. Again suggested that you reference this photo to set up your HERO8, and then follow along my explanation below with your camera in your hand!
Click to Zoom
Time Lapse Presets Explanation, Uses, and Walkthrough
TIMEWARP Preset
There’s not much to setup with TimeWarp as long as you have your on-screen shortcuts dialed. I’ll either film in 4K or 2.7K 4:3. For lens I almost exclusively use Linear because it provides a smoother result and looks better for landscapes and architecture. For speed, the new Auto setting is perfect when you don’t know what to use. If I’m not using Auto, I’ll most likely use 15x for anything handheld/walking, and 5-10x for anything car/vehicle mounted. With your on-screen shortcuts I recommend almost always locking your White Balance if you want a consistent look. Next, determine how much light there is and how much grain you’re willing to put up with. ISO Max of 100 looks amazing, but sometimes you’ll need to raise that up based on steadiness of the motion and available light. If it’s mounted to a car, you could probably get away with low ISO and give your video a nice looking blur. Lastly, I prefer to use the exposure lock before I start a TimeWarp using the press and hold exposure lock on the rear display.
TIME LAPSE Preset
This preset is made for capturing photos hands free. When you click the shutter button it will take 2 photos per second until you stop it. My on-screen shortcuts are Output, White Balance, ISO Max, and Interval. With Output you can choose between standard photo and RAW; however, RAW is only available on intervals 5s or higher. I rarely adjust White Balance when I’m using this for photos unless light is really crazy outside and needs it. Sometimes if you’re on a boat in the middle of the aqua-blue waters of the Bahamas you’ll benefit from locking WB. I’ve started out with a Max ISO of 400 knowing that I’d use the on-screen shortcuts to adjust as necessary. 100 is great if you’ve got plenty of light or you have a steady hand. For most I’d probably say 400 is a safe bet if you don’t want blurry action photos. Lastly interval is great if you don’t really need 2 photos per second – such as during longer mountain bike runs, kayaking, etc.
NIGHT LAPSE Preset
I have this preset to create night time lapse video in 4K Linear. I have shortcuts to Shutter and Interval, which you’ll want to play with to see what works for your settings. I typically keep interval at auto, which means it’ll start the next capture as soon as the previous photo is done snapping. Note that by not having a fixed interval, it’ll make your timelapses appear to have variable speed if your scene is going from light to dark and your shutter is set to auto. This is because the exposure times will be shifting depending on the light. If it gets really light out, the camera will be snapping almost video rates, then all the way up to night exposure levels when it gets dark. If my shutter isn’t auto, take some test shots to adjust that and the ISO to whatever gives you a clear shot of what you’re trying to capture. I recommend locking WB for any night lapse. Usually 5500K does the trick, but experiment a bit to see what works!
OUTDOOR Preset
This preset is for a normal time lapse that goes straight to a video. Technically, you can use the Night Lapse preset for this same thing, but it’s nice to have one preset for night time type settings (WB and shutter), and then keep this preset as a quick and always ready mode. With an interval of 2s I’ll end up with one minute of time lapse for every hour it records. Because it’s a video, it’s easy to deal with on mobile and speed up if needed. There’s no stabilization in this mode so keep it steady! I prefer locking both WB and exposure (exposure locking through the rear display touch & hold).
ProTune Settings
Most of these settings are explained above, but just to reiterate: EV Comp is 0 because GoPro’s image science engineers are good at their jobs and it’s usually pretty spot on! White balance is set to Auto, but I like to have this as an on-screen shortcut for all presets! ISO Min and Max are both at 100 for the video lapses, but this is definitely something that should be played with. If you keep ISO Max at 100 you risk getting blurry photos if you’re moving, or strange blurs in your Time Warp videos, so I have that set at 100. I personally will always aim for 100 for my action photos, but sometimes it’s just too low for the motion. I always keep Sharpness at Low because I prefer the look – this might be too soft for you – switch it up if necessary! Lastly, GoPro color is punchy and rad – I’m a fan. Another win for the engineers!
RAW Photo, Burst Rate, LiveBurst
Abe’s Go-To Preset Settings (Photos)
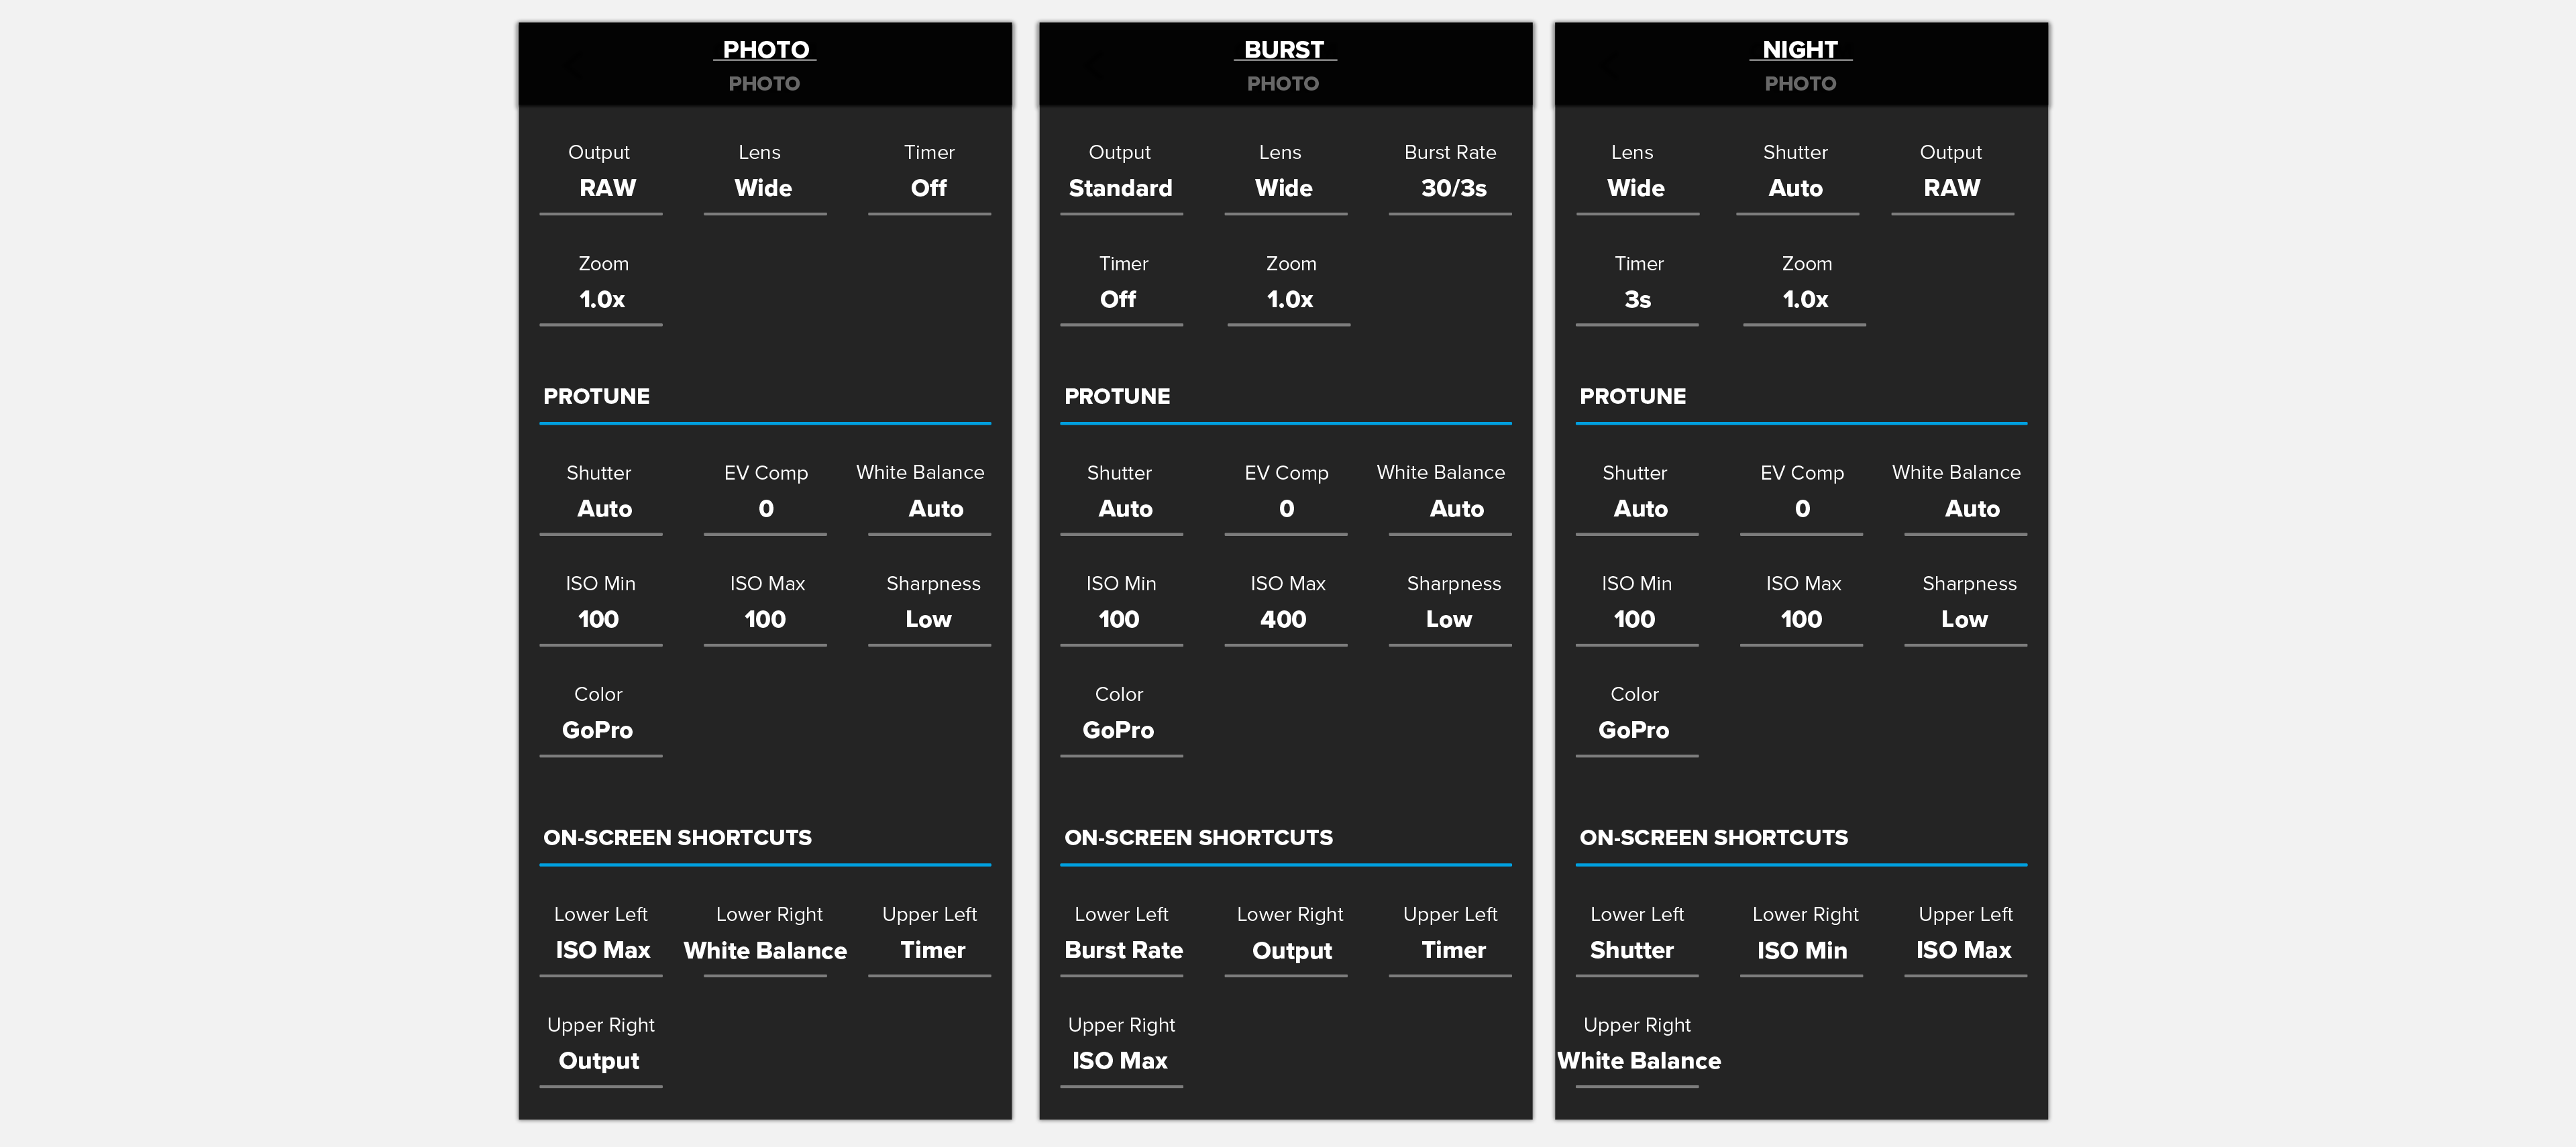
Listed below are the presets I have set on my HERO8 in the Photo modes. I’ll explain below how I utilize each one. Feel free to setup your camera this same way and walk through the explanation below with camera in-hand.
Click to Zoom
Photo Presets Explanation, Uses, and Walkthrough
PHOTO Preset
Single photo usually means I’m intentionally snapping a photo using either timer mode, voice-control, or both. It’s typically selfies, photos with friends, or landscapes. For this reason I like to turn RAW ‘On’, because they are usually photos I’ve purposely taken with the intention of sharing at some point. For those that don’t edit their photos on a computer, I recommend SuperPhoto. I keep an ‘Output’ shortcut on-screen to easily flip between RAW, SuperPhoto, HDR, and standard! White Balance I keep at ‘Auto’ or ‘5500K’ for daylight photos. I like to keep my ISO Min and ISO Max at ‘100’ – which makes the photo super clean. The only thing you need to watch out for is lowlight motion blur. I typically make sure my camera is very steady if I’m using ISO Max at ‘100’. Raise it up if you’re worried about motion blur. I always keep Sharpness on ‘Low’ and add it later in Photoshop/Lightroom.
BURST Preset
This preset is pretty self explanatory. All of my photo settings are similar to single photo, although I recommend starting with a Max ISO of 400 just so your photos don’t come out blurry. I’ll probably keep my Max ISO at 100 🙂 . This mode really benefits from the on-screen shortcuts. My shortcuts are burst-rate, output (for switching RAW on and off) and timer! Couldn’t be easier to dial in your settings.
NIGHT Preset
Night photo has settings similar to single photo. My on-screen controls are the only things I’ll need to touch to get this set up. Typically it takes me about 3 or 4 test photos of tinkering with settings before I have the perfect photo. Shutter is a shortcut because obviously you’re going to want to change this depending on available light. You can take a photo up to 30s to capture the stars! I have ISO Min AND Max because sometimes I need to force a high ISO to make sure it captures the stars properly. Lastly White Balance is a must-have for night photos. Play with it and see what comes out nicely!
Thanks for digging deeper with your settings! If you came over from the HERO8 post, you can hop back over now!