EDIT: Updated 12/20/2023 with updated QR codes & information due to newer Labs features available
A downside of digital stabilization is that it’s inherently bad at night or in lowlight situations. If you’ve used HERO8 or HERO9 indoors or in the woods, you’ve most likely wondered why your footage has sporadic and jittery ghosting. It’s quite obvious once you know what’s happening behind the scenes, but rather difficult to explain all aspects (which I will attempt below). The culprit of the blurry & jittery footage is long shutter speeds – this occurs when the camera is in a lowlight situation and recognizes it needs to take action to make the scene lighter. There’s two ways a camera can do this where the lens aperture is fixed: either raise the ISO so there’s more digital gain (more noise), or make the shutter speed longer. In the case of a GoPro, it uses a combination of both; unfortunately, as soon as it decides to make the shutter speed longer it’s introducing the chance for the jitters to occur. They will only show up if your camera is being physically shaken – which happens a lot if it’s handheld or mounted to something. HyperSmooth is so good that it’s made us forget just how shaky our hands are when we’re going about filming things.
Why HyperSmooth has Jitters in Lowlight
So what’s really happening? Let’s assume you’re in the woods following your dog trying to get a shot. First of all, inside houses and in a forest are both much darker than you think – our eyes are great at adjusting. The GoPro sees that it’s dark and it needs more light, so it elongates the shutter speed to the longest it can: 1/30th of a second (because you’re presumably shooting 30FPS). This may not seem very long, but it’s long enough to start getting significant motion blur. If you have the opportunity to shoot photos with a DSLR, I recommend changing the shutter speed to 1/30, then move the camera back and forth really fast while you snap a photo. See how much motion blur you have. The faster you move, the longer the blur will be; secondarily, the longer your lens focal length, the more visible the blur will be.
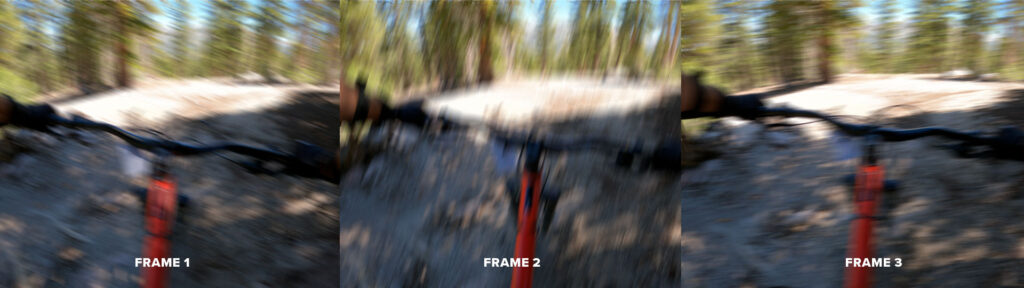
Actual frame grab from 4K on HERO9.
So as you’re walking, each frame has the opportunity to have 1/30th of a second of motion blur. The problem is you’re walking and moving the camera up and down, left and right, and rotating as you’re trying to follow the dog. It doesn’t feel like you’re being shaky but you are. Each frame of video now has blur vertically, horizontally, rotating, constantly shifting in all directions. This wouldn’t be an issue if stabilization was turned off because it’ll just show a shaky video and the blur follows the shake, so it’s obvious. Now introduce HyperSmooth: it is based on the accelerometer and gyro of the camera so it knows exactly where the frame of video should be if it were stable. It doesn’t know what your frame of video looks like because the stabilization is not visual based. It just says “you moved the camera down a little bit so I need to correct and place this frame up a bit, now you moved to the left, so I need to place this frame to the right”. So now you have what should be perfectly stable video, except that each frame has the motion blur going up and down, and then left and right, and then rotating – so when you watch back your video it seems stable but you see ghosts jumping around whenever the camera shakes. Starting to make sense now?
How to Solve the Problem
We either need ZERO camera shake, or we need to have ZERO motion blur on any frames. To get zero camera shake we can use a gimbal – hence why a gimbal never gave us these issues even in low-light. It stabilizes the camera itself, so the images it captures have zero motion blur. Since “gimbals are dead”, we need to solve this another way: putting a limit on the shutter speed. By not letting the shutter speed get long enough, we can stop it from ever producing frames that have motion blur visible. Up until now, there’s one way to solve this, and that is to manually lock the shutter speed on something specific. The issue with this is if the light is changing throughout your video it will overexpose or underexpose constantly. You’d have to babysit the shutter setting, constantly adjusting. I’m typically OK with underexposing an image (letting it go dark), but I hate a blown out image. The solution: maximum shutter speed control via GoPro Labs.
Maximum Shutter Speed Control with GoPro Labs
GoPro Labs is an experimental suite of features made by GoPro, but not fully fleshed out into a finished product like the main firmware. Labs features and settings are accessed and triggered by QR codes that the camera will be able to read once Labs firmware is installed. Simply point the camera at a QR code when powered on.
Maximum shutter speed is a control that tells the camera to never elongate the shutter longer than your specified shutter speed, but allows it to go shorter. Essentially saying, if the scene gets brighter, the shutter will go shorter, but it won’t elongate past whatever you set. The caveat is that by not allowing it to expose longer means it will get significantly darker than it normally would in lowlight situations; however, you will be able to easily see this on the rear display and can bump up the ISO Max to accommodate. The camera knows what the light levels should be in any given situation, and by removing the ability to use longer shutter speeds to make the scene brighter, it will exclusively look to ISO to brighten the image. This means your images could potentially be very noisy. I typically begin my sessions with ISO Max of 100 to see what the light levels are looking like, and then increase to 200 or 400, never really wanting to go higher than that due to extreme digital noise.
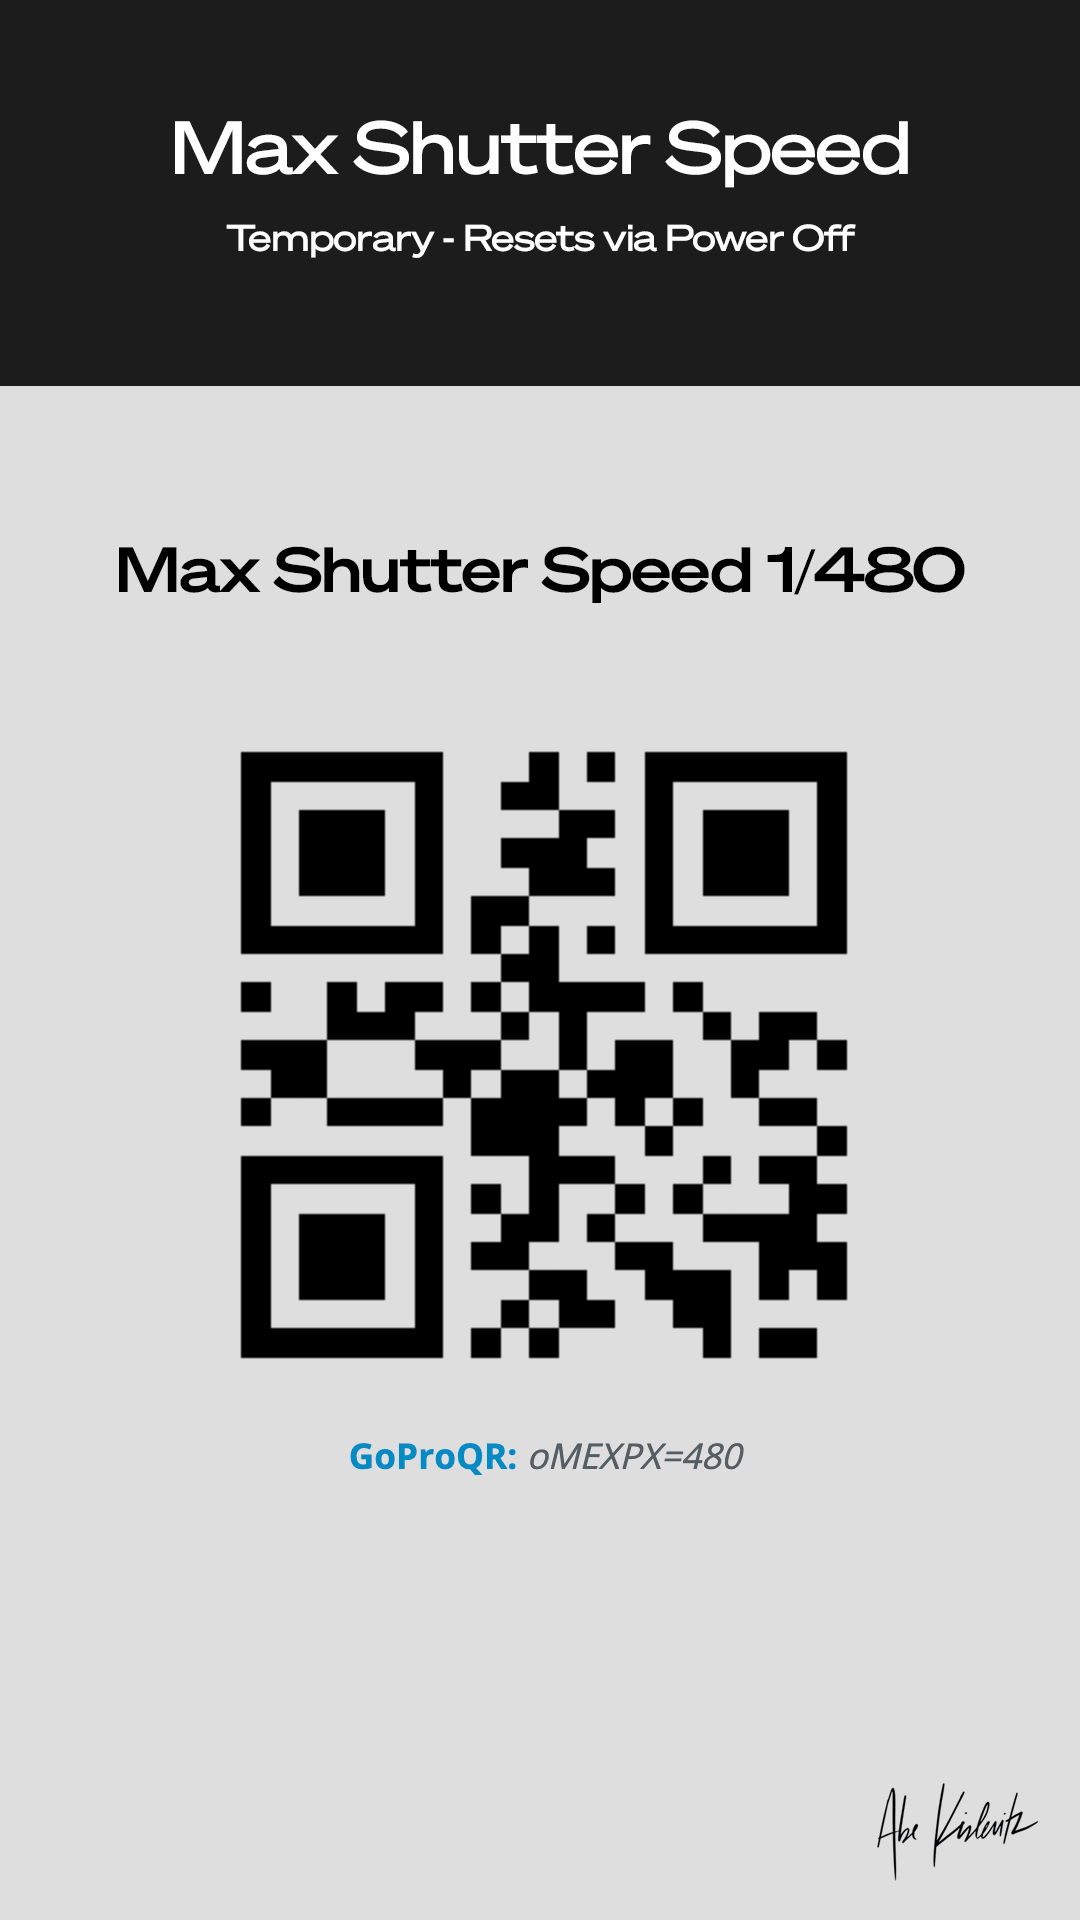
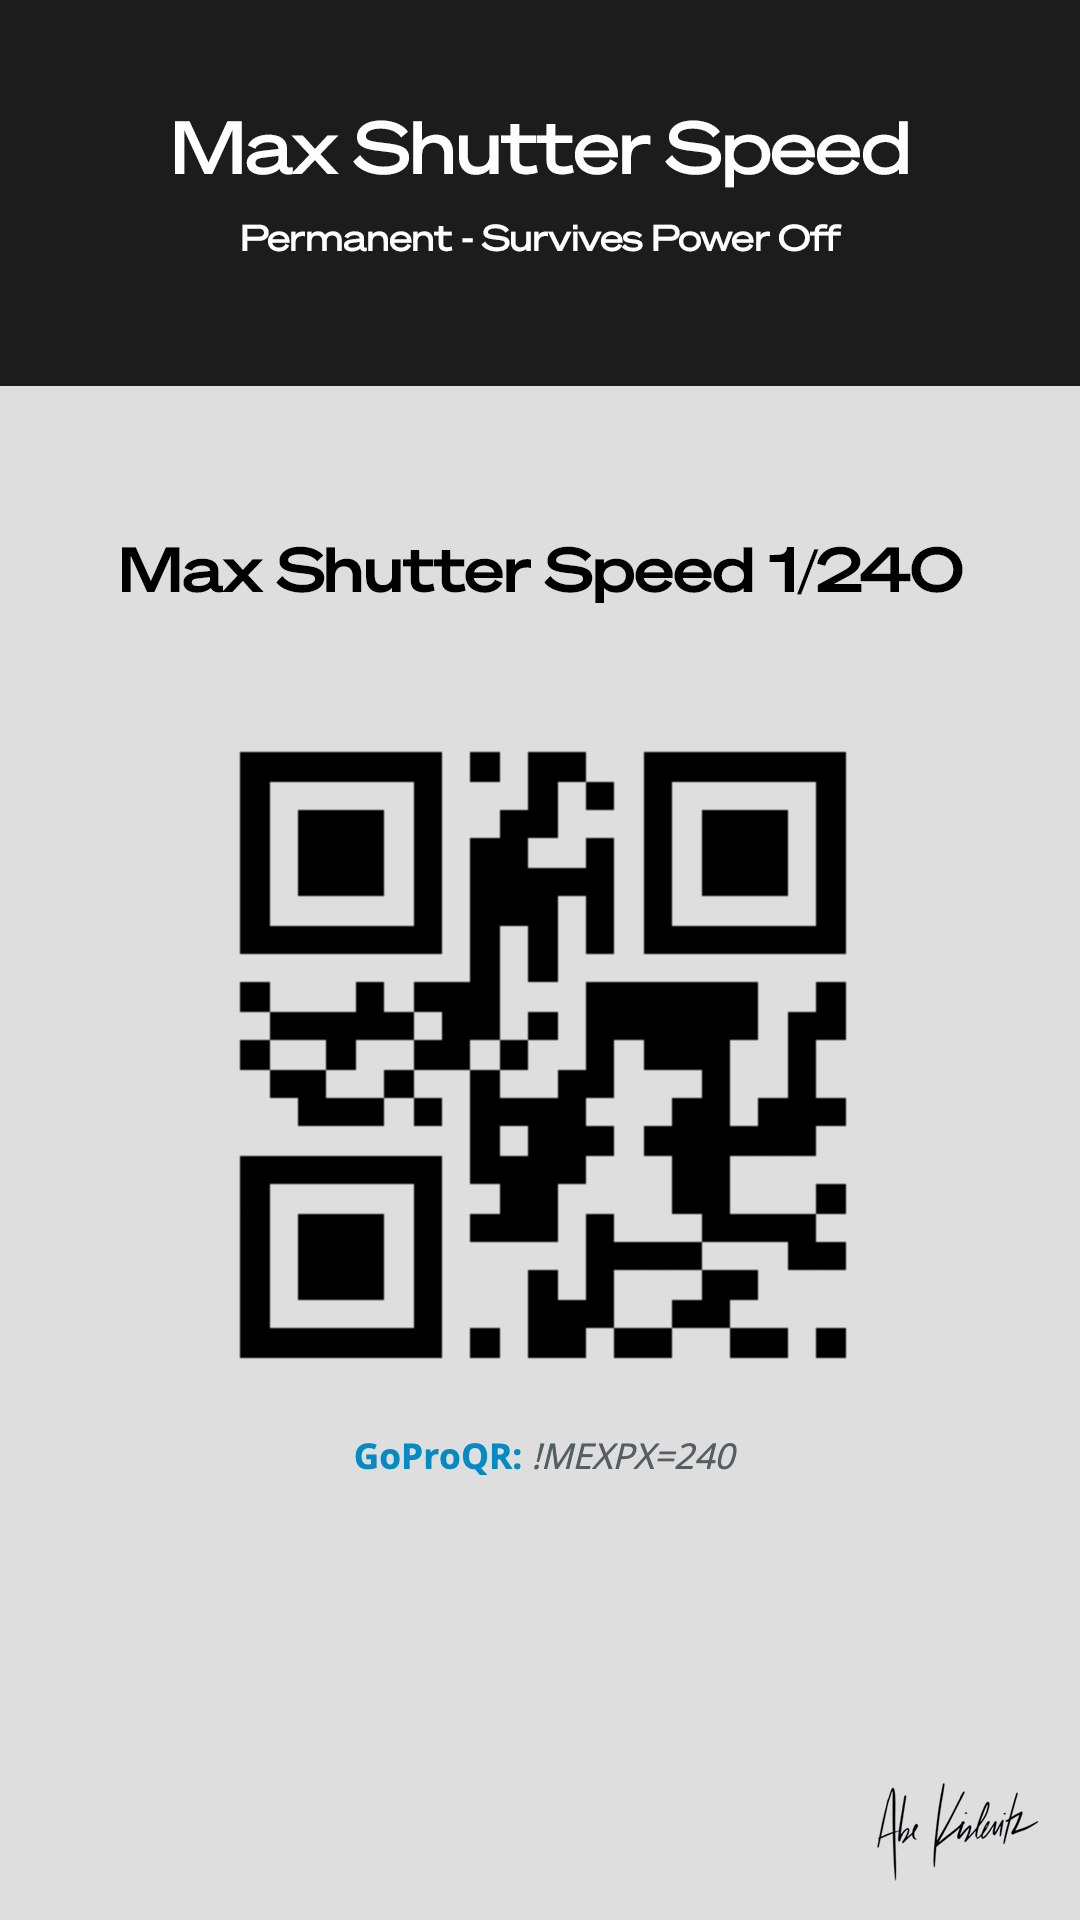
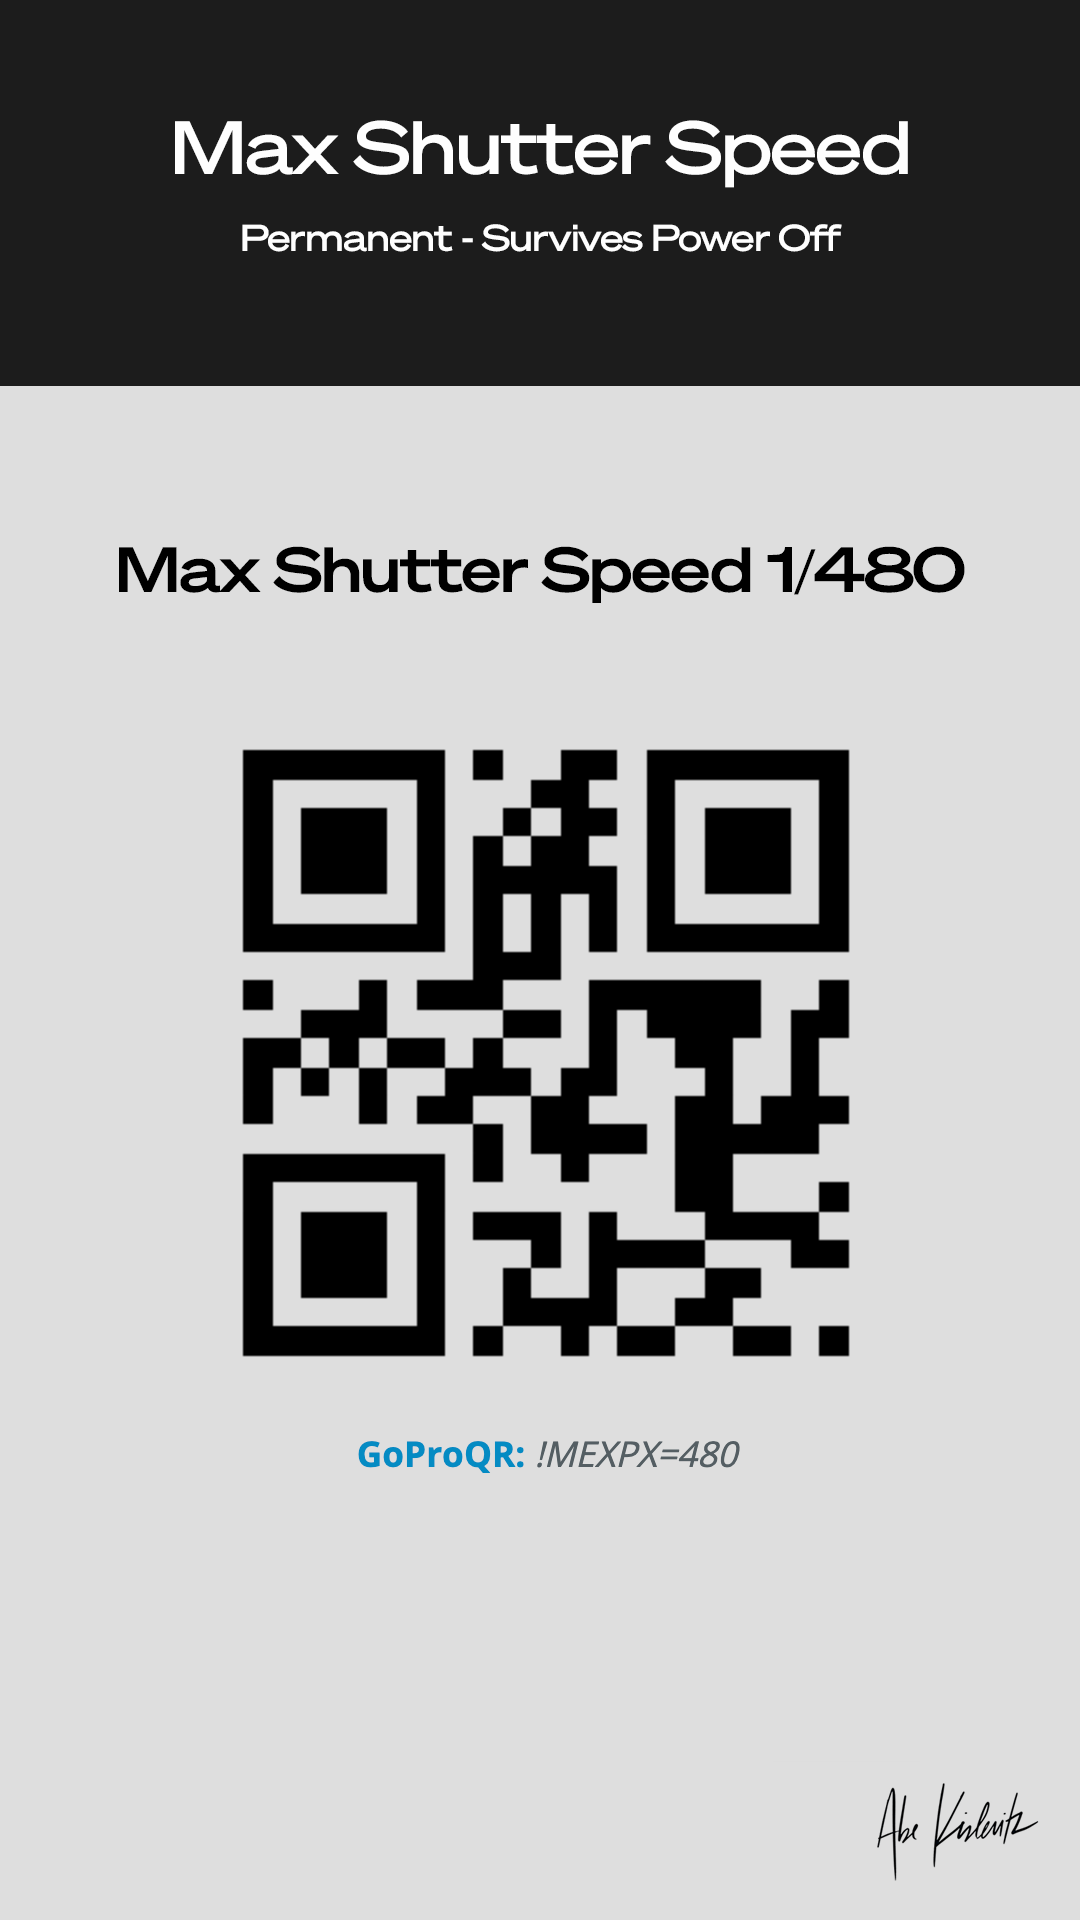
The actual shutter speed you need in order to completely mitigate blurring depends a bit on how shaky your intended activity is and what digital lens you’re using. If you’re in Linear, Linear + HL, Boost, or Narrow you’ll see the blurring more since you’re zoomed in on the image. I’ve found 1/480 will pretty much be jitter proof, but limiting the camera to that short of a shutter speed means lowlight filming will be VERY dark.
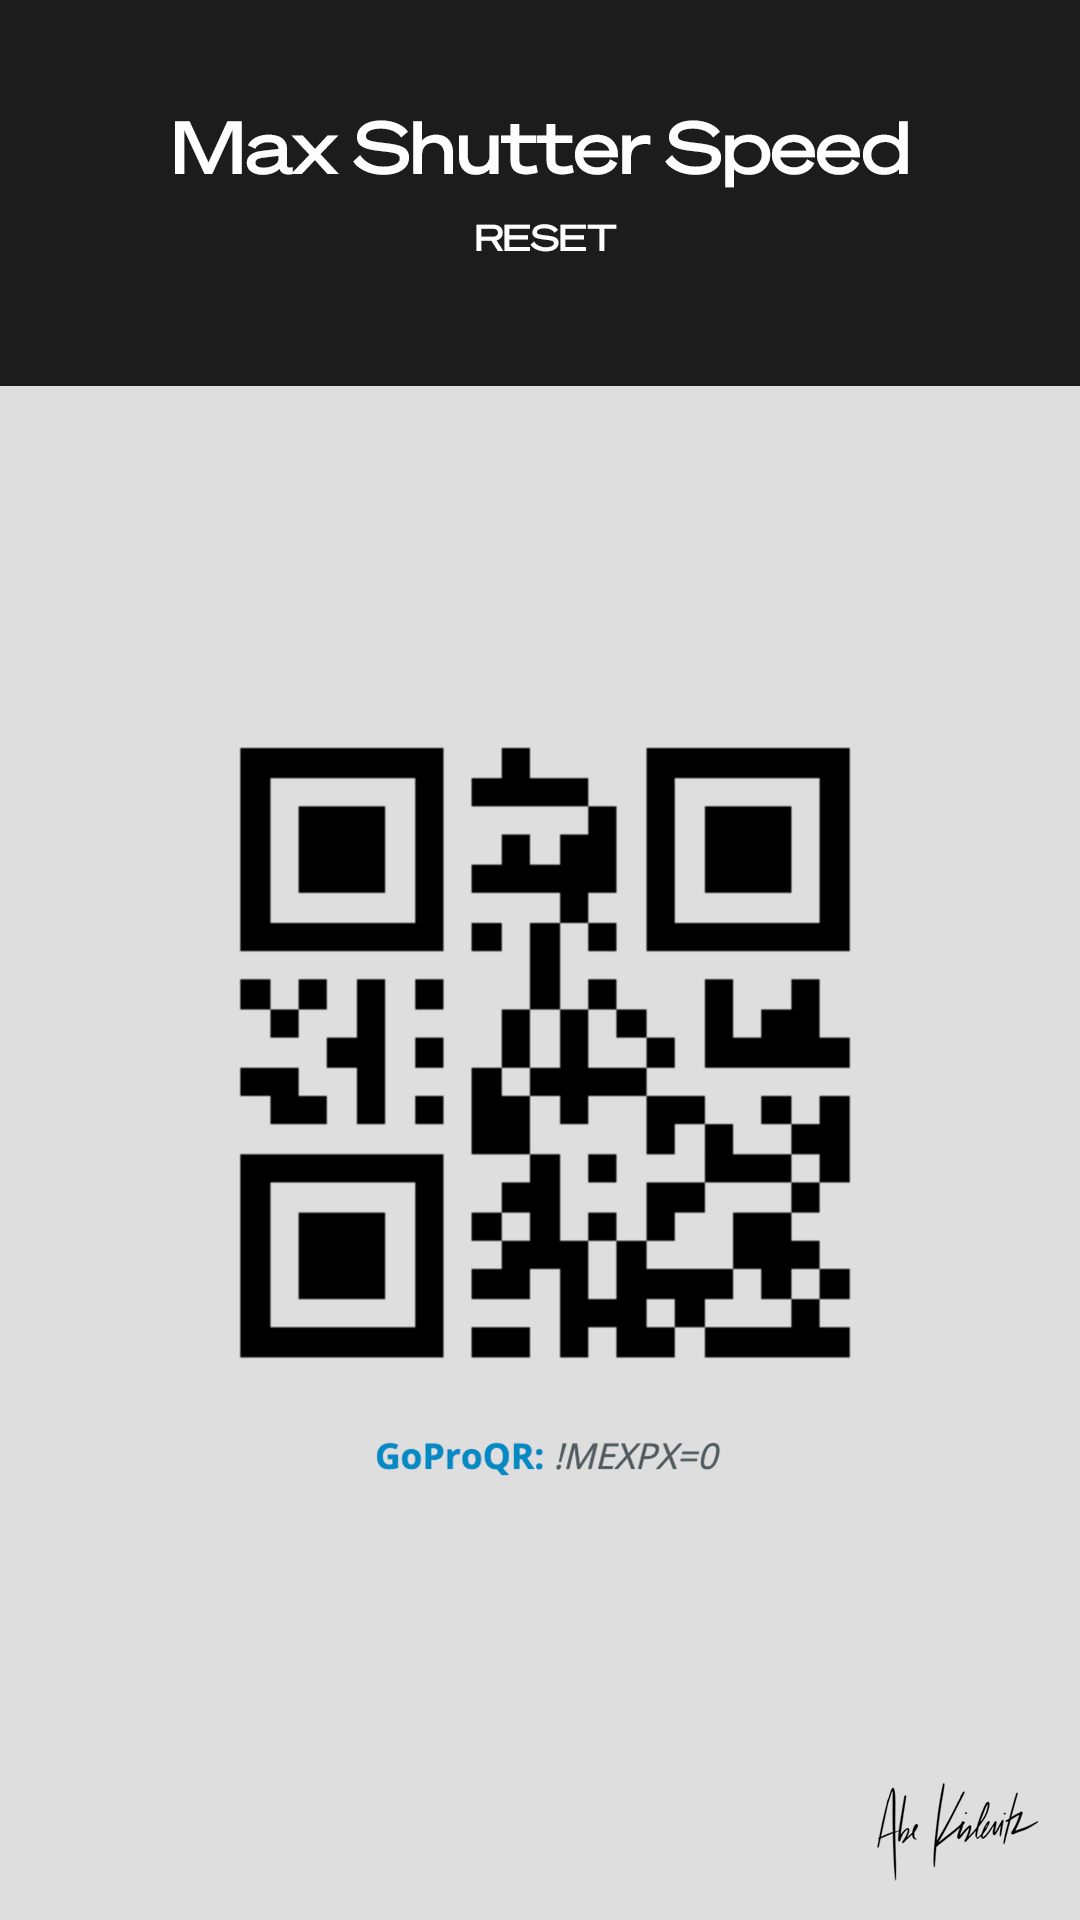
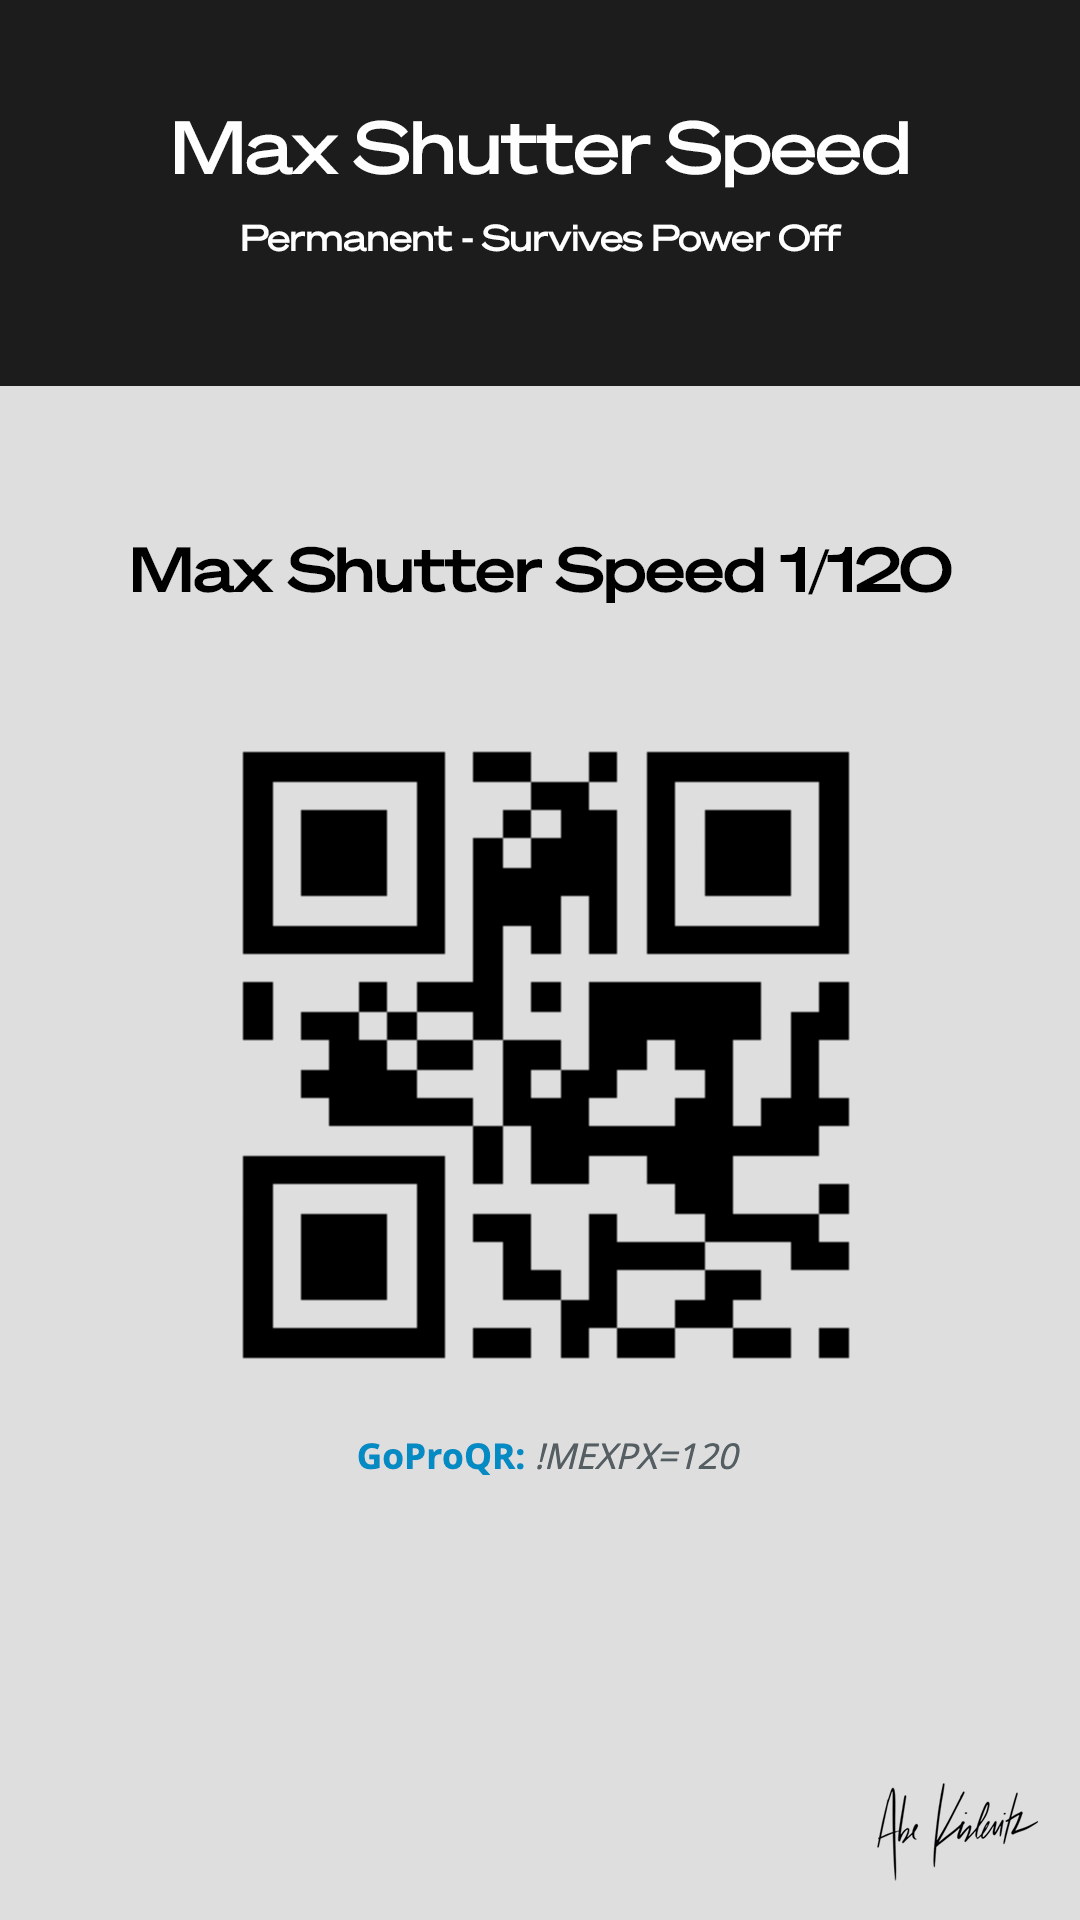
There are two ways to implement this on camera: temporary and permanent. Temporary will enable this setting until you turn the camera off. Permanent will persist until you remove it using another QR code. There is no indication on the camera that it’s in this setting, so you’ll want to have the reset QR handy. I have made some phone friendly QR sheets you can download and store in an album on your phone so they’re always readily available.
Download Labs & Download these Handy QR Codes
Now that everything is explained here’s what you have to do:
Step 1: Download & Install GoPro Labs firmware on your camera.
Step 2: Download these handy QR code sheets I made to your phone. Turn your camera on and point it at any one of these! I have temporary listed on the left and permanent listed on the right. The reset will work for both temporary and permanent.
If you’re looking to plug the codes into the QR generator on your own here are the codes you’ll need:
-
- Temporary – Max Shutter Speed 1/480: oMEXPX=480
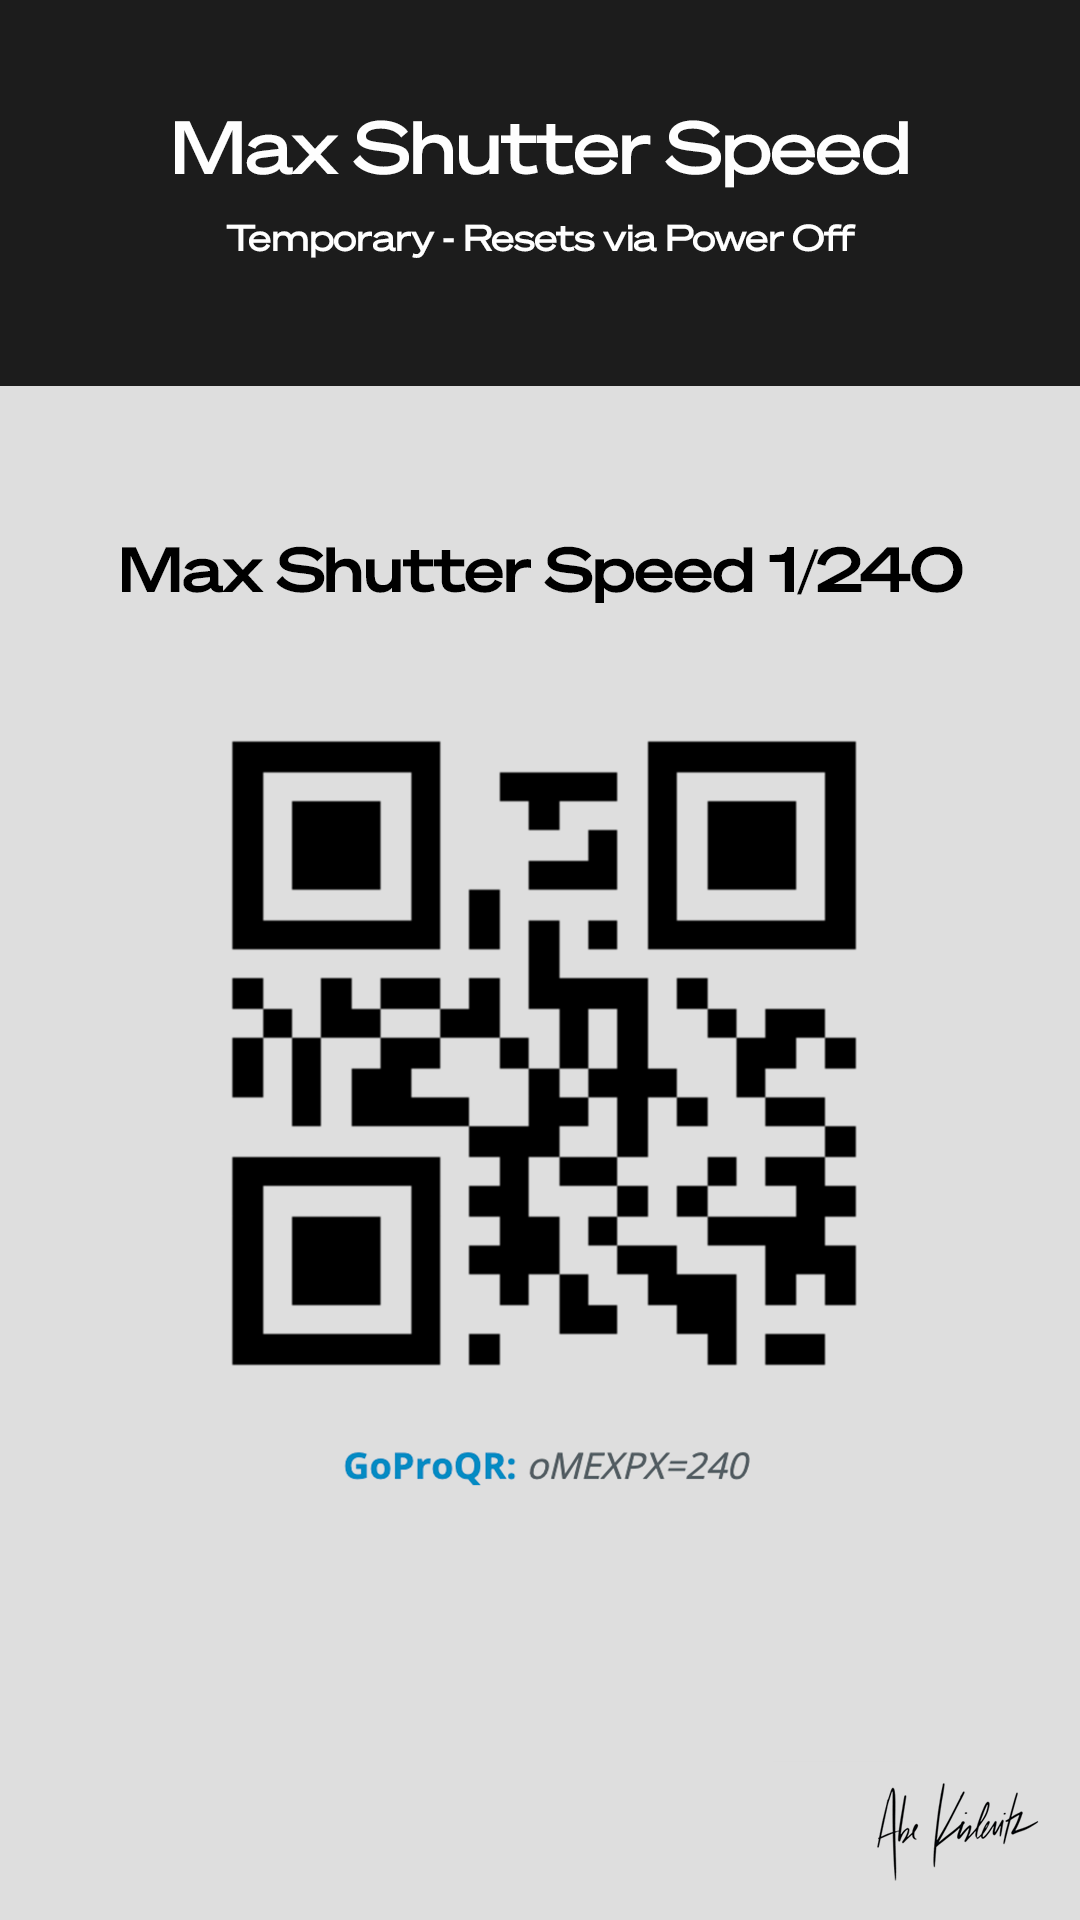
- Temporary – Max Shutter Speed 1/240: oMEXPX=240
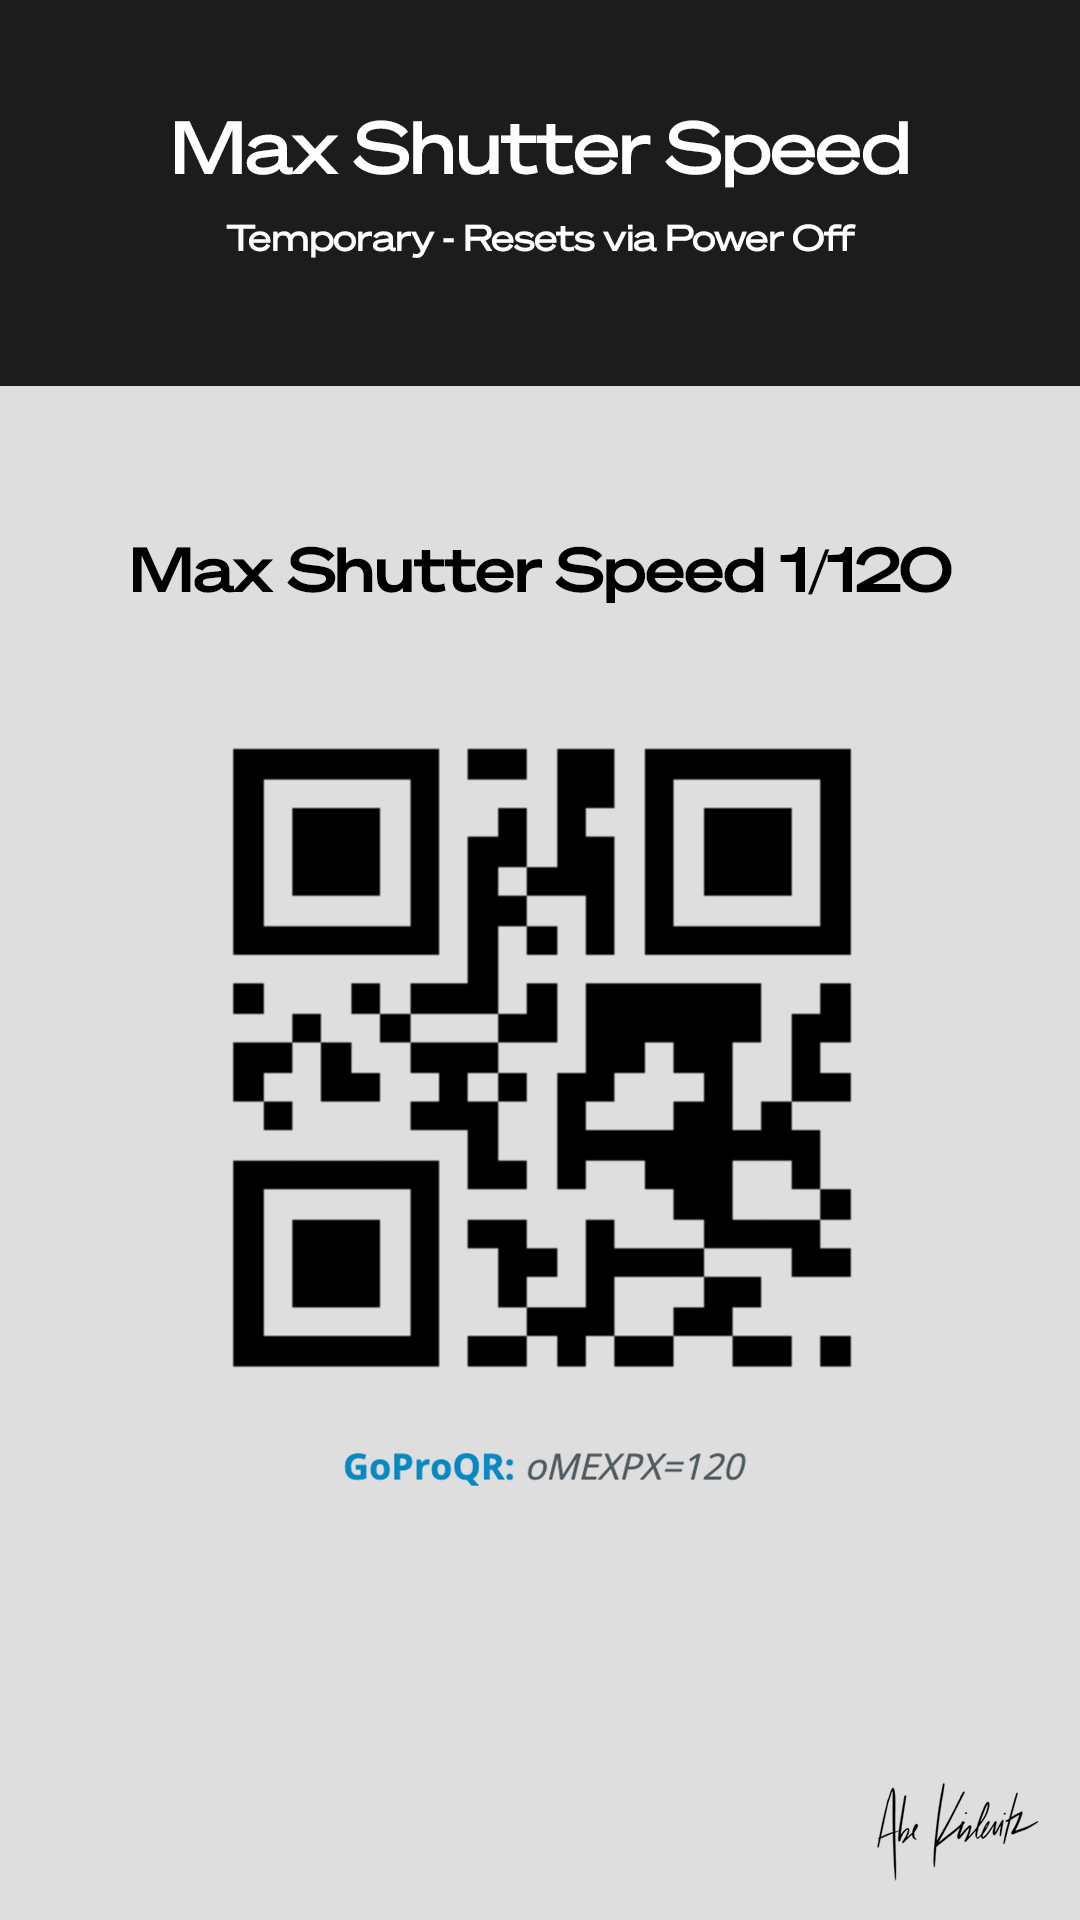
- Temporary – Max Shutter Speed 1/120: oMEXPX=120
- Permanent – Max Shutter Speed 1/480: !MEXPX=480
- Permanent – Max Shutter Speed 1/240: !MEXPX=240
- Permanent – Max Shutter Speed 1/120: !MEXPX=120
- Reset Max Shutter Speed: !MEXPX=0
Go give it a try and let me know if this solves any issues! Also let me know if the comments below if this helps understands the Labs features.